Lenovo ThinkSystem SE350 Topology
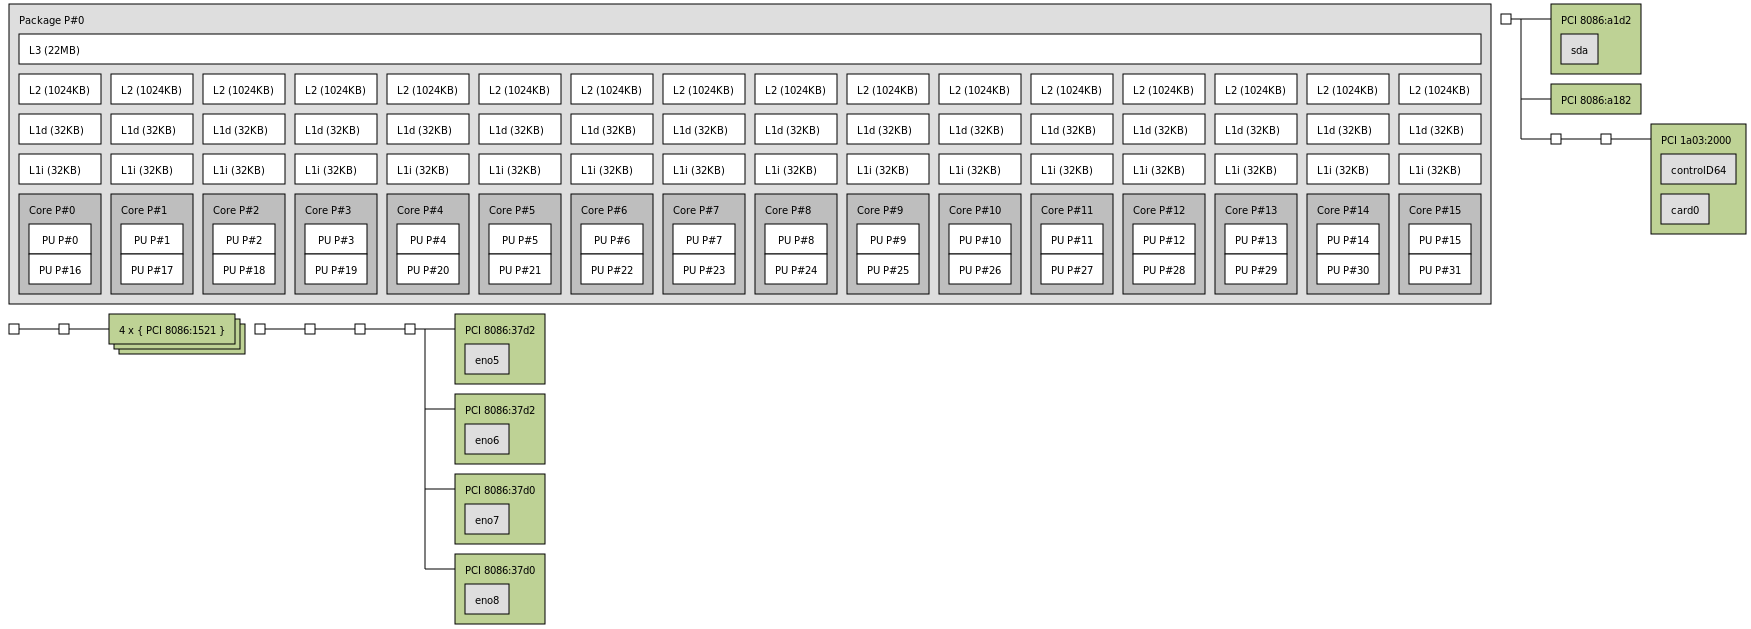
We are going to keep this section brief since we had a large overview section and want to get to management. Our ThinkSystem SE350 is powered by a Xeon D-2183IT 16-core CPU:
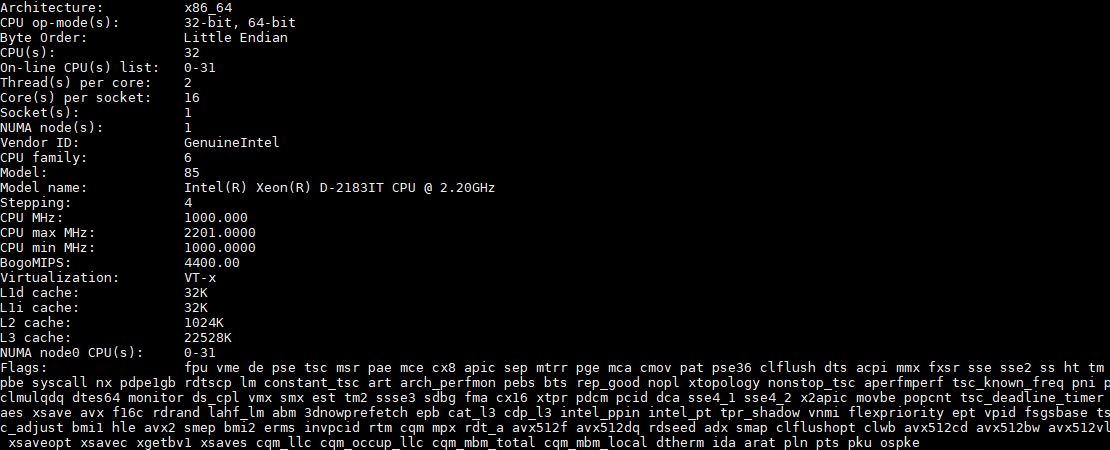
The Xeon D-2100 is a single socket and single NUMA node solution. As a result, one does not have to deal with socket-to-socket transfers and the associated performance penalty. If you are building an accelerator heavy solution, this is what you want.
While 16-cores is the practical top-end for the Xeon D-2100 series, Intel charges a large premium for these parts. If you are on the configurator and wondering why prices seem high, the Intel list price of a 16 core 2.2GHz base clock Xeon D-2183IT is $1764 while the list price of a newer-generation single socket-only 16 core 2.9GHz base clock Xeon Gold 6208U is only $989. The lower core count parts are more reasonable but Intel is charging a large premium in this segment which is pushing Lenovo’s pricing up.
We think adding an AMD EPYC 3000 series variant to the mix (ThinkSystem SE355 maybe?) would help in two ways, even if it added a two NUMA node solution on something like the AMD EPYC 3451. First, it would apply pressure in the market to push Xeon D-2100 pricing to more reasonable levels. Second, it would provide those who certifying these in solutions with an easy way to get CPU supplier diversity. The Xeon D-2100 series is still “Skylake” which means we do not have the spectre/ meltdown, L1TF, and other security mitigations present in the newer “Cascade Lake” Xeons. Many of those vulnerabilities, AMD EPYC was less or not susceptible to. Especially for systems deployed in the field for years, having alternatives if another vulnerability was found in either Intel or AMD architectures helps ensure continuity with an easy disaster recovery plan alternative.
Lenovo ThinkSystem SE350 Management
One of the more interesting features of the Lenovo ThinkSystem SE350 is a lockdown and activation mode. When one first purchases a system, they need to activate it via Lenovo’s activation tool before it can be used.

This is important because it protects the server in-transit. It is also a mechanism that can be used for locking down a system and unlocking a system in the event of tampering sensors being tripped. The system itself has a strong set of tamper detection sensors including motion and chassis intrusion. It also has a suite within the Lenovo XClarity Controller management solutions to define how the system should behave if sensors are tripped.
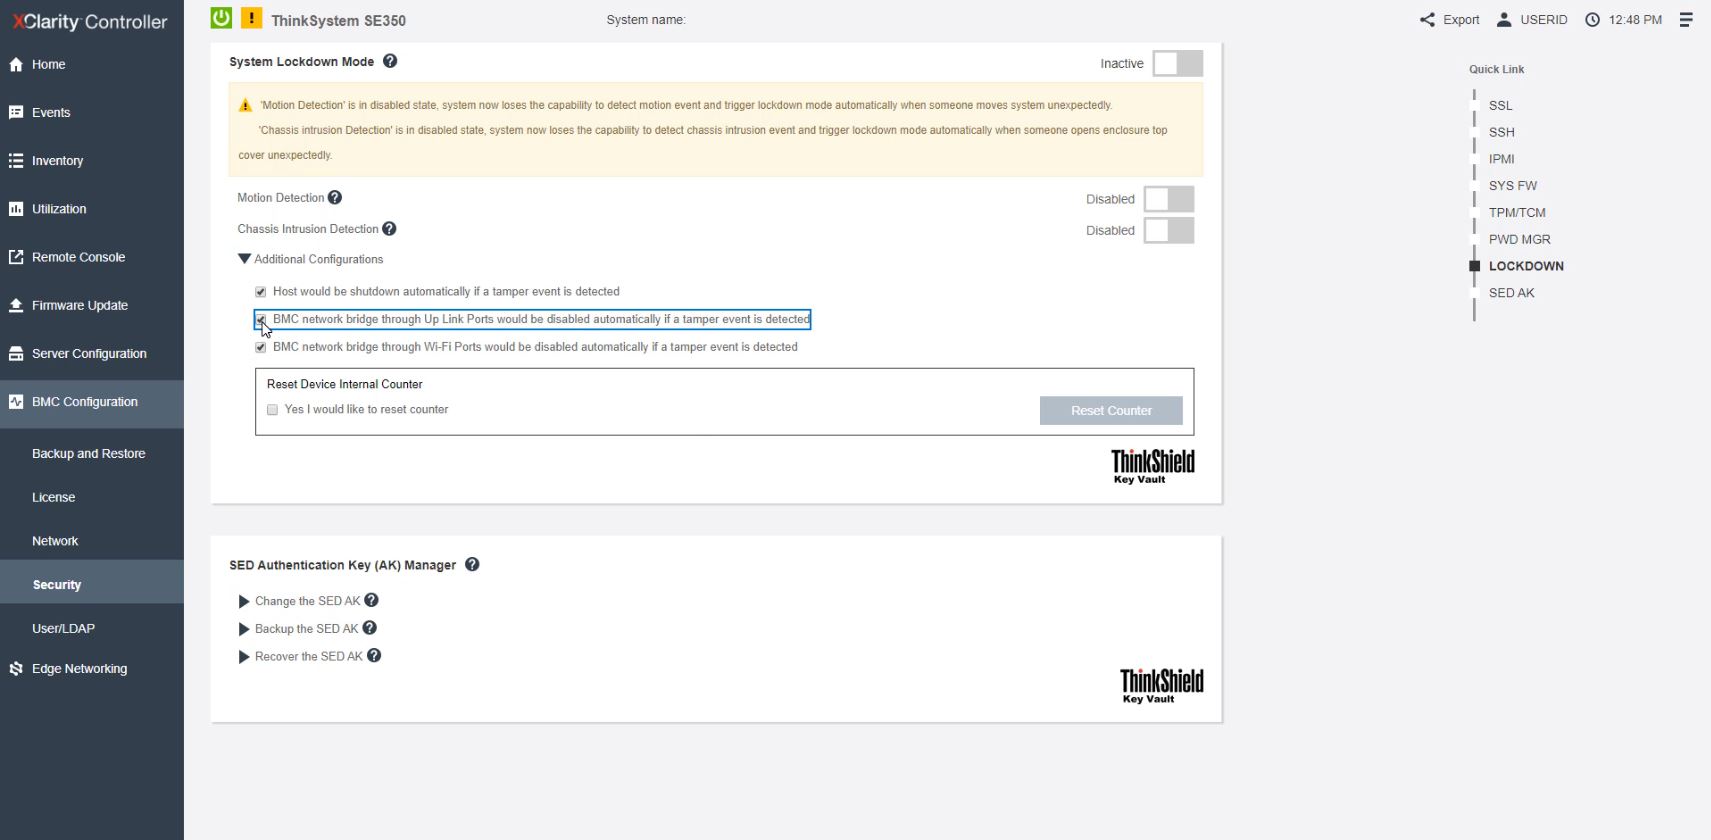
At the same time, the lockdown and activation features also mean that the ThinkSystem SE350 is actively seeking a connection back to Lenovo. Many do not necessarily like that at a conceptual level because it gives some degree of control and leverage to Lenovo. For ThinkSystem SE350 customers, this is going to be viewed as a positive as it is one less task that customers and ISVs need to take when creating solutions using the SE350.
The Lenovo XClarity Controller is very responsive and is a tier 1 solution. If you last used Lenovo’s management interfaces in the IMM days, you will be greeted by something much more modern here. All of the sensor data and control functionality is designed to allow for remote collection and management. That is especially important if one is looking to deploy many of these systems in the field.
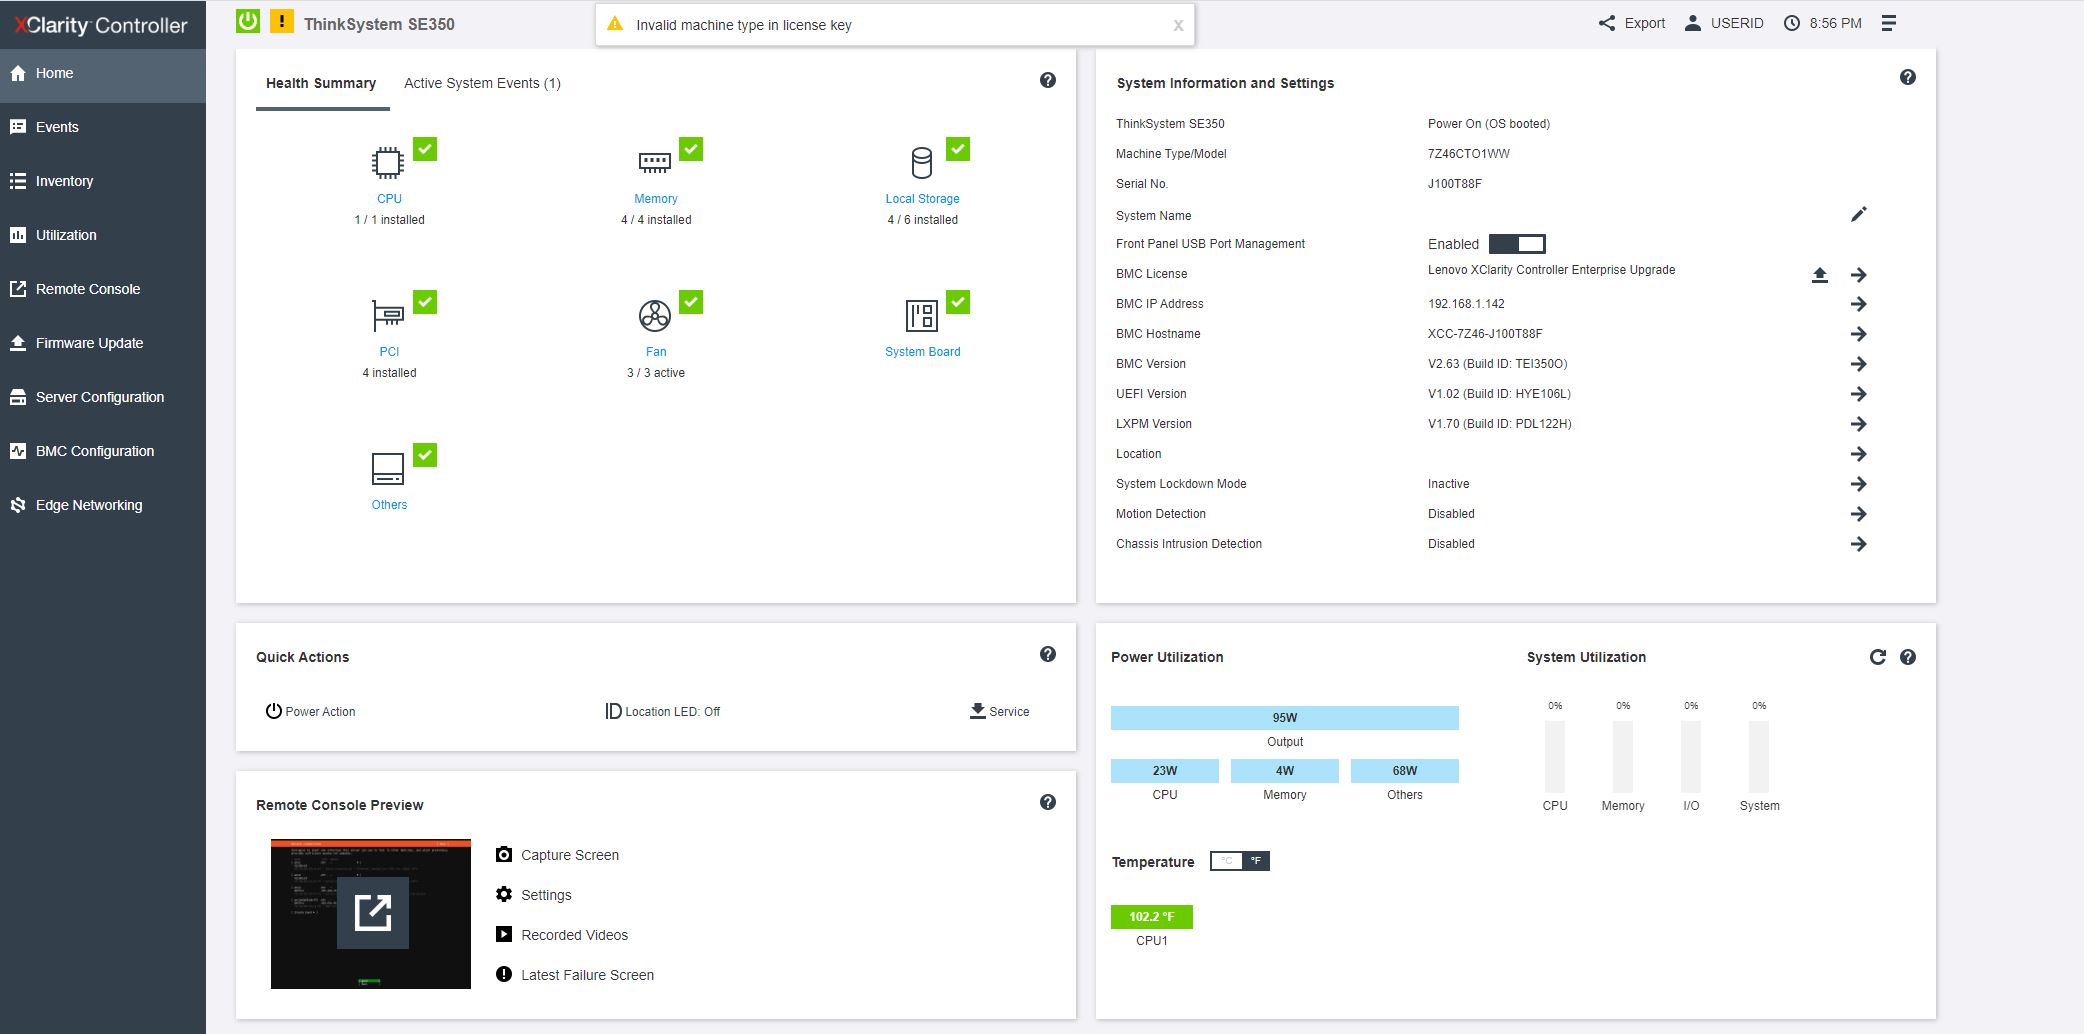
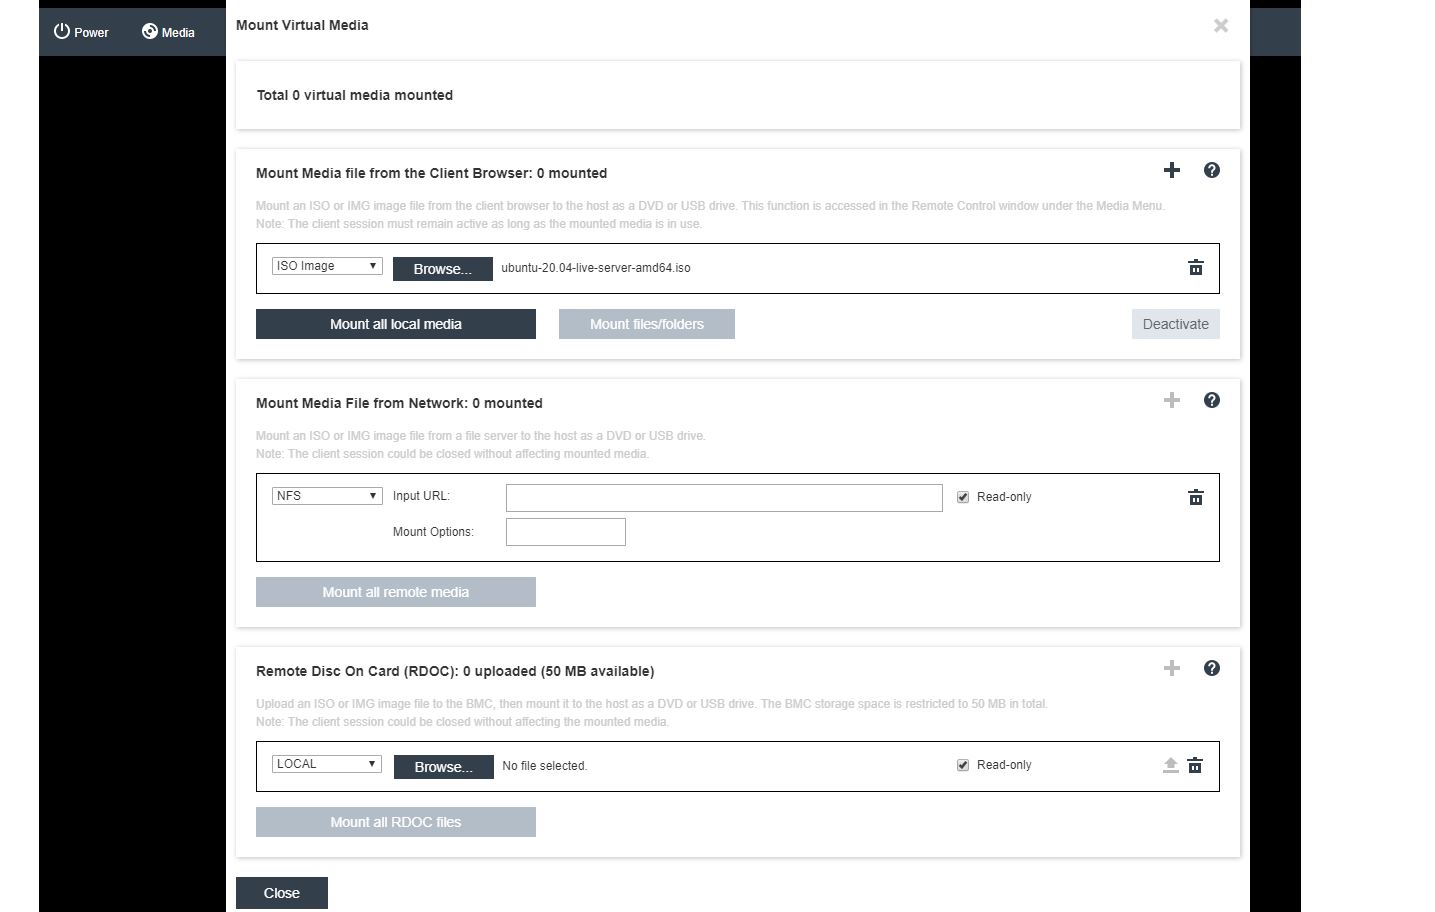
As with most other solutions, there is an iKVM functionality (including with HTML5) as well as the ability to remotely mount OS installation media or LiveCD media. We ran into an interesting challenge here. With XClarity Advanced, one gets iKVM functionality, but cannot remotely mount media.
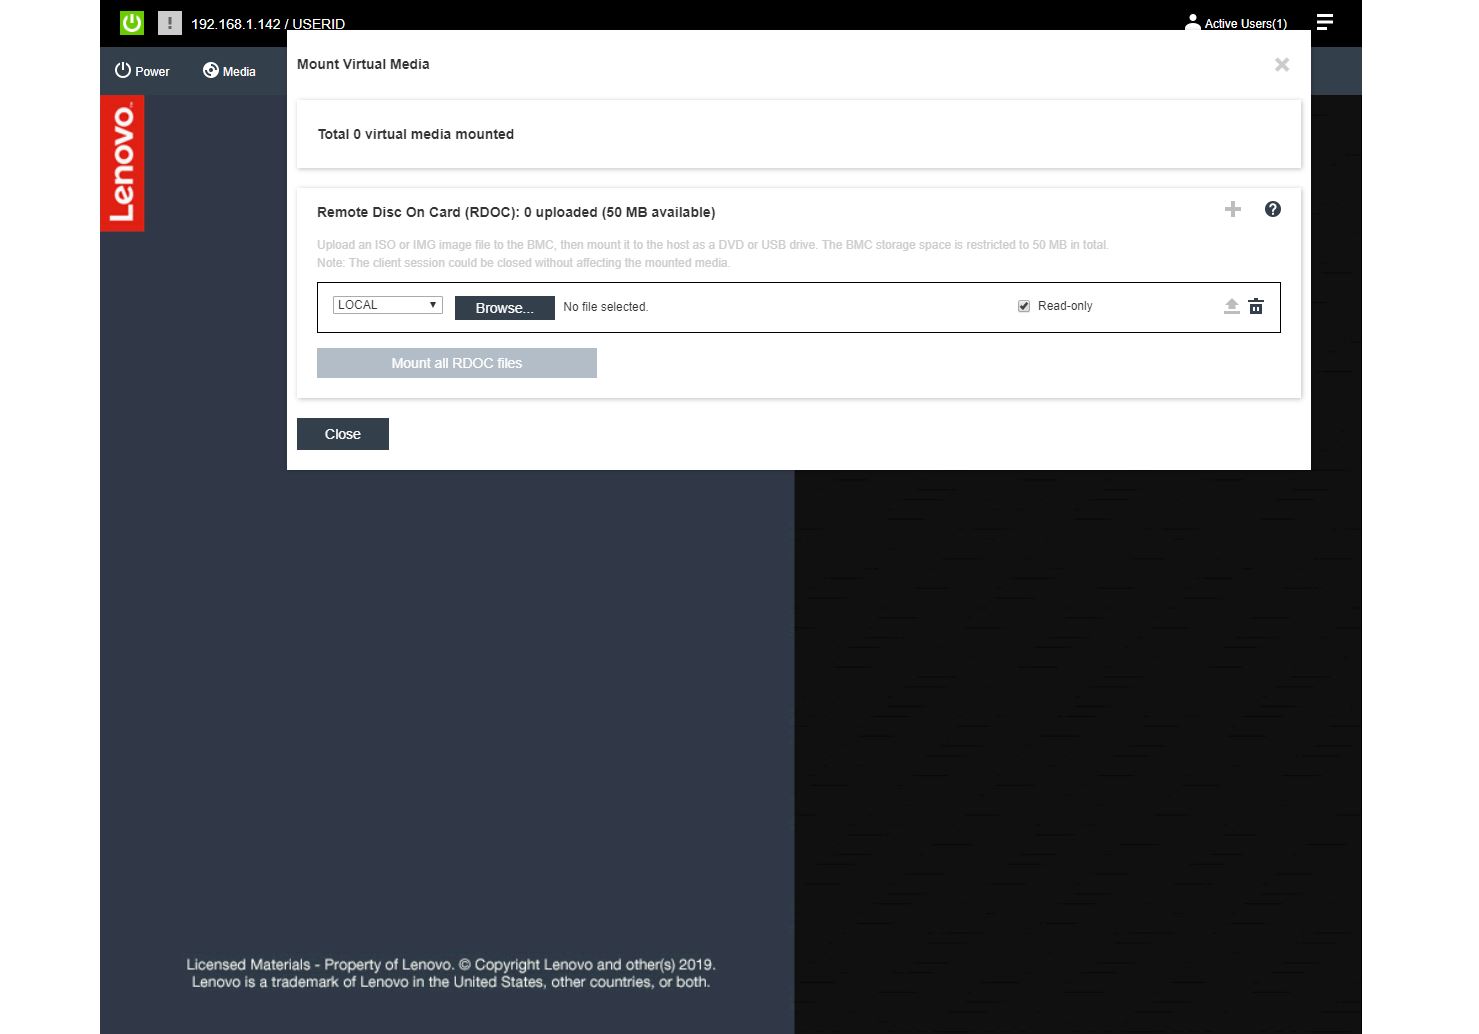
We went through the steps of going through a reseller, getting a Lenovo XClarity Enterprise key, installing it, and then activate the license on our system to give us remote functionality.
Lenovo has a great self-service portal for its license upgrades with one challenge. We actually activated the license we purchased on the wrong SE350 model because Lenovo has different SE350 variants listed on the page. We picked the one near the top of the list, but the correct one was far down the list. This is something that can be streamlined.
One of the killer features of the ThinkSystem SE350 XClarity solution is Edge Networking.
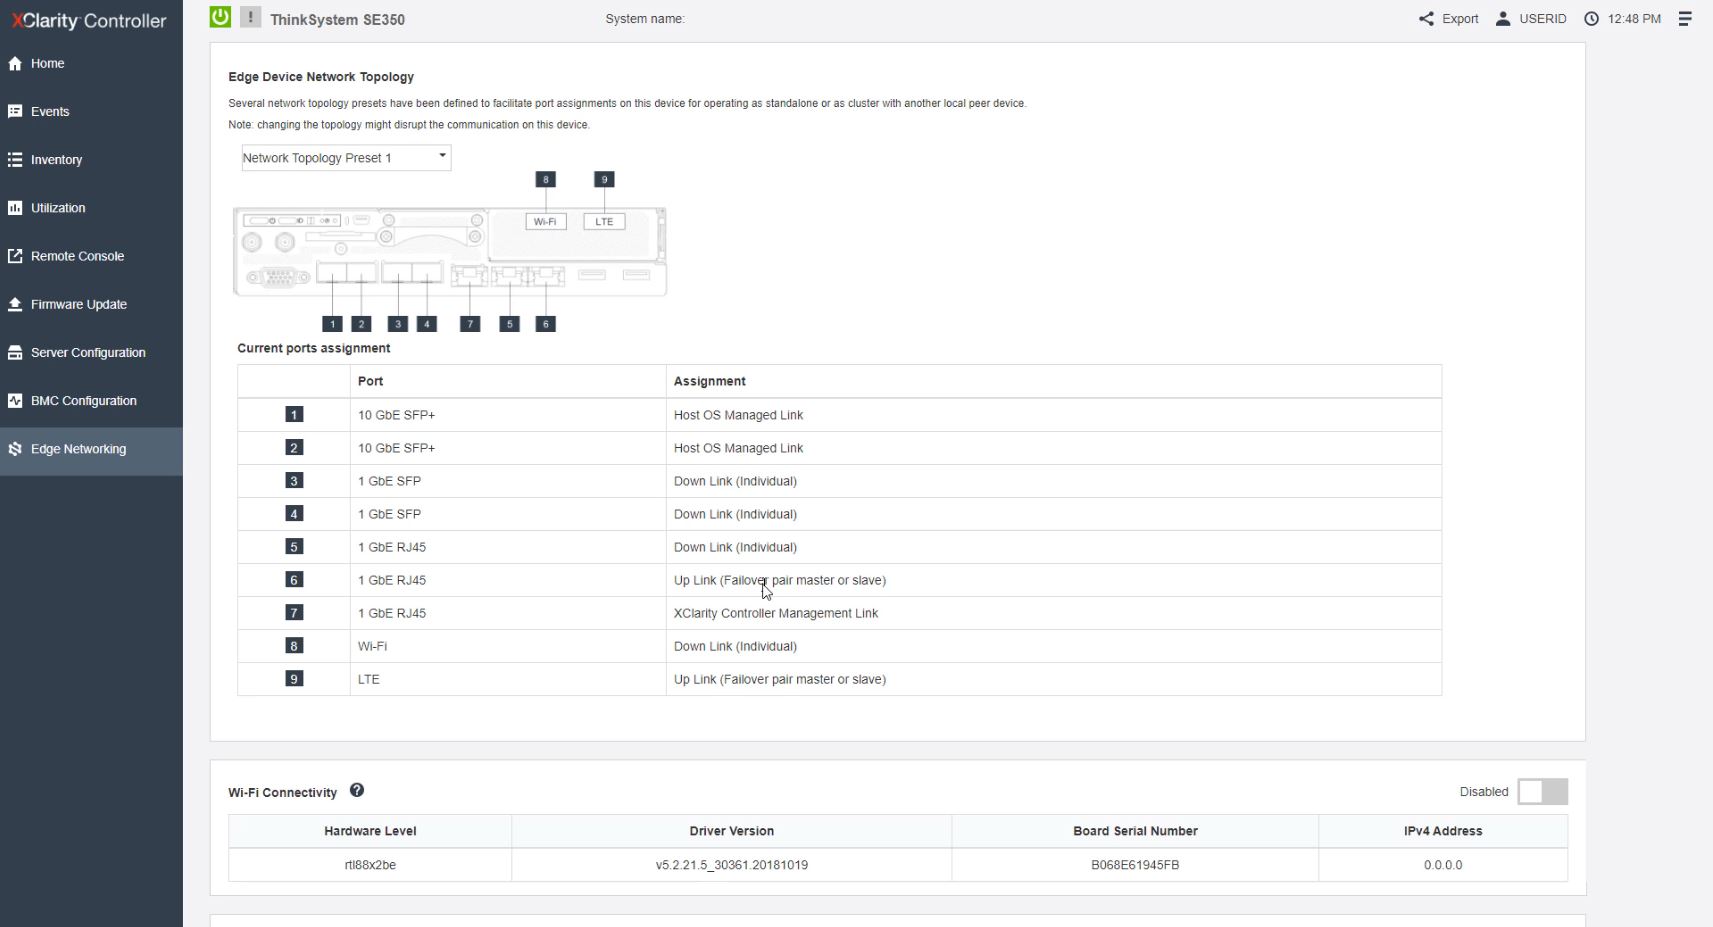
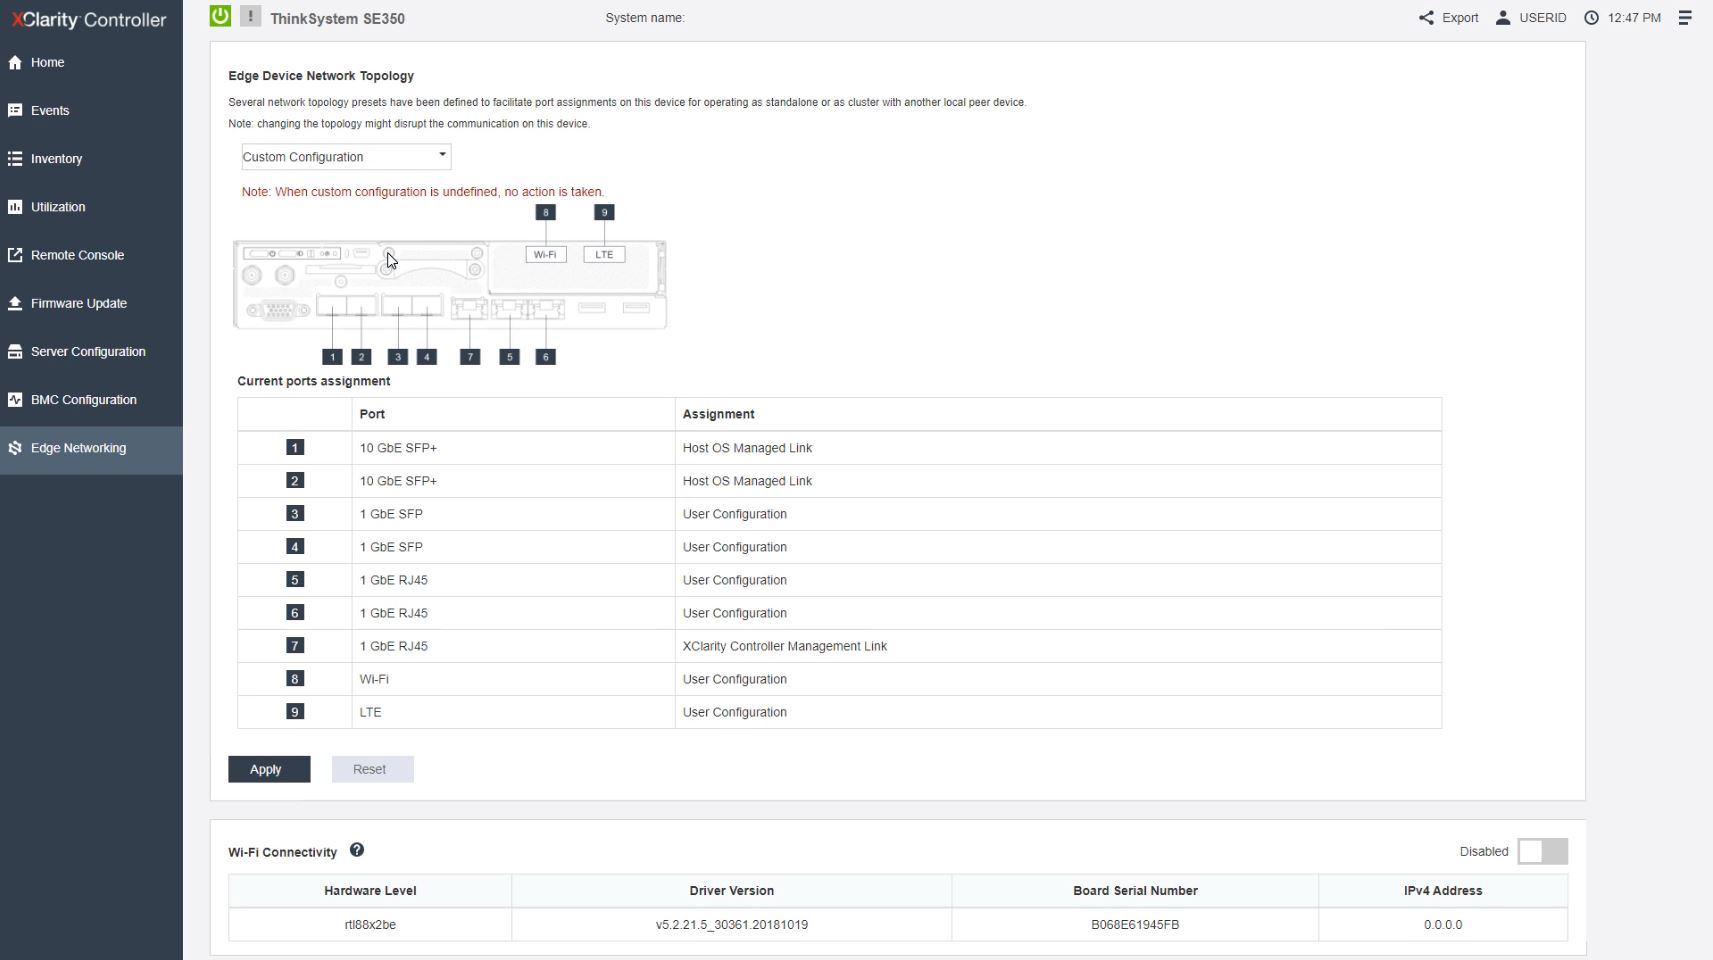
Here Lenovo has a number of presets for how different ports on the SE350 should operate including a diagram mapping port locations to functionality. The idea here is that if you want a SE350 to be a firewall you may use a certain preset while if you want to use them for an Azure Stack edge deployment, you can use a different preset. Of course, there is an option to define custom roles:
This feature works not just with the wired ports, but also with the management, LTE WWAN, and Wi-Fi ports as well. This makes templating deployments much easier and more consistent across fleets of systems.
Next, we are going to look at SE350 performance before wrapping up or review.


I’m listening to the video on my 2 nd monitor while I’m reading through this. Where’s the 10lb photo that’s in the video at like 4:45? I laughed at that one.
This is so much but absolutely great. We’ve been looking at the SE350 for a project that’s gotten stalled due to distancing. I’m sending it to our team. This is more useful than all of Lenovo’s marketing fluff and the other reviews we’ve found online so far combined.
Who needs SE350, when we have on horizon ThinkAgile MX1021 :-)
https://www.servethehome.com/lenovo-thinkagile-mx1021-and-thinksystem-dm7100-launched/
Lenovo: “Lets send to STH for review our half-year old stuff[cough]SE350[/cough]! Yeah!”
Jokes aside.
Pitty, i was expecting MX1021 review from Patrick.
Why the server is pulling 20W even when it’s powered off? I’d expect it to be close to 0W
I’ve got one of these in my lab and really don’t like it. For the model in the review, all the gig ports are hidden behind a switch chip and not exposed directly to the OS – instead you have to configure a “topology” for the ports which makes them access ports on a few VLANs that are tagged back to a backplane NIC that shows up as a NIC via PCIe. That’s incredibly limiting and not all that well documented either.
Some other observations:
* activating a license to be able to power on the system was frustrating and involved downloading an app for my phone and tethering the BMC through it and signing up for multiple Lenovo accounts.
* the external power bricks might make deployments flexible, but when fitting them into the 1U 19″ chassis, it’s a bit sloppy.
* the RJ45 serial port for the blade is on the back of the unit, and to access it when racked requires snaking a cable into the _top_ of the chassis between the blade and the power bricks.
* it ships with a ton of extra stuff that you’ll end up throwing away. The thought of having “smart hands” in a datacenter sorting through everything to rack and stack these makes me shudder.
* the firmware is… different – and didn’t expose all of the options that I expected such as SR-IOV.
I can only conclude that this was created for use cases and with requirements that just aren’t what I need – and that perhaps I just don’t _get_ edge networking at all, though I’ve got a couple of similar products with other vendors that are quite reasonable to use.
Hello Patrick,
Thanks for this test, it’s very clear.
I have a question about the power measurement. In your 100% STH test page 5 you get a power of 201W on the machine. In this context, what is the status of the Nvidia T4? Maximum load too ? Thanks !
I too have an SE350 and I’m struggling with getting the gig ports to work. The topology presets are very limiting, and the user guide tells you that you can customize the ports on the LOM switchboard, but I’m not an expert in linux or UCI to figure out how that is done. The examples in the guide just don’t cover that detail. I’ve spent hours trying to figure it out. I finally got the wireless working as a client so it could connect to the network. The 2ea 10GbE SFP+ ports are natively exposed to the operating system and I was able to populate them with copper transceivers. However, I still have 4ea 1GbE ports that are useless to me unless I can figure out how to make them active.
I have overcome some of my struggles with the SE350 LOM-Switchboard in getting the networking to work with an ESXi installation. I wrote detailed instructions in the Lenovo Community Forums. https://forums.lenovo.com/t5/ThinkSystem/bd-p/sx04_eg
Hope this helps someone.
Comments are closed.