9 Steps to Recover from a Failed Promxox VE Boot Drive
Since odd numbers and lists are good, we are going to have a nine-step process for getting back online. Do not worry (unless you had a boot drive with VMs on it and no backups), this can all be completed relatively quickly. The 9 steps we will cover are:
- Decide if it was the drive or the system
- Get hardware including a new boot drive and install Proxmox VE on it
- Do initial installation preparation including updates, networking, and reboots
- Import local storage
- Re-add network storage
- Add to the cluster if applicable
- Get VMs back online
- Set up backups
- Monitor/ look for missing items
We are going to go into detail on each of them, and give you some tips and tricks we have learned over the years.
Step 1: Decide if it was the drive or the system
This is something that is amazingly important to investigate, but many miss especially if they have never dealt with a major failure. The fact that you had a drive failure means one of two things. First, a device failed. Second, you may have something in your system that caused the drive to fail.
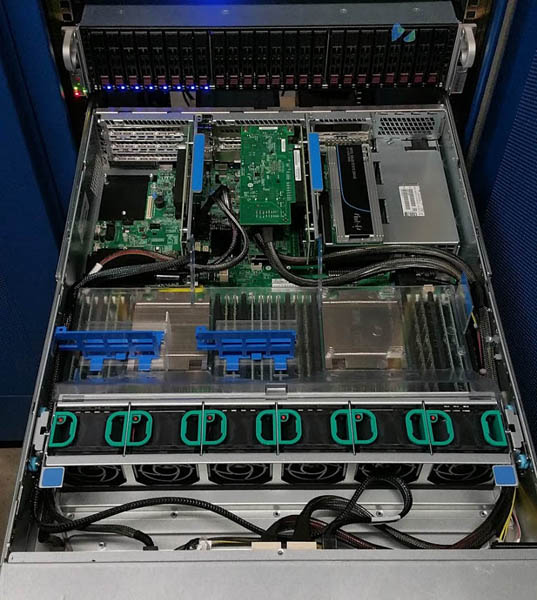
Typically you are under the clock when replacing drives and getting a node back online so you are not going to be trying to probe pins with a multi-meter. Some basics here are to check the power supplies, motherboard, and backplane and ensure there are no visibly bad components such as capacitors that look burned. Also, check the fans to ensure they are all working and that all cables are secure. If you find anything in these chains that looks off, get to replacing as soon as you can.
If it looks like all you need is a drive, then you are all set. You can simply procure a new drive and continue rectifying the situation.

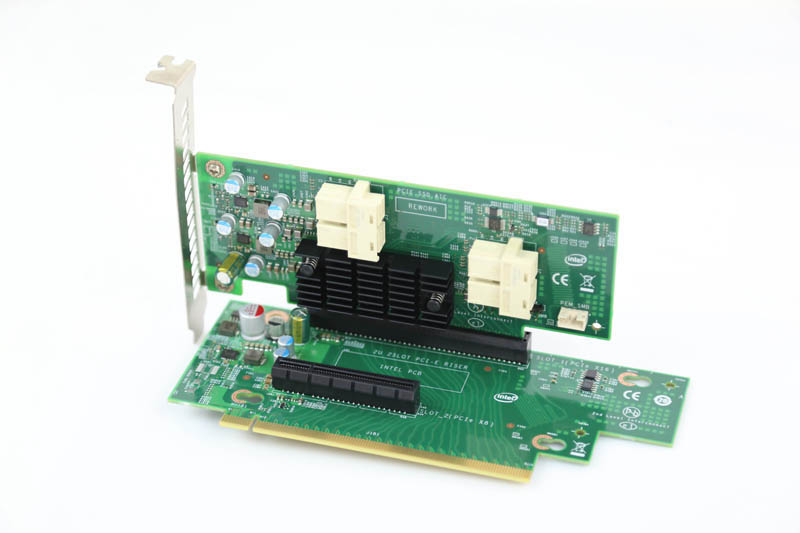
In our hosting cluster, we have effectively three kinds of nodes. The particular node that failed was one of our older Xeon E5-2600 V3/V4 nodes based on 2U Intel server platforms we bought years ago. We keep extra nodes in the cluster because it is relatively not too expensive for what we do and if we need to do a quick replacement, we can simply move entire risers worth of add-in cards, hot-swap drives, and be up and running. That strategy is part of how we decide which nodes to buy.
If you are on a tight budget, you may not have readily available parts or spare nodes. That means you are going to have the node offline for a longer time. We specifically budget to have extra barebones systems available and they are often less costly than buying extended hardware warranties. That is an advantage of getting white box barebones servers and building them. Self-warrantying can be useful.
Step 2: Get hardware including a new boot drive and install Proxmox VE on it
If you have the hardware on-hand, life is easy. If not, then you are going to wait on an order/ replace cycle. Under a service contract, someone will show up and handle this for you, but there is only so much that can be done if the part is not in stock locally.
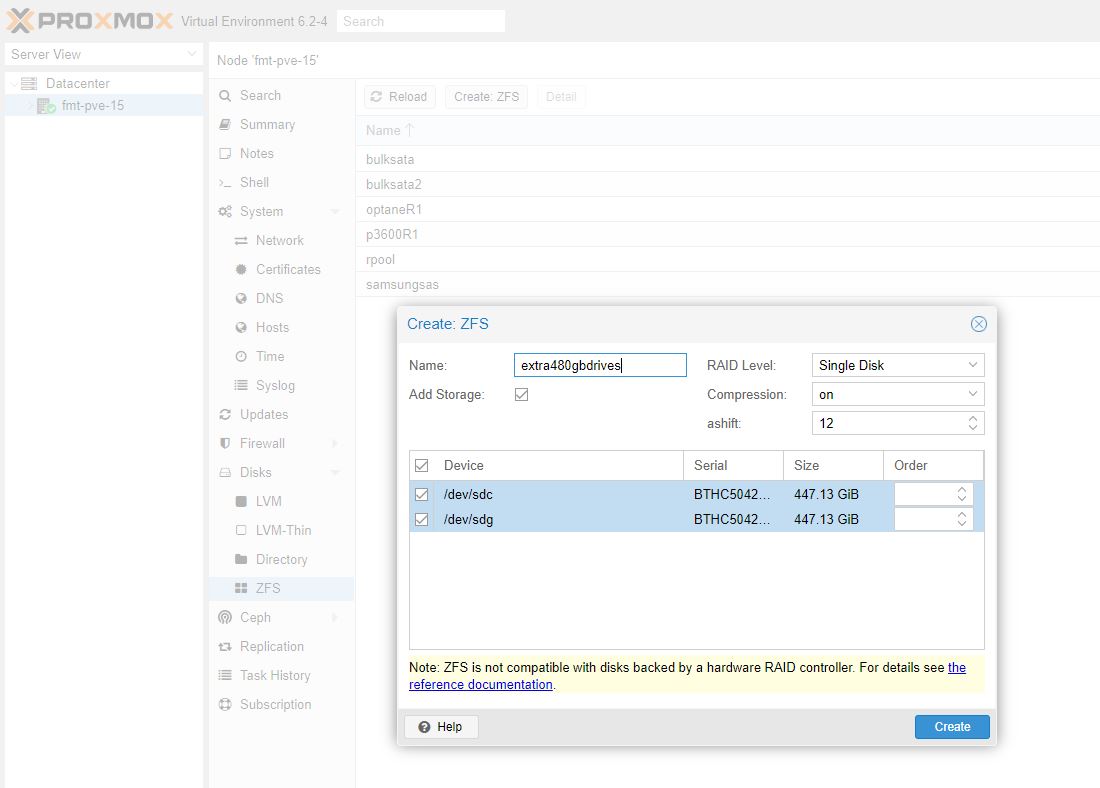
Something we started doing after we deployed the node that failed was mixing vendors. When we replaced the failed drives, for example, we are now using 480GB drives from two different vendors.
This is not discussed much, but drives can die for a variety of reasons. We had a Dell C6100 2U 4-node chassis that experienced a power inrush event and killed all of the SSDs in the system, taking down all four nodes. That was terrible. For our readers, remember this is also the basis of many of the lower-cost VMware and Nutanix deployments. Multiple nodes in a single chassis do not help you if the chassis causes failure. Something we have found that mitigates this risk is mixing SSDs.
Another tip here is a trick we used to get online quickly: we installed Proxmox VE to two different SATA SSDs before heading to the datacenter. Installing Proxmox VE for a replacement node is very easy. You can install over ISO via IMPI or make an installation USB drive. The trick is, that if you are in a situation like we were where you need to replace hardware in a node that is still running, that creates a lot of downtime. You need to boot into the installer, spend 10 minutes letting the installer work, then do another reboot. Instead, we installed a mirrored ZFS array before heading to the data center. Then we could insert the new drives into the machine we would use, and skip downtime from going through the installer and just edit a single line to get up and running.
Step 3: Do initial installation preparation including updates, networking, and reboots
We have a Proxmox VE 6 Initial Installation Checklist that we are not going to repeat here, but this is about a 2-minute procedure on any node you install. You want to ensure everything is updated and ready before turning services on. Nothing is more annoying than getting to the end and ready to go with users on the system then having to reboot again. People can lose work that way and so it is better to stay offline until you are done.
If you are using a PVE installation that you did on another machine, you will likely need to edit the interfaces first which can be done via nano /etc/network/interfaces. You can use ip a to find the right interface and then ensure it matches the bridge_ports line. It is highly likely if you pre-prepare OS drives you will need to change this. If you go through the installer, it will be done for you. Still, this takes a few seconds and is much faster than an installation process.
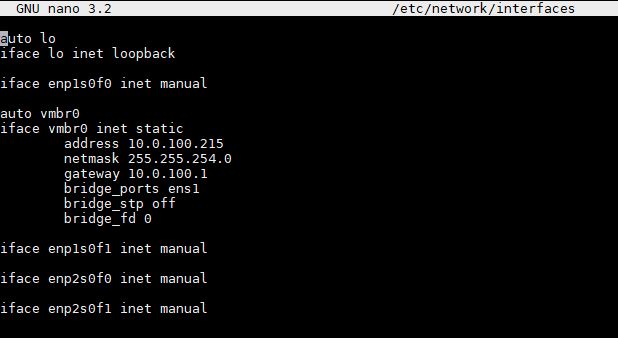
One item you will notice is that we give our nodes a very specific naming convention. You can see this is node “fmt-pve-15.” The IP address ends in 15. That is intentional. Make your life easy and tie together as much as you can so administration does not involve needing to look up what is what. That advice may make no sense when you first install a node and are running 1-2 nodes. As you scale, it makes life so much easier.
We also increment the node number every time we install a node. In cluster configurations, adding a node with the same name as an old node caused issues. While the Proxmox team has been great and making this a lot better over time, this is an old habit that still is useful here. What this allows you do to is follow guides for removing old nodes and installing new nodes to clusters in a clean manner.
Step 4: Import local storage
When you connect storage to Proxmox VE, it is not automatically available. We are going to use ZFS here, and one nice feature is that a lot of this can be done through the GUI in recent versions. The Proxmox team has done a great job in enhancing capabilities here. If they ever got into user and share management, it would be the end of many of the dedicated storage solutions.
Since we are using ZFS pools on non-boot drives that survived the crash, we do not need to rebuild. Instead, we can just import them using:
zpool import -f zpoolname
The “-f” is needed since you are importing the pools from the old Proxmox installation. You can see a zpool list in the system simply by using zpool status:
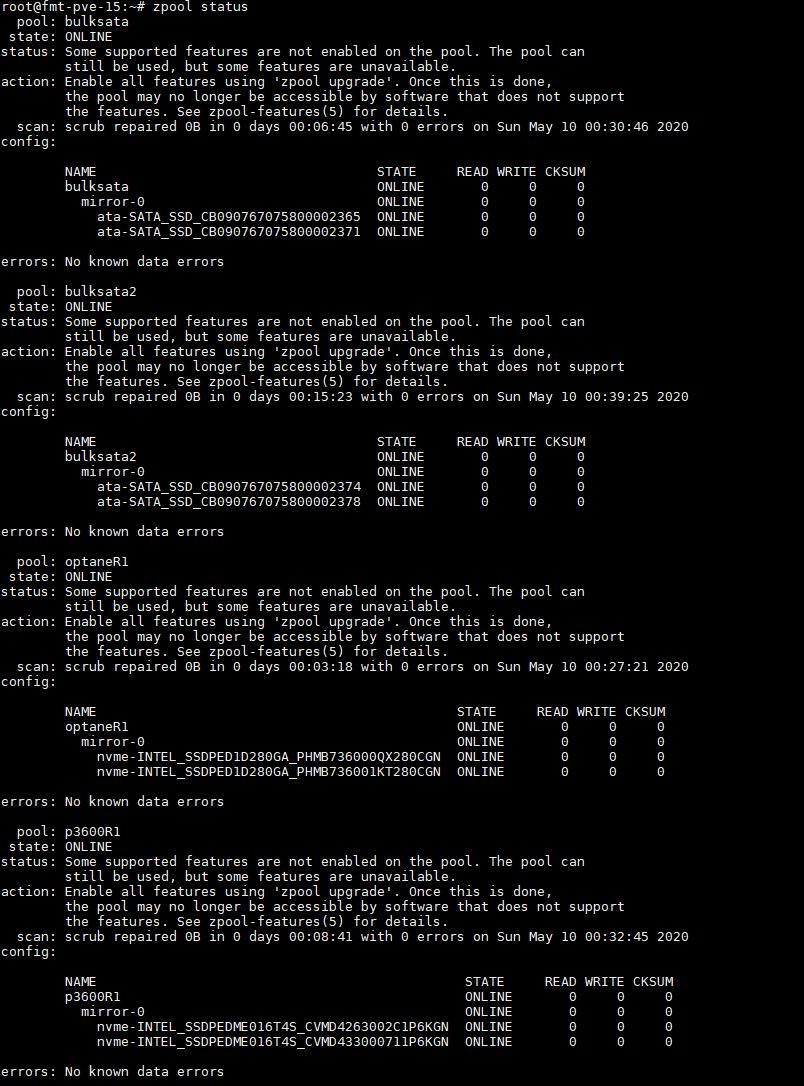
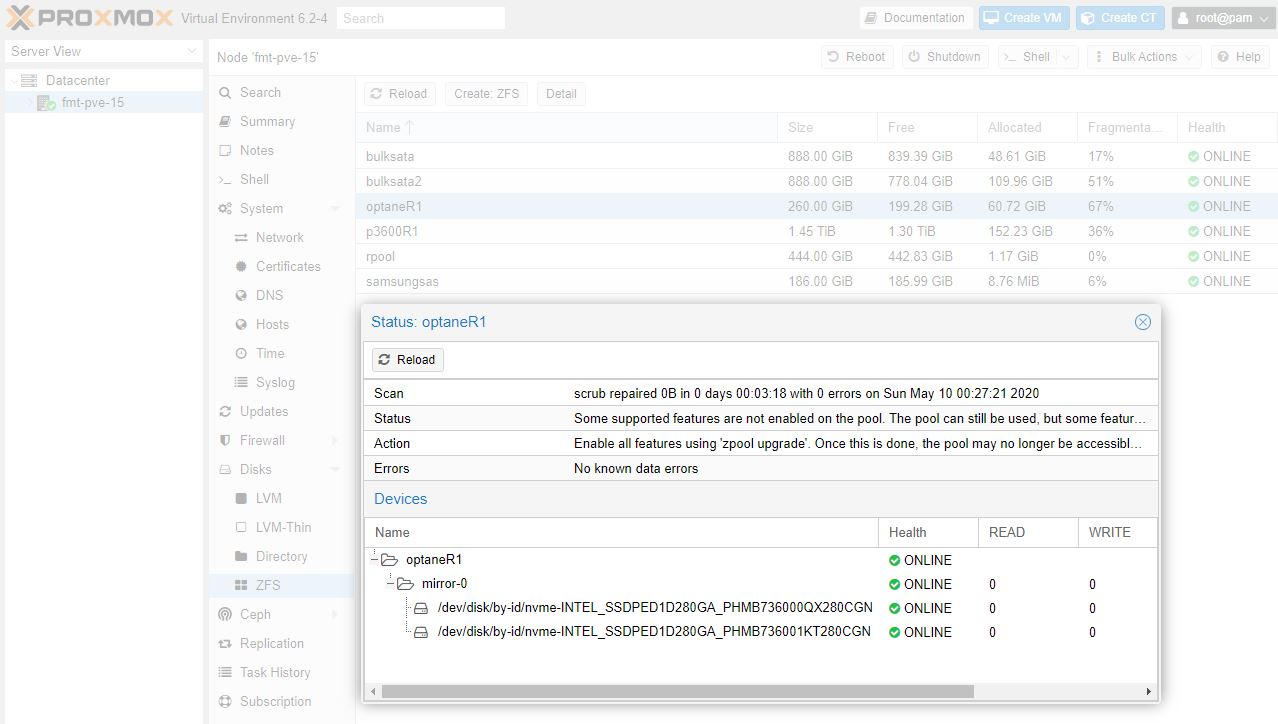
A trick we use, especially with mirrored drives, is to name the pool based on what storage is being used. For example, we now that the “optaneR1” pool is made up of the Intel Optane SSDs in RAID 1 (or a zfs mirror here.) When you create pools, you can use the GUI now but we still do ZFS imports on the CLI.
You can also see the status of the optaneR1 pool now in the Proxmox VE GUI:
In Proxomox VE the first step is getting the pool setup, the second is adding that pool to Proxmox VE for storage. You can do that easily enough. Go to Datacenter on the top left of the GUI, then to Storage on the next panel. From there Add and select ZFS from the menu. For other types of storage, that will be different.
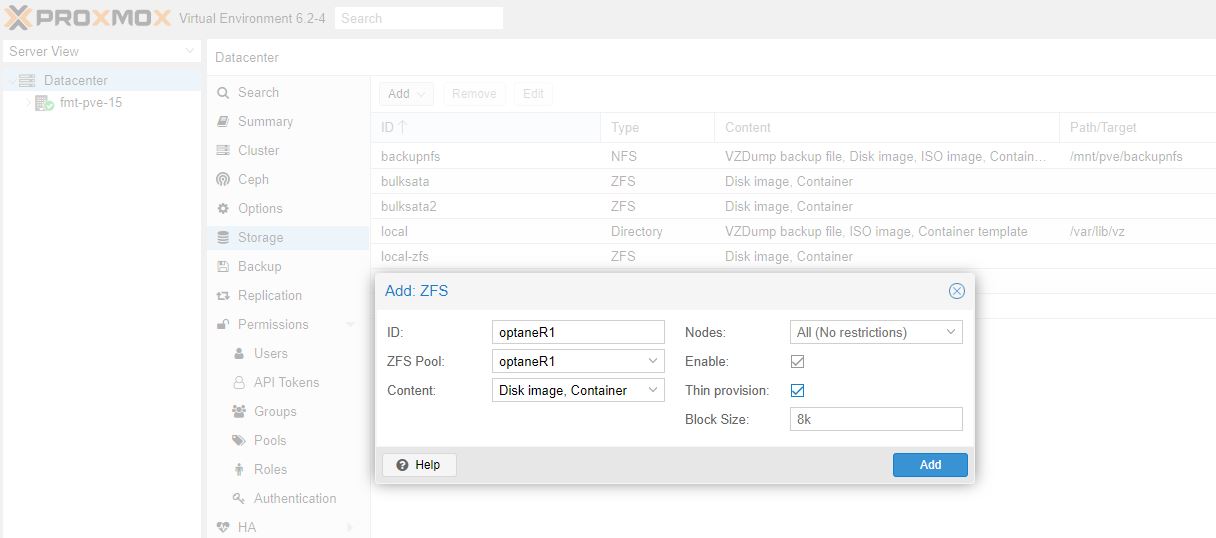
Here you can see we are giving this one the name “optaneR1” which matches the ZFS pool “optaneR1” we created earlier. Again, nothing is more frustrating than having to tie everything out years down the road when you are frantically trying to repair. Make everything easy on yourself.
Step 5: Re-add network storage
Similarly, you are going to want to add network storage. For the AIO Proxmox VE folks, this will be less necessary. At a minimum we suggest that your second box is a NFS server so that you can use it as an easy backup target. It is also a good place to store files such as ISOs so you do not lose them.
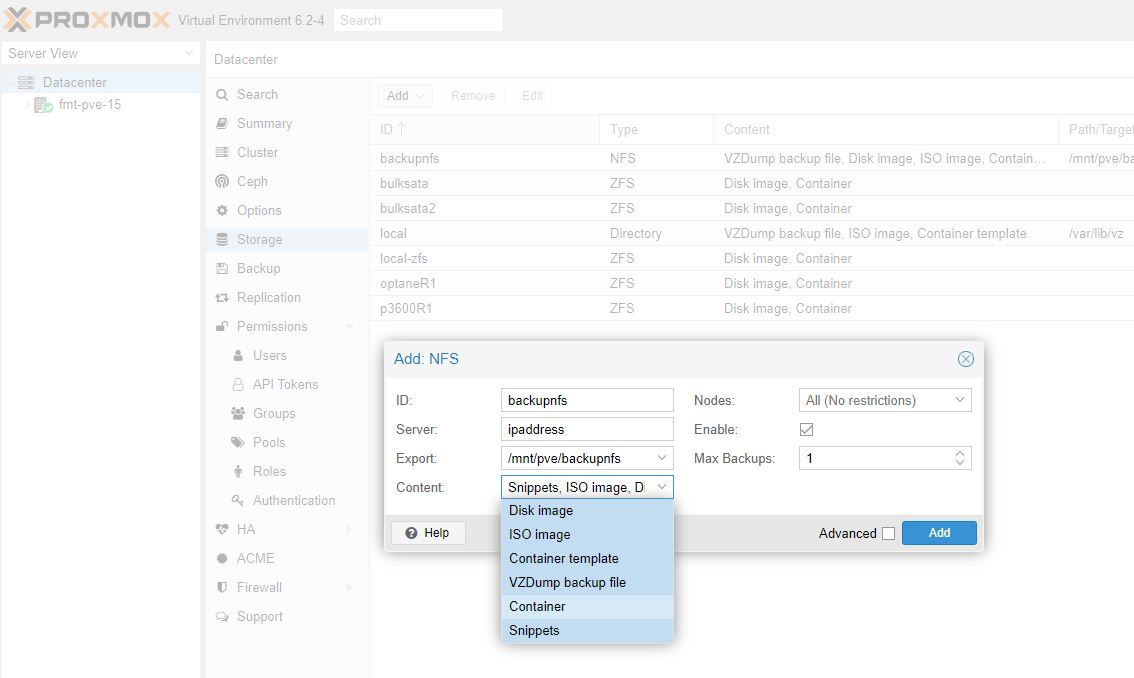
Here, remember to tick “VZDump backup file” so you can use Proxmox’s built-in backup solution. Not setting this properly as above is perhaps the #1 reason people get frustrated with Proxmox’s backup solution. We are going to get there in Step 8.
Step 6: Add to the cluster if applicable
Some may debate exactly when this should be done. For those using standalone non-clustered Proxmox VE hosts, then you can skip this. Proxmox VE clustering does add another point of complexity so there are many who run Proxmox VE as individual servers with some other shared storage (e.g. a NFS backup server) skipping clustering functionality.
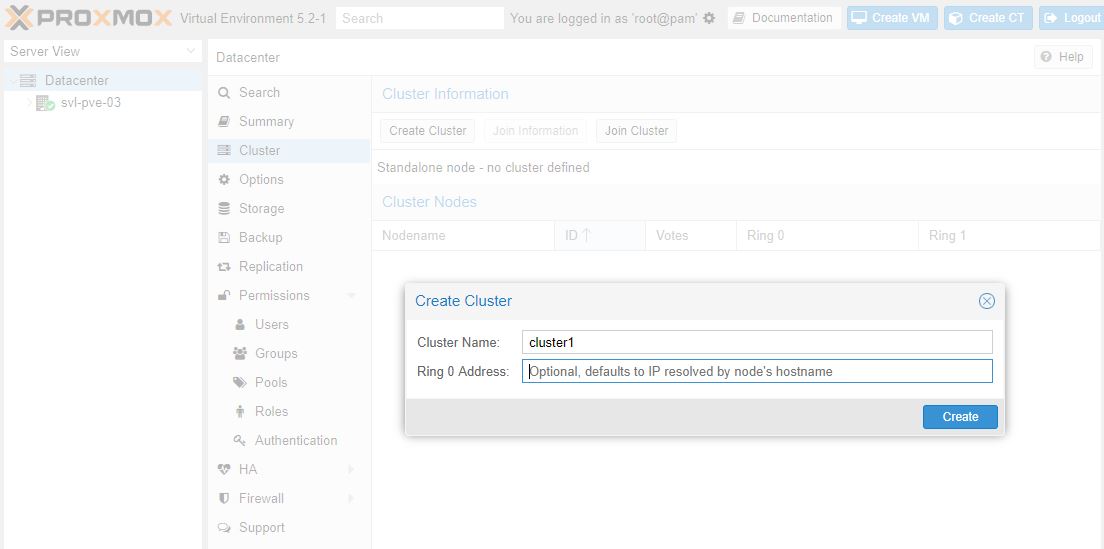
Compared to years ago, using the PVE clustering functionality is much easier. You can easily even create clusters from the GUI instead of using the pvecm tool.
If you recall, since we increment our hostnames and internal IP addresses, we can treat this as a retirement of a node and adding a new node. First, remove the old node from the cluster. Then add the new node to the cluster. The Proxmox documentation is pretty good here so we suggest just using that.
Step 7: Get VMs back online
This is a really interesting part of the process and can be stressful for newer Proxmox VE admins. Indeed it is something you could potentially mess up so it is important to have a plan.
Speaking of plans, for some, all that is left is restoring from backup. If you have a nightly backup, you will lose a day’s worth of progress. If you had the OS drives fail, but the VMs on different arrays kept running as we did, Proxmox backup will not run. You will most likely not get a notification it failed if you have the option to only be notified on issues. If you get “backup successful” notifications, you simply will not receive one likely when you are sleeping. Overall, there is a good chance that if you have to go to backups, you will lose more than a day or perhaps a week of progress depending on your backup frequency. As a result, that should be Plan B and a good lesson on why you should have frequent backups.
The easier way to do this is to create VMs and point them to the storage that did not fail. If you have VMs running, as ours did, after the OS storage fails, pointing a new VM to the existing storage will get you up and running without data loss.
With ZFS and Proxmox VE, this is a conceptually simple framework. We just need to have a config file with the compute, network, and memory parameters that ties to the existing storage. We can use zfs list to see the storage arrays and the disks on them.
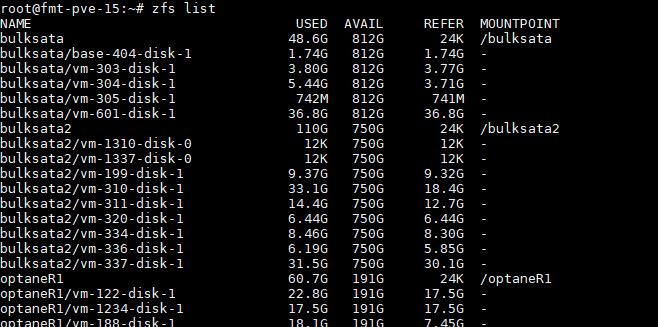
Therein lies a problem. If you did not keep records of which VM is which, and you have a lot of VMs, these are the storage paths you need, but you likely have no idea which disk is which since that information was on your previous OS disk/ array that failed.
The good news is that there is a solution that is better than just make a random VM for everything. That is using snapshots to tell what disks have whatever information you want using zfs list -t snapshot:
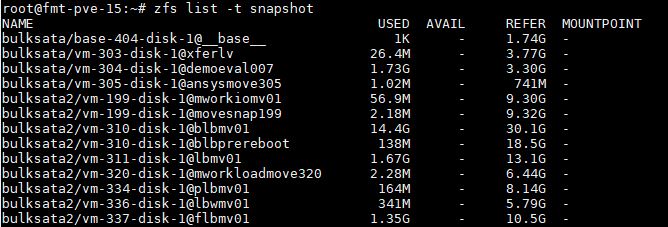
If you are good about doing manual snapshots before any major upgrade or event, and you label all of your snapshots with the name of your VMs, then it is very easy to tie out whatever you need. For example, bulksata/vm-305-disk-1@ansysmove305 may not be the most descriptive, but it is a pretty decent basis for this being a FreeBSD license server we had running. Likewise, bulksata/vm-304-disk-1@demoeval007 we know is related to a DemoEval internal server we use.
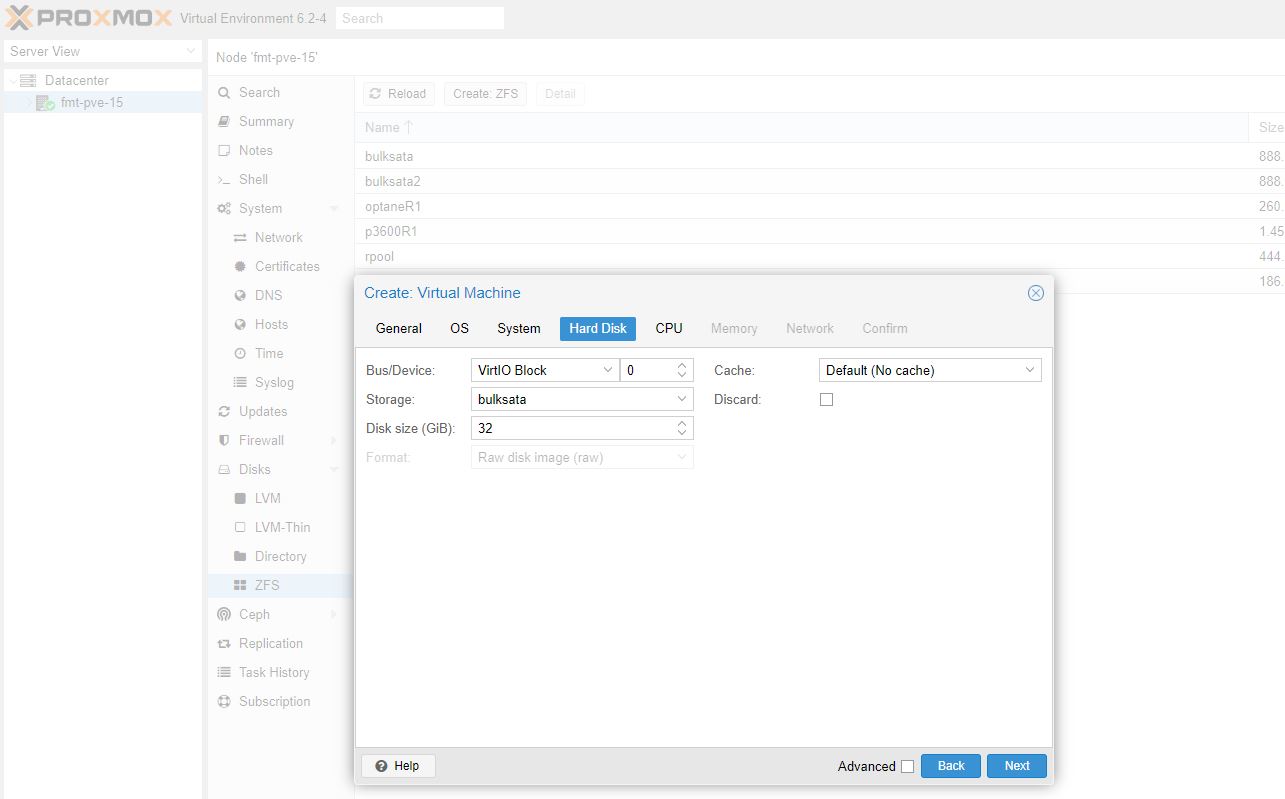
Now that we know the storage, we just need a template VM that we can edit quickly to get the VM back up and running. Here we are going to recreate what was VM 304 on our old server via the GUI. What we are specifically going to do here is name this one 1304. “304” to match the old VM name, “1” to differentiate it. Nothing would be worse than accidentally deleting or overwriting the storage that has made it this far. Proxmox defaults to using the name of the VM for storage, so adding that “1” means creation will happen for a new virtual disk on 1304 not 304. You likely would not overwrite your old disk anyway, but keeping this differentiation makes it very clear even later on what is different.
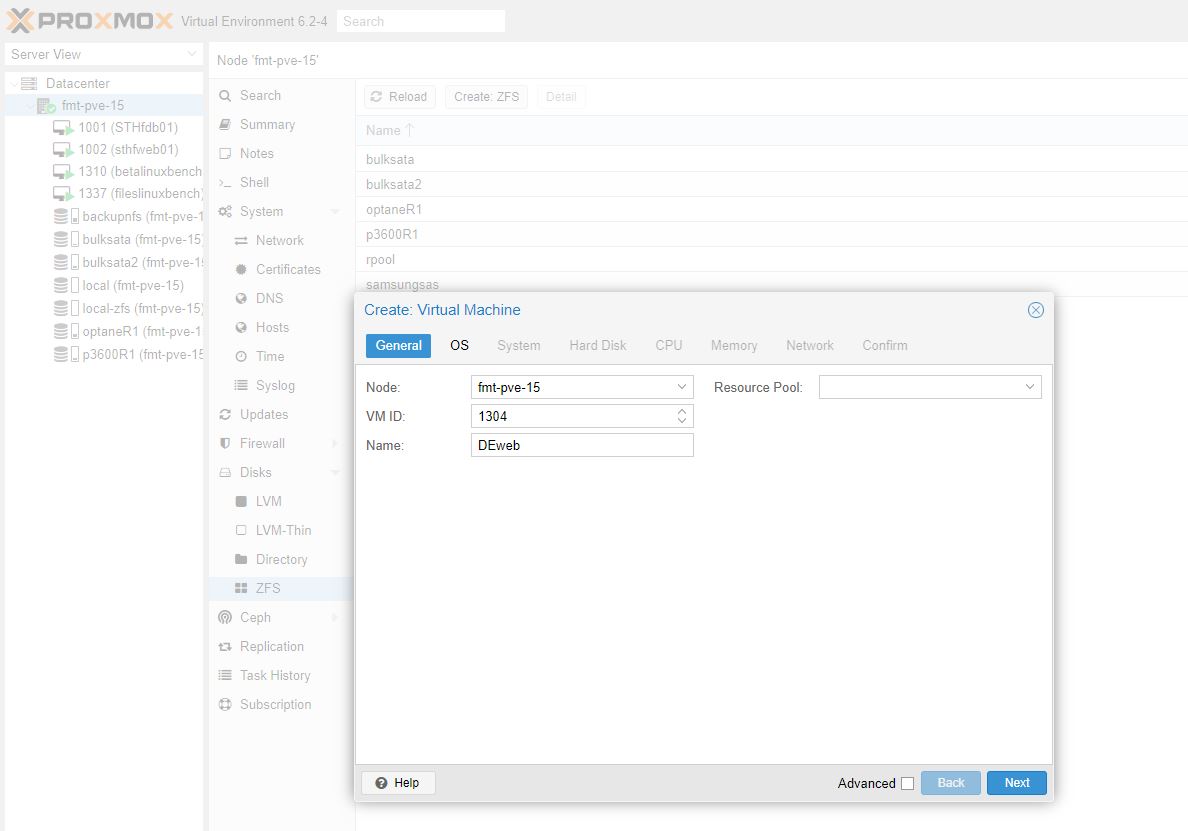
When we get to the hard disk, you will see that there is no option to attach an existing disk. Instead, we are going to put this new VM’s disk on the same storage as the storage we eventually want to use. In this example, bulksata.
Now that we have this setup, we can go to /etc/pve/qemu-server and edit the configuration file. In this case, it will be named 1304.conf.
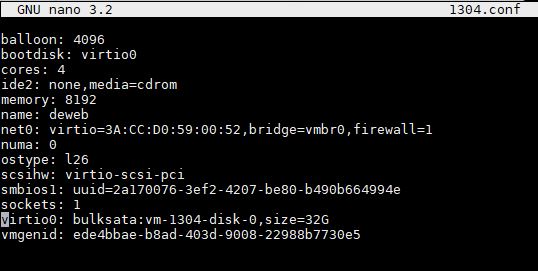
On the line with the cursor, we can see our “bulksata:vm-1304-disk0” here. All you have to do now is delete that “1” and you are done. As a bonus, you can save the file as 304.conf as you exit nano (or another editor) and the VM numbering will be the same attached to the same storage as it was before. Since we are using the same storage, we should not have lost any data in this process.
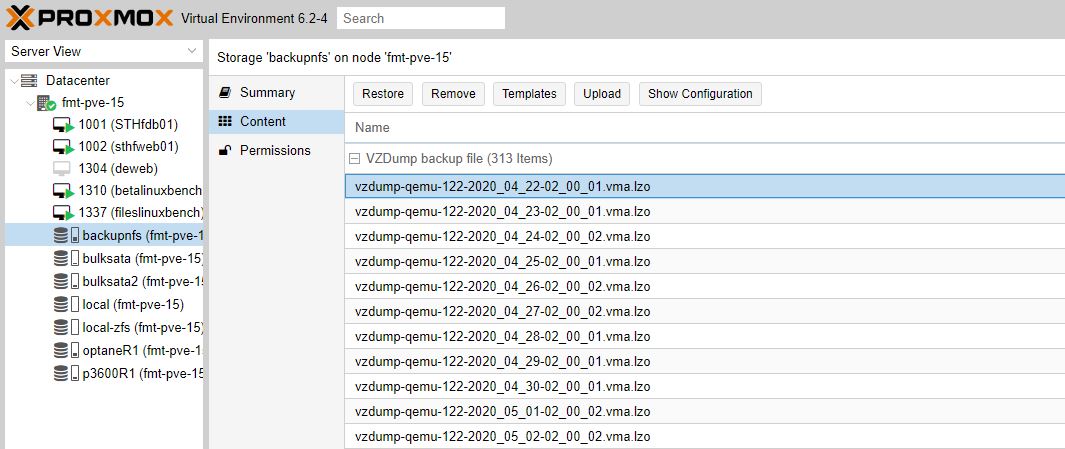
If you do have to go to Plan B, and restore from backups, or if you had a static, say HTML site with no changes since the last backup, then you may not know where to look. Normally, you can restore from a VM’s backup using the GUI but if the VM is not there, that is harder. What you instead need to do is go to the NFS share you mounted earlier, navigate to Content, then pick the VZDump backup file that you want. You will see the VM number, date, and time for those in the file name based on Proxmox VE defaults.
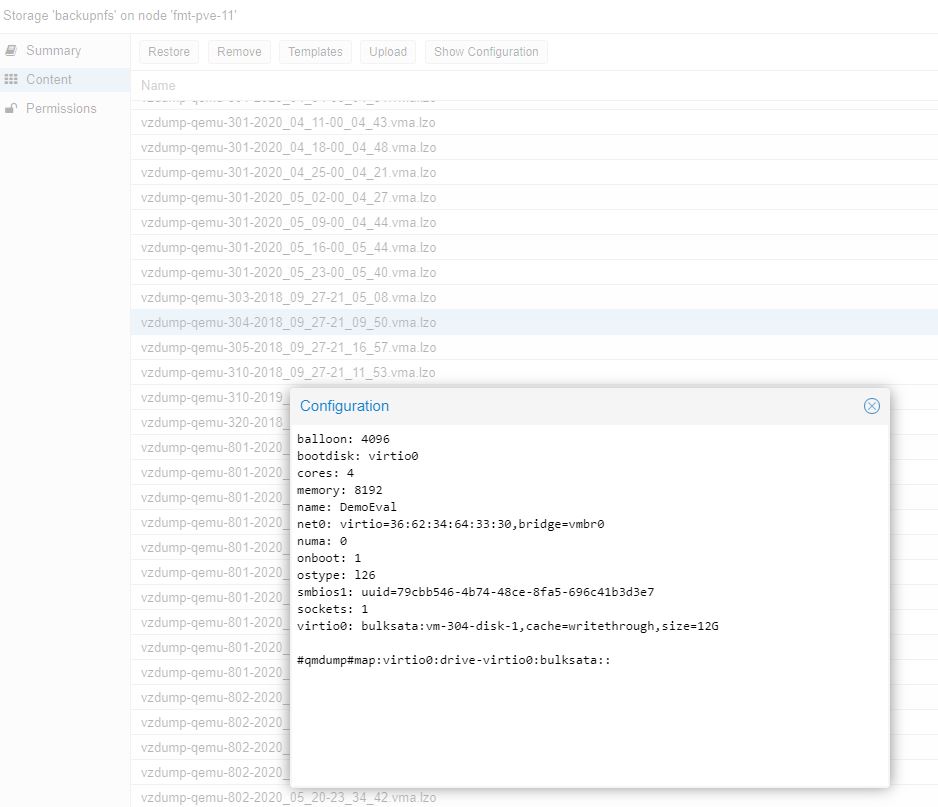
Here you can click restore and be back up and running. If you do have backups, and think they have the current configuration, you can use “show configuration” to get storage, names, and MAC addresses. The above shows how to get the data back without backups, this shows how to get the VM configuration file back if you are using the VZDump backups (credit for this and why in the comments by Stewge):
Thinking through the “what if” here will make recovery later a breeze compared to if you have random names for everything and have to figure this out on your own under time pressure.
Step 8: Set up backups
If you have not figured this out by now, you should make backups. In Proxmox VE you can manually make and restore from backups at the VM level in the GUI. The better tool is going Datacenter -> Backup and adding a task there.

This is one where you do want to edit defaults. By default this makes one backup per week. You may do one backup per day here. You can also make multiple jobs and do a backup each hour as an example.
You can also use rsync or a cron job to backup /etc/pve/qemu-server configuration files to another location regularly. This avoids the steps later of having to re-make configuration files as we went through above but we prefer to know how it works so it is easier to troubleshoot.
Step 9: Monitor/ look for missing items
The final step is to ensure everything is working properly and that you did not miss anything. Double-check that all of your VMs are there. Do cleanup on intermediate items such as those disks that we created and never used in Step 7. A major risk is that the old OS installation had something working that you walk away from and miss only to find out later when it is too late to fix.
It is also worthwhile to double efforts watching the new OS disks as well as any other disk that is connected to the system to ensure that there is not some other issue in the chassis that caused your original disk or two to fail in the first place.
Final Words
Hopefully, you will never have to experience a boot drive failure with Proxmox VE. Luckily, if you do, it is not too hard to recover so long as you take proper precautions. If you are reading this to get a feel for Proxmox VE before migrating, or maybe you use Proxmox VE, I hope this guide helps you think through the disaster recovery plan. Despite having a major system failure, everything stayed online until we had to move it so there was absolutely minimal downtime.
For some context here, the last time we had even been to the data center was almost exactly 18 months prior and that trip was to simply grab some cage nuts that were left there. These failures do not happen all the time, but it is much better to spend the time thinking through how failures will impact you and what you will do in response before they happen.


Thanks for the candor. Ya’ll actually talk failures openly. It may not be smart for your business but I’m appreciating it over all these years.
Great article!
As a long time PVE user I would like to add that it’s possible to get your complete VM Config file back in Step 7 if VM backup file (without having to extract/restore it).
– Add/import the old backup storage location into your PVE
– Select the storage node in the left-side tree. Click on Content. Select a VZDump Backup file. You’ve added a screenshot of this screen already.
– Click on “Show Configuration” to view the VM config.
Note: This does not require you to extract the backup file, it can be read immediately, including over network storage.
This gives you an exact copy of the VM Config file which you can use to recreate the VM with.
Furthermore, for people who do not want to use the PVE Backup system, but want to save the VM configs (e.g. due to file sizes), just uncheck the “Backup” option on each VM hard disk item. Now when you “backup” the VM it just creates a <1KB file which only contains the config file.
This can be hugely important when it comes to unique identifiers like the MAC address of NICs and the Bios UUID. MAC address mismatches in a restore will require you to reconfigure interfaces and/or firewalls in most OSes. Mismatched BIOS uuid or unmatched CPU/Machine types can result in Windows license failures and other issues of that nature.
Stewge – that is a great point. Added that screenshot so people can see it as well.
I think ProxMox is a fantastic product & probably the most “complete” of all the KVM based hypervisors.
It would be nice if they could just provide more tools (videos, blog posts etc) that make it easier for people to consume/try/get their feet wet (insert your fav term).
We use clustered Proxmox at work and it’s generally great, though live migration often doesn’t work between nodes running different major Proxmox versions and, more infuriatingly, even between some different minor versions! It means some Proxmox cluster node upgrades can involve VM downtime, which ruins the whole point of clustering/live migration.
One obvious tip – make sure your Proxmox host servers have “remote control” features such as an independent Web interface (think Dell Enterprise iDRAC, HP’s iLO etc), an HTML 5 virtual console, virtual media (so you can attach a Proxmox ISO across the network that the host BIOS can see and boot from) and the ability to power cycle the host remotely even if the kernel has crashed. It saves you a load of trips to your data centre!
If your node that needs to be recovered is in a cluster every node has the configuration files in “/etc/pve/nodes/{old node}/qemu-server/” and “/etc/pve/nodes/{old node}/lxc/”. You can create a “new” vm and then copy the config or just copy the files.
Comments are closed.