
What happens when your Proxmox VE boot drive fails? In this article, we are going to talk about how to recover, and give some advice based on something that we recently experienced in the STH hosting cluster. We have been using Proxmox VE in the STH hosting cluster for at least seven years. Installing Proxmox VE is easy (nowadays extremely easy) but one of the biggest hurdles we see to adoption is not the ease of installation, but getting comfort in recovering if something goes wrong.
Our intent with this piece is to give you a sense of what happened in our production system, what one has to contend with losing, and then give a 9-step process to recover if this happens to you. To that end, we have a video is designed to be an overview for those who (rightly) should be thinking about how to plan for disaster striking, and how we went through the process. In the written article below we are going to go more in-depth so if this happens to you, you will have some file locations and screenshots to help you recover. Since this is a huge piece, the first page is our recent experience and the key items you may lose. The second page will show you more screenshots and file locations going through the 9-step process.
9 Steps to Recover from a Proxmox VE Boot Drive Failure Video
Since this is a longer piece, we are going to have a video as well. You can find the video here:
If you are a new Proxmox VE admin, we suggest bookmarking both this article and the video so that you can find them quickly if you ever need to.
Background: Our Double SSD Failure on the Proxmox VE rpool
One morning, everything seemed fine, until it was not. We never received an alert from the Proxmox VE system that anything was wrong (more on that later.) All STH services seemed to be up, except a small file server we use to host some scripts for testing, not for hosting the site.
We tried logging into the Proxmox VE node’s WebGUI after VPN’ing in, and it was not reachable. We pinged the box, and sure enough, it was responding to ping requests so we tried SSH. SSH was down as well. Something was clearly wrong. A quick look at the console and we saw a lot of errors.
What happened was very interesting. The Proxmox VE rpool had failed. This was a mirrored ZFS pool using two Intel DC S3610 480GB SSDs. Not only did the drive fail, but it seems to have caused issues with the other SATA SSD ZFS pools on the machine, but not the VMs hosted on the NVMe SSDs. Yes, this was a fascinating one.
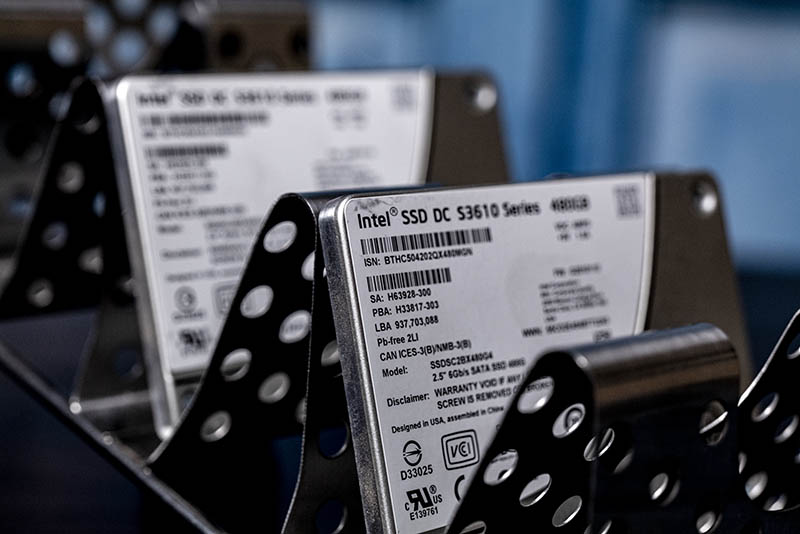
Those SSDs are very high-quality units that we use dozens of in our infrastructure. One had started to throw some SMART warnings (not a failure) a few weeks prior but we did not replace it since after a reboot it started behaving as normal. The node was not being used at the time, so we went through a week of power cycles once a day just to see if it was going to be stable for a few weeks. Also, the data center is far (a 20-minute drive) and we were just coming under shelter-in-place and it was not clear if we could even replace the drive.
This brings up a very important point. In mirrored arrays, or in other RAID arrays, one of the biggest reasons for failure is not a disk failure in a healthy array, it is what happens if something causes a double-disk failure. This could be a faulty power supply, backplane, SSD firmware, being slow to introduce a replacement, or anything else. That time when an array can be vulnerable waiting to rebuild is very scary and one of the reasons we discussed it heavily on our Surreptitiously Swapping SMR into Hard Drive Lines Must Stop piece. Will has been collecting data that you will see soon on that subject, but it is a big deal.
Normally we would reboot the node remotely to see if that fixes the issue, but we could not in this case. If we did, and the box did not come up, the forums would have gone down and we would have had to rush a fix in a remote data center. We recently rebuilt and upgraded the forums and we were hosting the database on this node. It was intended to be a < 2-month window until we replaced about half the nodes in the cluster. Yet the shelter-in-place delayed our plans.
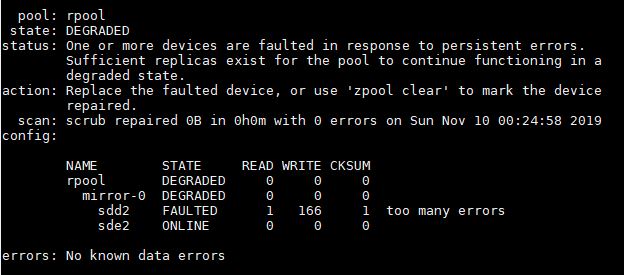
We had a dead rpool. Effectively even though we had a mirrored SSD setup, by sustaining the double-disk failure, we lost our installation just like if one had a single SSD. In this article, we are going to show how we recovered, in production, from a Proxmox VE boot drive failure and some tips and tricks you can use if this ever happens to you.
What is Stored on the Proxmox VE rpool?
It is important to understand what you lose if the Proxmox VE rpool fails:
- Proxmox VE OS
- ISOs that are downloaded directly to the node
- Local VMs that are stored on the boot disks/ array
- VM/ container configuration files
- Any other files you may have kept on here. Of course, you know better, but we also know sometimes files end up being left in home directories as an example
The Proxmox VE OS makes sense. If you lose your OS drive, you do not have your OS and all that was configured in it such as networking profiles. This is the same as if your laptop drive fails so we are not going to go too much into that. Even if you made rpool snapshots, that will not help if the actual drive or drives are not accessible.
If you had a local cache of ISOs, then you will want to re-download them. You can see Directly Download an ISO to Proxmox VE for VM Creation but this is usually a very simple process.
Local VMs that were stored on the boot disk(s) are a bit more challenging. You are going to need to restore from a backup. Most likely, you will have lost data here because the original VMs are gone along with their snapshots. If you have a backup, then life is good. If you do not, hard days may be ahead as you learn a valuable life lesson. This is the same with any local files that were left in home directories as an example.
The VM and container configuration files may seem meaningless, but they are not. For KVM VMs, these are located in /etc/pve/qemu-server
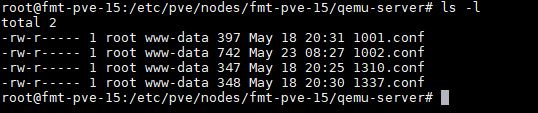
These files define the basics of a VM such as CPU, memory, networking, and most importantly here, storage configurations:
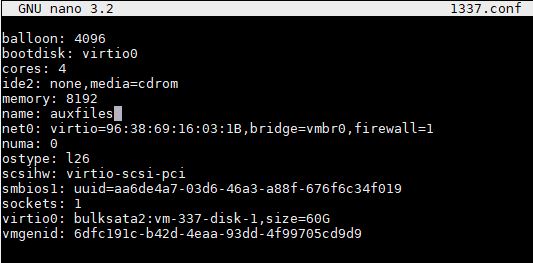
The challenge you may have is that these configuration files tell Proxmox VE where the storage for a VM is located. As a result, losing these files means Proxmox does not know what resources, including storage should be provisioned for a VM.
If you are running high-availability storage such as Ceph, and high-availability VMs, then realistically, you have a somewhat easier process. If you are stuck with VMs on local storage arrays that are still working, then things will be a bit harder, and that is what we are going to focus on since it is the much harder case.
Now that we have an example of what happened, and some of the key items lost if the boot drive fails, we are going to get into the 9-step process next.


Thanks for the candor. Ya’ll actually talk failures openly. It may not be smart for your business but I’m appreciating it over all these years.
Great article!
As a long time PVE user I would like to add that it’s possible to get your complete VM Config file back in Step 7 if VM backup file (without having to extract/restore it).
– Add/import the old backup storage location into your PVE
– Select the storage node in the left-side tree. Click on Content. Select a VZDump Backup file. You’ve added a screenshot of this screen already.
– Click on “Show Configuration” to view the VM config.
Note: This does not require you to extract the backup file, it can be read immediately, including over network storage.
This gives you an exact copy of the VM Config file which you can use to recreate the VM with.
Furthermore, for people who do not want to use the PVE Backup system, but want to save the VM configs (e.g. due to file sizes), just uncheck the “Backup” option on each VM hard disk item. Now when you “backup” the VM it just creates a <1KB file which only contains the config file.
This can be hugely important when it comes to unique identifiers like the MAC address of NICs and the Bios UUID. MAC address mismatches in a restore will require you to reconfigure interfaces and/or firewalls in most OSes. Mismatched BIOS uuid or unmatched CPU/Machine types can result in Windows license failures and other issues of that nature.
Stewge – that is a great point. Added that screenshot so people can see it as well.
I think ProxMox is a fantastic product & probably the most “complete” of all the KVM based hypervisors.
It would be nice if they could just provide more tools (videos, blog posts etc) that make it easier for people to consume/try/get their feet wet (insert your fav term).
We use clustered Proxmox at work and it’s generally great, though live migration often doesn’t work between nodes running different major Proxmox versions and, more infuriatingly, even between some different minor versions! It means some Proxmox cluster node upgrades can involve VM downtime, which ruins the whole point of clustering/live migration.
One obvious tip – make sure your Proxmox host servers have “remote control” features such as an independent Web interface (think Dell Enterprise iDRAC, HP’s iLO etc), an HTML 5 virtual console, virtual media (so you can attach a Proxmox ISO across the network that the host BIOS can see and boot from) and the ability to power cycle the host remotely even if the kernel has crashed. It saves you a load of trips to your data centre!
If your node that needs to be recovered is in a cluster every node has the configuration files in “/etc/pve/nodes/{old node}/qemu-server/” and “/etc/pve/nodes/{old node}/lxc/”. You can create a “new” vm and then copy the config or just copy the files.
Comments are closed.