
We recently posted an article about how you can build your own server to get started with machine learning. The premise was simple. Starting off with deep learning you do not need a giant system as you cannot put it to good use. The starter server, DeepLearning01, is a great all-in-one machine, but cost around $1700 to build. Today we are going to present a much more budget friendly AI developer station idea, the sub $800 machine learning / AI server.
Over the past two years, I have been asked to advise dozens of folks on simply the segment of starter machine learning / AI / deep learning systems. There is one aspect I have noticed in common: most people wildly overspend on GPUs for starter rigs and are less than happy with results. We were challenged to build a system under $1000 and we managed to get everything we could want in the system.
The Build List
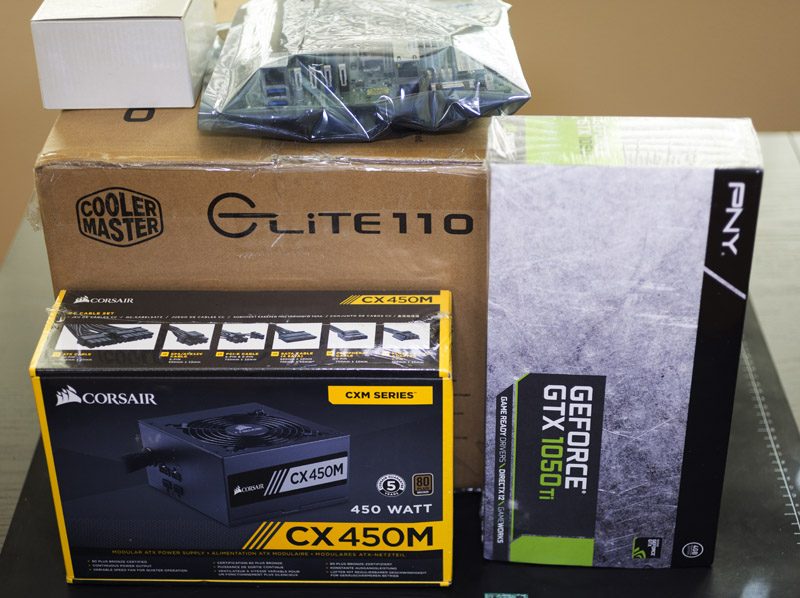
In the subsequent sections, we are going to explore the choices made in the build. Here is a quick list before we get started:
- GPU: PNY GTX 1050 Ti 4GB
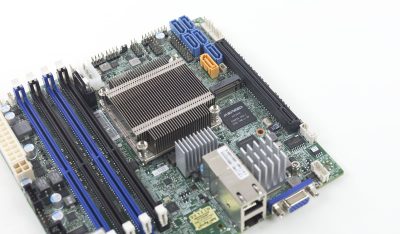
- CPU/ Motherboard: Intel Pentium D1508 / Supermicro X10SDV-2C-TLN2F
(review here)
- RAM: 32GB (2x 16GB) DDR4 RDIMMs (Amazon example here
)
- SSDs: 1x Supermicro 32GB SATA DOM
- Chassis: Cooler Master Elite 110 mITX
- Power Supply: Seasonic 360w 80Plus Gold


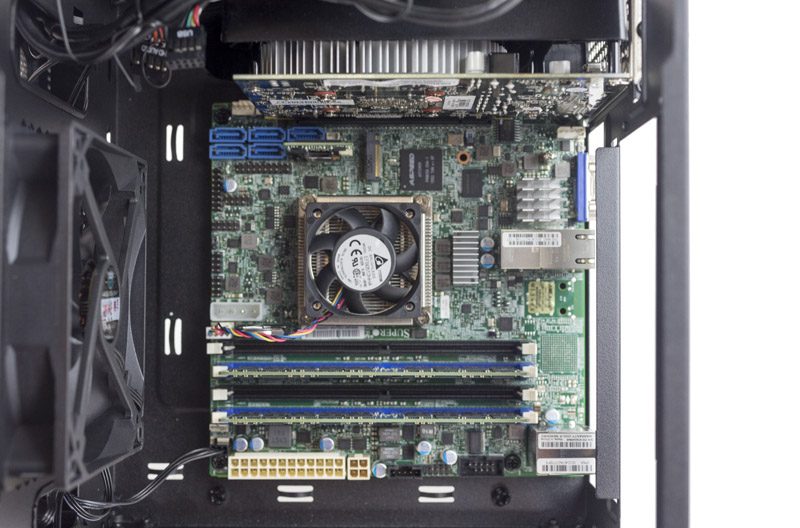
While this build is not completely silent, it is certainly very quiet. We also swapped the passive heatsink for a Supermicro SNK-C0057A4L just to ensure we had enough cooling. The Pentium D1508 is a 25w SoC but we still wanted to over-cool the system. Total cost was around $800.
A GTX 1050 Ti why not bigger?
In the world of GPU compute, NVIDIA is currently king. They have over a decade of experience making CUDA compute cards and are aware that their gaming GPUs are used as entry GPU compute devices. Since we have helped spec, build, and get feedback on many entry-level systems, there are a few vectors we optimize on:
- Get as much onboard memory as you can. Models that take up more space than the local GDDR5 allows end up slowing down significantly.
- Get as much CUDA compute as you can. Like in CPUs, more CUDA cores, in a given generation, mean more performance.
- Cost-optimize the platform. NVIDIA is all-in on deep learning/ AI, so we expect 2017 iterations to improve significantly. Look to upgrade GPU as user’s skills improve to take advantage of new technology.
Focusing on that last point, we have found that there are many people who buy extremely high-end systems to start endeavors in machine learning. There are two minor issues with this. First, as you are starting off, you likely are not using giant data sets and models. Most learning “NVIDIA DIGITS with MNIST” type classes/ models are relatively small and take, at most, single digit minutes to train. Importing pre-trained models and using more inference based applications is also common. Starting out, you are also unlikely to have the data to train, nor the experience to utilize multiple machines or GPUs effectively. Learning on small models seems to be common as feedback happens in seconds or minutes rather than days. By planning for a lower-end GPU at the outset that is right-sized for first endeavors, we can save money today to take advantage of tomorrow’s faster GPUs.
At STH we spend more than the cost of several GTX 1080’s on power and space in our data center colocation each week, so cost was not the paramount concern. Instead, we wanted to derive some metric on picking the best GPU for someone who is in their first few weeks of deep learning. Here is the chart I came up with and shared with several folks in the community focused on GPU compute:
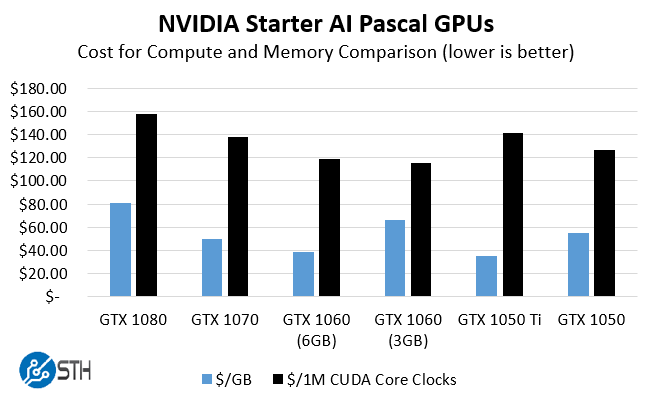
Raw performance wise, get a GTX 1080, Titan X (Pascal), Tesla M40 or whatever your budget allows. Looking at value, the NVIDIA GeForce GTX 1060 (6GB) is certainly a sweet spot in the market and what we opted to use with our DeepLearning01 build. The GTX 1050 Ti is low on compute but we decided to try it in our build. Using the GTX 1050 Ti we were actually able to power the entire rig using a PicoPSU 150XT but decided to use a larger PSU for potential future upgrades. With the GTX 1050 Ti there is no PCIe power connector so we wanted to have one in the lab. While we would recommend the GTX 1060 6GB card, we went for an ultra budget friendly option. We do want to point out that you want the “Ti” version. The GTX 1050 has half the RAM and fewer CUDA cores and is marginally less expensive.
CPU / Motherboard / RAM: Value with a Caveat
This build has less than one quarter the CPU power of our previous build, DeepLearning01. Instead of buying a Core i3 or Xeon E3 plus server motherboard for around $300, we went with a slightly more expensive Pentium D1508 option. We have a decision guide on buying Intel Xeon E3 v. Intel Xeon D which goes into more detail on some of the platform differences. We ruled out the Core i5 and i7 because I wanted the ability to have IPMI with a dedicated console GPU. It is also important if you are going to build a server, it acts as a server. Once you deal with colocated machines, IPMI and iKVM are near essential since you can remotely load OSes, troubleshoot computer issues down to the BIOS level and etc. Although both the motherboard and the GTX 1050 Ti have video outputs, we never connected a keyboard, video, monitor nor optical/ USB drive to the machine.
Why then spend a bit more for a Pentium D1508? STH now recommends all new systems use 10GbE as a minimum. We expect larger data sets to be stored on a NAS and there is a significant latency/ throughput impact by increasing network speeds tenfold. In 2017 we expect new servers, except for the extreme budget segment, to all have 10GbE, and that will be a rating criterion for STH reviews. Given this was our first build of 2017, we are following our own guideline. The Supermicro X10SDV-2C-TLN2F gives us an embedded Pentium D1508 along with IPMI and dual 10Gbase-T ports. The Pentium D1508 is only 25W which includes the dual core/ quad thread CPU, the PCH and the 10GbE MAC. This board sips power.
Here is the one (major) drawback of this system, the CPU is slow. Instead of the Xeon D-1541 which can prepare images and other data with decent speed, the Pentium D1508 is not your ideal candidate for this.
Storage: A Different Approach
With our DeepLearning01 build, we opted to use a RAID 10 array of fast, hot-swap, SSDs for local storage. With DeepLearning02 we are taking a different approach. We eschew the large and fast SSDs for a single 32GB SATA DOM. The SATA DOM approach means we are running our base OS on the small SSD and then accessing our data sets on a local NAS. If you were creating a deep learning / AI lab at a high school this might be what you would use so that you can share data among students all the while using ZFS snapshots on the NAS. The benefit once you move beyond one system and into many is obvious, you can store data sets once instead of multiple times and save money on storage. We have seen giant AI clusters at hyper-scaler labs use a higher-end version of this (e.g. a Pure Storage array).
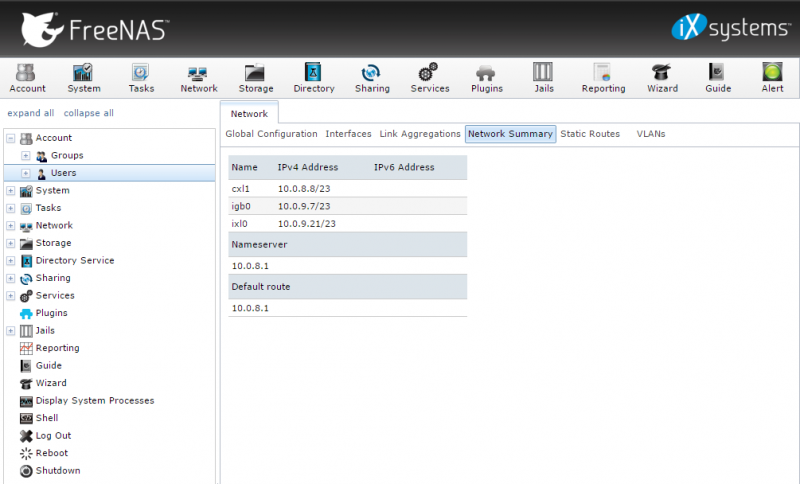
The basic idea is that we are going to use a NFS share to our FreeNAS machine to store all of our data sets. We are then going to use that NFS share to store our data. This is something we would strongly advise against if 1GbE was the only networking available, but since we have a NAS and a motherboard capable of 10GbE, we can get decent speeds over the network, especially if we are using fast SSDs to cache data.
If you wanted to spend a bit more here, check the STH “Great Deals” forum where people post deals on used enterprise SSDs daily.
Chassis: Pint Sized!
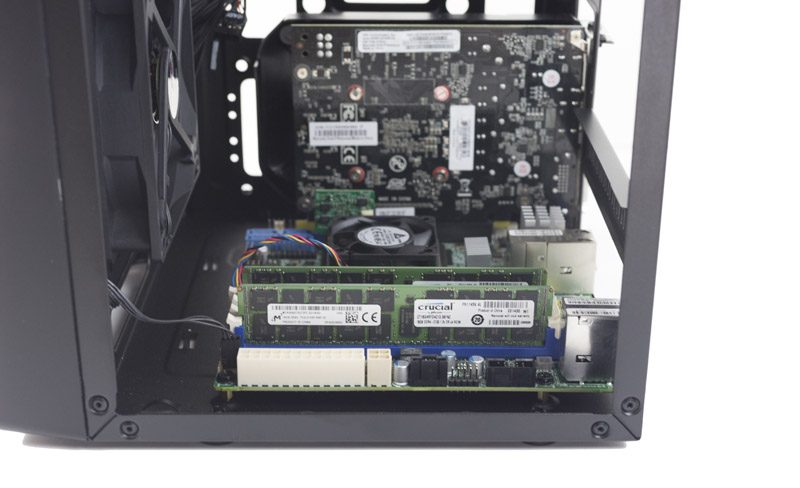
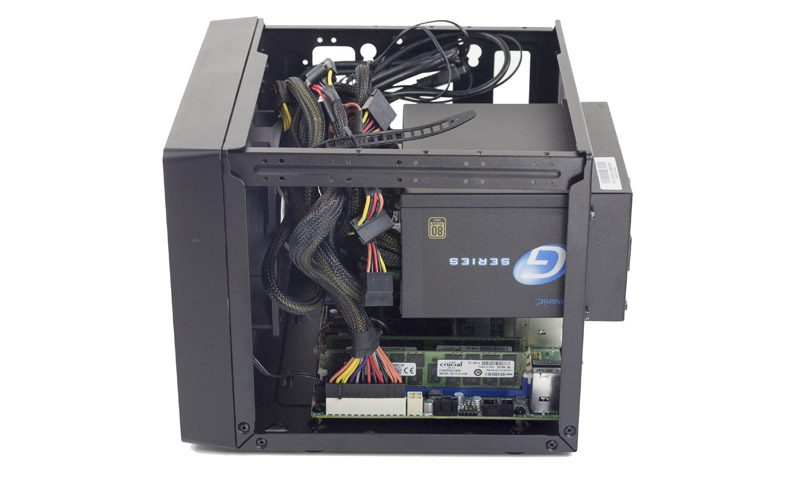
We wanted the build to be compact, and we were willing to sacrifice to save space. We are using the Cooler Master Elite 110 case. The PNY GTX 1050 Ti is a small GPU, it is even shorter than our mITX motherboard. There is marginally more room in the chassis for a larger GPU. Still, we would not be able to fit a GTX 1070 or larger GPU in this form factor. That is something to keep in mind of you are looking for expandability. DeepLearning03 will have a 6GB GTX 1060 (6GB) in the same form factor.

One nice feature of this build is that the internal cabling is kept to an absolute minimum. You need a 24-pin ATX power connector from the PSU to the motherboard. Beyond that, we had no other internal cables. The SATA DOM does not need to be mounted in the chassis since it sticks out from the SATA port and does not require a power cable. The GPU does not require an additional power connector. Cabling consisted of three network cables (2x 10Gbase-T plus one IPMI), one power cable and the 24-pin ATX power connector. That is it. If you are building a PC, this is about as easy of an experience as you can have.
A Word on PSUs: Skip Corsair
Our biggest mistake of the build was using a Corsair PSU. We spent $58 for the Corsair CX450M PSU which was reasonable (see current pricing on Amazon.) The thought was that this PSU could handle larger loads and was both quiet and compact enough to work in our build. We did not want to use a larger 500w+ unit because DeepLearning02 can run CPU and GPU compute workloads at under 100w.
Our experience was shocking. Both on the Supermicro X10SDV-2C-TLN2F as well as other Xeon D platforms we tested from Supermicro and ASRock Rack we had issues booting the motherboards with the PSU. The BMC would boot, and the management interfaces would go live. When we powered on the systems via IPMI or physical button, the systems would simply not boot with the Corsair CX450M. PicoPSUs and Seasonic PSUs have powered these same systems without issues, as have the 200W Supermicro 1U PSUs. The Corsair CX450M we did try on some consumer systems and it worked fine. Since we deal mostly with servers and workstations, the CX450M found its place in the e-waste bin.
Our solution was to order the slightly more expensive Seasonic 360W Gold PSU. We paid $60 for it on Amazon and it worked flawlessly. The one gripe we have with the Seasonic is that the cables are not fully modular, or are not fully modular beyond the 24-pin ATX cable. Since all we needed was the 24-pin cable, we had a huge bundle of unused cables. It is probably a good thing so we do not misplace cables for future expansion but it is ugly. Aesthetics aside, the Seasonic 360W PSU worked flawlessly and has a better efficiency rating (80Plus Gold rather than Bronze) so we were happy with the selection.
Putting it Together: How Much Power Does DeepLearning02 Use?
We did two sets of tests for the DeepLearning02 machine. We setup Docker and ran Monero mining both on the Pentium D1508 CPU as well as the GTX 1050 Ti. We also trained an image recognition model on the GPU for street number recognition which involved a small ~2GB data set stored on the NAS. The first test “Monero” was CPU and GPU intensive while the second “Image Recognition” incorporated accessing data over our 10GbE networking. Here are our power consumption results measured at the wall using our Extech 380803 TrueRMS power meter.
- Idle Power Consumption: 37.5w
GPU Monero Mining: 71.6w
CPU+GPU Monero Mining: 91.2w
Image Recognition: 98.9w
As you can see, this build absolutely sips power at sub 1A on a 120V electric circuit. It is also extremely quiet even though we likely had too much cooling (4 fans total) for the setup. If you were wondering on the performance of our image recognition model, it was about 40% slower than our DeepLearning01 build, yet at half the price.
Final Words
In terms of stability, this system has been under 100% CPU and GPU load for 10 days straight. We are testing these machines like servers rather than like gaming machines since we expect them to be able to spend weekends training larger models. At 37.5w the idle power consumption is relatively low and with the addition of IPMI it is trivial to have this machine locked in a rack and powered down when not in use. Using iKVM we never needed to plug a keyboard, monitor or any other device other than network cables.
This may not be the most powerful machine on the market, but it is extremely easy to assemble, affordable, and uses a server platform that can handle up to 128GB RAM. It also has 10Gbase-T networking so as your storage needs scale, there is room to grow with this platform. You could easily take the motherboard and convert this into a rackmount build and the low power consumption means that you could even place it in commodity (inexpensive) 1A / 120V colocation.
Build Difficulty: Extremely Easy


 built-in.)
Poor lil corsair PSU… I’ll take it off your hands :p
But yeah, I’m a big fan of seasonic’s too.
Corsair doesn’t make PSUs, they just badge different OEMs as their own (sometimes ODM for their “high-end” with bling-features).
Ironically a lot of their better PSUs have been made by Seasonic as the OEM, Superflower is another one that is typically very good quality.
I’m curious who the real OEM is on the one that had boot problems with servers, you can look it up with the FCC id or one of the online databases where nerds track all the different models and 80+ ratings. It probably means it is outside the current ATX spec for low current on a rail or something similar that desktops don’t typically need.
This is what I saw: http://orionpsudb.com/news/corsair-and-cwt-design-a-higher-quality-refresh-of-the-cx-line-also-target-german-market-with-new-vengeance-series
You are right that this is not the intended market for the CX450M but that also means we are not recommending it for this market.
The Xeon-D is surely due for a refresh from Intel. I would love to see a Kaby Lake part with support for 256GB of DDR4.
They might come out with a Skylake version, but I wouldn’t hold my breath since there isn’t a lot of competition in that particular niche anymore and Intel probably doesn’t want it to displace their more expensive offerings.
Comments are closed.