
This is the third part of our “Building a Lab” series. With our initial planning complete, and our network deployed, it is finally time to look at building out our servers. In this article, we are going to configure VMware ESXi and TrueNAS Core to work with our lab.
Preface
We are proceeding under the assumption that if you have gotten this far you can write the operating system installer ISOs to a USB thumb drive. Installing operating systems is pretty trivial. We will, however, lead you to all of the necessary official documentation in order to accomplish that goal. If you are a Windows user, the easiest way to do create an installer USB drive would be to use Rufus.
The latest ISO of the TruNAS CORE BETA can be found here and documentation from iXsystems on how to install TrueNAS Core can be found here.
Once we have installed our operating system, all that needs to be done is to give each our server an IP address in the 10.99.10.0/24 subnet. For the sake of this article, I have given TrueNAS Core the IP 10.99.10.11. Documentation from iXsystems on how to do initial setup in TrueNAS Core can be found here.
The latest ISO of VMware ESXi can be found for free online here. Documentation from VMWare on how to install ESXi can be found here. For the sake of this article, I have given ESXI the IP 10.99.10.10. Documentation from VMWare on how to set the management IP in ESXI can be found from VMWare here.
TrueNAS CORE Initial Setup
The first thing we are going to do when we have TrueNAS CORE installed, and have the networking configured in the config wizard, is going to the web interface. Sign in with the username root and the password we created during our installation.
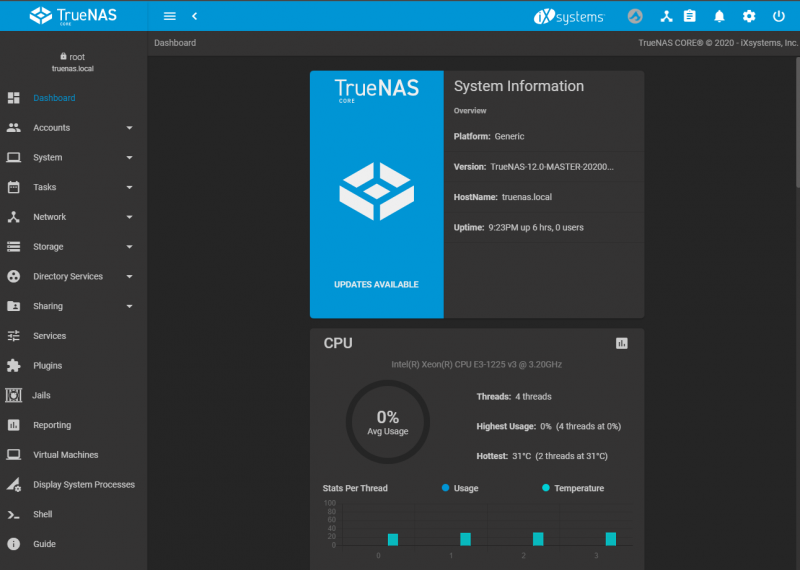
TrueNAS core is laid out with tabs for each menu item on the left and there are submenu items under each thing listed in the menu that you can expand. Once we are here, we are going to expand the Network menu and click on the Global Configuration submenu.
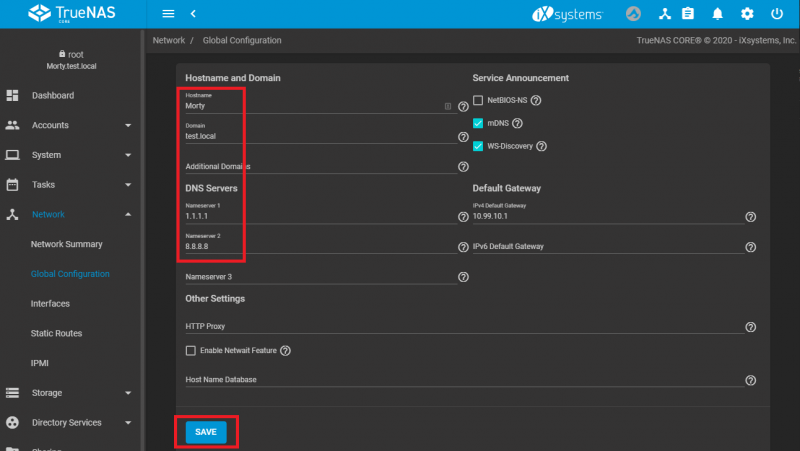
We are then going to modify the Hostname field, we named ours Morty. There are two schools of thought for naming servers, one camp says you should name things as specifically as possible so that when the next person comes in they can figure out what is what. The other camp says you should name things as random as possible so that if an attacker gains access into your network they have a harder time trying to find critical systems to attack. They can also be easier to communicate and remember. When you use the latter method as we are here, you should keep things thematic so it doesn’t become impossible for you to remember what systems are related.
In the Domain field, we are going to use the same domain test.local. Similarly, for the DNS Servers field, we used Cloudflare and Google. Once you are done, press Save.
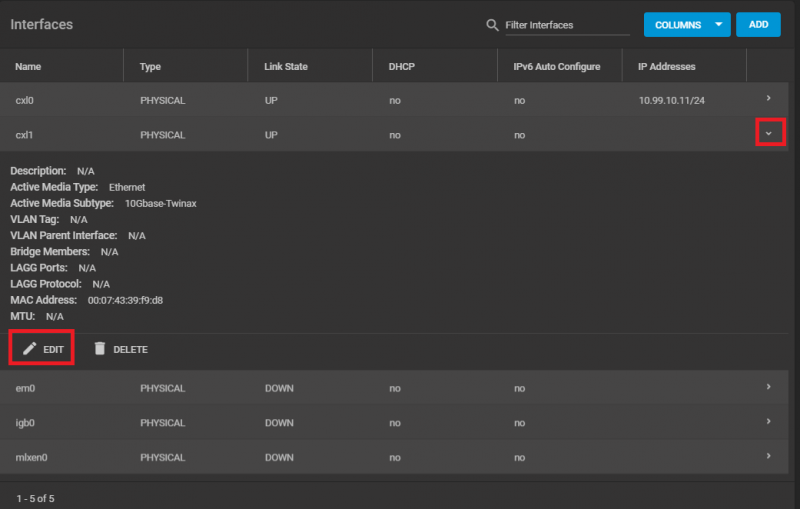
Next, we will go back to the Network menu and click on the Interfaces submenu item. Just like in ESXI, we need to find our second connected network interface and configure it. In our case it is cxl1, we are going to click on the >, and then press EDIT.
Once in the new window, we are going to assign it an IP Address in the VLAN 100 subnet. I am going to attempt to keep it simple and use 10.99.100.11. When you are done, press APPLY.
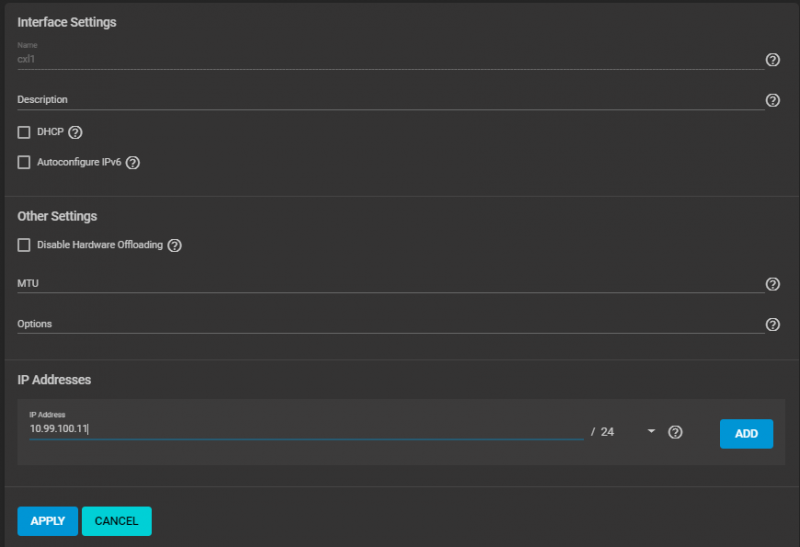
TrueNAS will then warn you that you’ve made a network change. Press Test Changes. Then check the Confirm box when it warns you about possibly losing connectivity and then press Test Changes. If everything goes as it is supposed to, you can press Save Changes. It will then let you know that configuration change was made and you can press Close. Before we proceed with the configuration, there are some important things we need to go over.
TrueNAS CORE Storage Setup
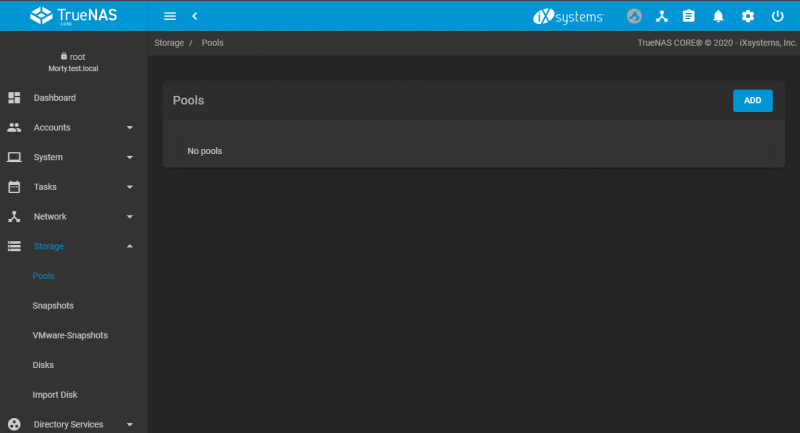
With our networking set up, and basic configuration completed, we can now move onto the the primary objective with TrueNAS Core. To get started we are going to expand Storage submenu and click Pools and Press Add.
Once the pool creation wizard opens we are going to select the Create a new pool radio button and press the Create Pool button.
Now we will see the disks installed in our system. For the purposes of this lab, we have installed three 120gb Intel SSD DC S3500s into our server. These are low-end server grade SSDs. When building our pool, we are going to use them to create a RAID Z1 VDEV. As discussed in our primer on ZFS above, for performance reasons it will be a better choice to construct your pool with mirrored VDEVs. However, we only had three drives to work with, and they are SSDs, so we selected RAIDZ 1.
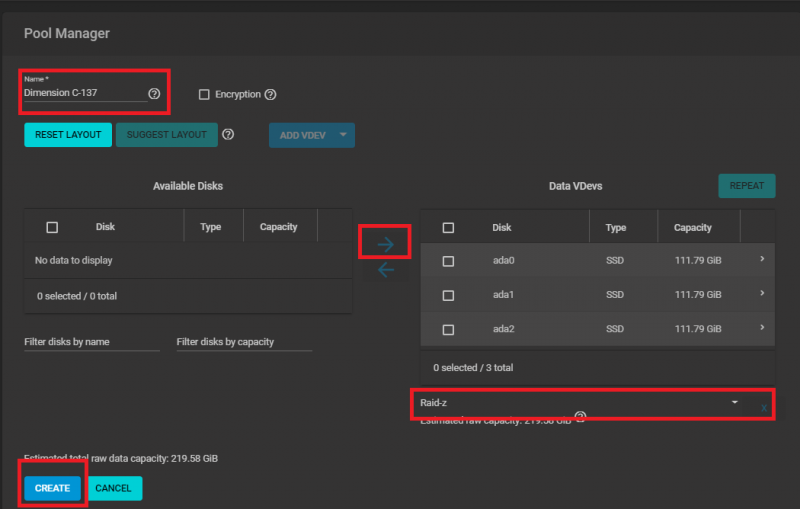
Before proceeding with the pool creation, we need to first provide it with a Name (we are calling ours Dimension C-137). Then we simply check the top checkbox under the Available Disks section and press the Arrow under the Data VDevs section. TrueNAS Core already assumes we wanted a Raid-Z1 volume, so all we have to do is press Create.
TrueNAS CORE will then warn you that you will destroy any data that is on those disks. You need to check the Confirm box and press Create Pool if you are ready, and it will begin creating your pool.
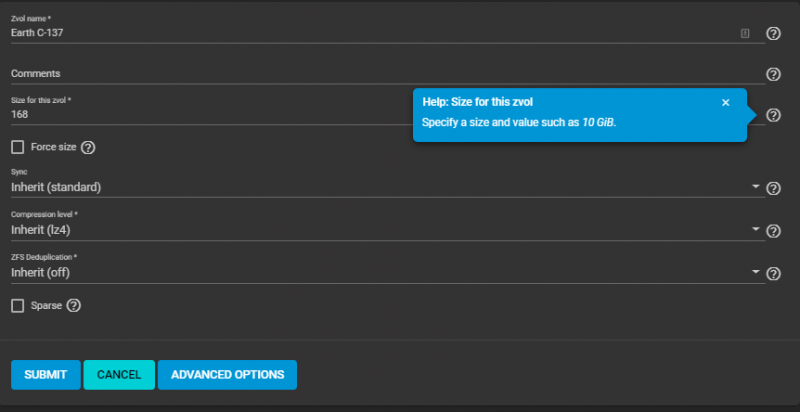
When it is completed, we will see it now shows up under the Pools page. The next step will be to click on the ellipses (three dots menu) and select Add Zvol. A Zvol is basically a virtual hard drive that lives in our pool. We are creating this virtual drive for VMWare to see is a device that is shared with it over iSCSI.

Now we need to give it a Name (we chose Earth C-137) and the Size for this Zpool. It is best practice to use no more than 80% of a ZFS Pool at any given time, so we are going to set it to 168 GiB. When completed, press Submit.
Storage Efficiency Considerations
Creating a ZVOL in the original way we outlined above, TrueNAS will always think the pool is 80% full. VMWare will only ever have access to 80% of the pool. Something important to realize is that when the VMFS volume utilization is at your set alarm threshold (let’s say that is also 80%), your pool will only really be 64% full. There is added benefit to sharing a pool in this way, however.
First, there are the negative performance implications of a more full pool as we outlined previously. Keeping it at 64% here is probably a solid move from a performance perspective. Additionally, you are also over-provisioning your flash. SSDs wear out the more you write to them. If you have less space, you will undoubtedly have less VMs running. Subsequently, there will be less drive usage because of that, and you will be committing less writes to disk.
If you have high-end write-intensive SSDs, this may be less of a concern, but in our build we are using low-end read-intensive SSDs. We took a look at the topic of enterprise SSD performance and reliability a few years ago in our production SSD breakdown.

As a note, VMWare also does not like it when its own VMFS volumes are filled too much, and will alarm when it does. Because of that, you can instead rely on VMWare to keep track of when your pool is reaching the 80% no-go zone. This will buy you some additional space at the cost of some performance. Set the size of zvol to the maximum size of the pool, and then check the Force Size and Sparse buttons. Now, VMWare has access to the entire pool and you can monitor its utilization from within ESXi.
We are basically done here for now. Veteran ZFS gurus will point out that we didn’t adjust things like the ZFS Record size and ashift. For the purposes of this lab, we are going to leave these things left at their defaults. Additionally, we did not spend any time discussing compression or deduplication. We are going to leave all of these topics for another day.
Getting Started in Tasks
Tasks are automated jobs that the system runs on a scheduled basis. Most, if not all of these jobs are here to help keep your data safe. For now, we are going to set up a SMART Test task and a Scrub Task.
Let us start with SMART Tests. Smartmontools is a piece of software that communicates directly with your drives to pull metadata on the health of your drives, as well as to run low-level tests to ensure that they are in a constantly healthy state. These tests will identify when there is a problem and alert you so that you can then rectify it. To begin, start by opening the Tasks menu and clicking on the SMART Test button, then press ADD.
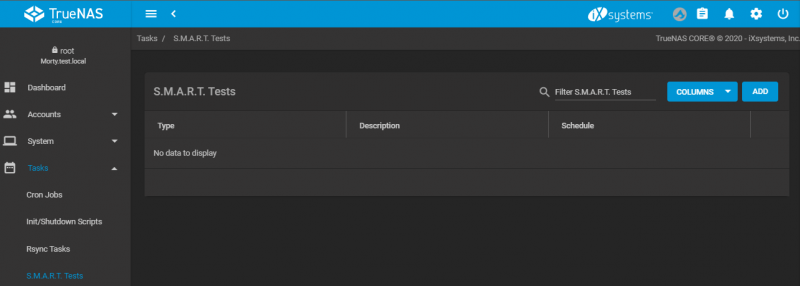
Check the All Disks box and then click Type and select SHORT. You can keep Schedule at its default of daily at midnight, then press Submit. Click ADD again, Check the All Disks box and then click Type and select LONG. Change the schedule to either Weekly or Monthly depending on your preference, and then press submit.
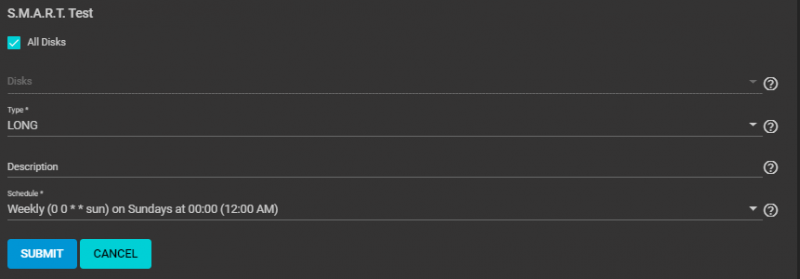
We can now see that we have a daily test which runs at midnight and a weekly test which runs on Sundays at midnight.
Next, we are going to look at Scrub Tasks. Scrubs are ZFS’s built-in mechanism to prevent bit rot. Without getting into too great of detail, ZFS stores a checksum of every block it writes. When you run a Scrub, it compares the block to the checksum, and if the disk is having problems and that checksum doesn’t match the block, ZFS will automatically repair the block during the scrub. TrueNAS CORE automatically creates a Scrub Task that runs every 35 days on Sundays at Midnight. We are going to change that to run every Saturday at 1AM, so as to not conflict with are SMART tests, and to increase the frequency (I am paranoid about my data.)
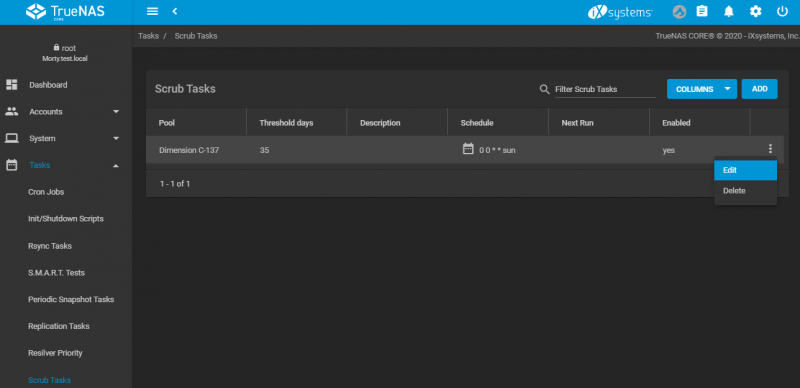
We are going to start by clicking the ellipses and selecting Edit.
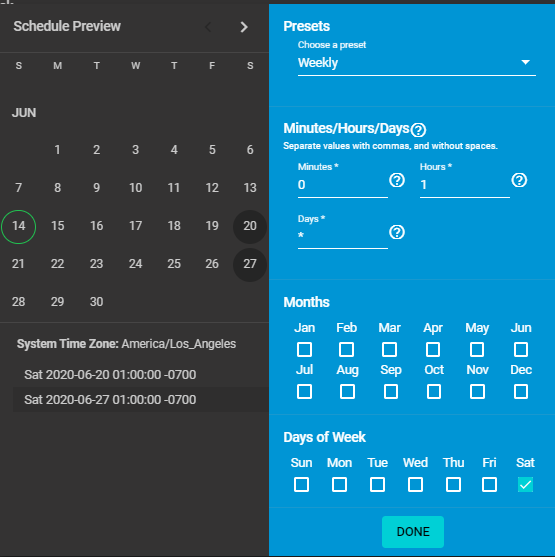
Once there, we are going to change the Threshold days to 7 and then go to Schedule and click on Weekly and change it to Custom. We are going to then select the Weekly preset and change the time to 1 hours. Then we will change the day of the week from Sun to Sat, and finally press Done, and then press Save.
Now that we have taken the time to work on our scheduled tasks, we can rest assured that we are doing everything we can to ensure our data will be safe. For now, let us move on to setting up iSCSI.
Configuring iSCSI
Basically, ISCSI is a way to setup block-level storage access between two different computers. We are going to use this protocol to store our virtual machines that we create in VMWare in our TrueNAS box so that we can gain all the benefits of ZFS that we’ve learned so far (and more later).
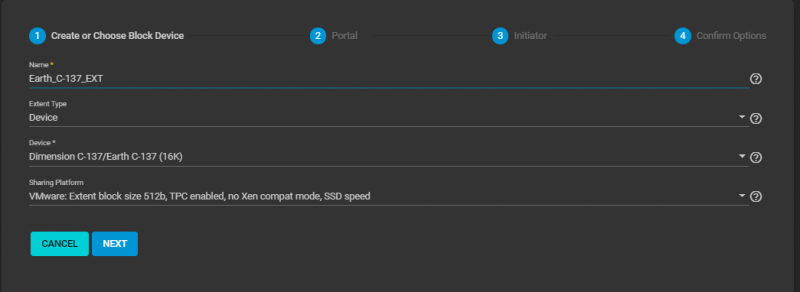
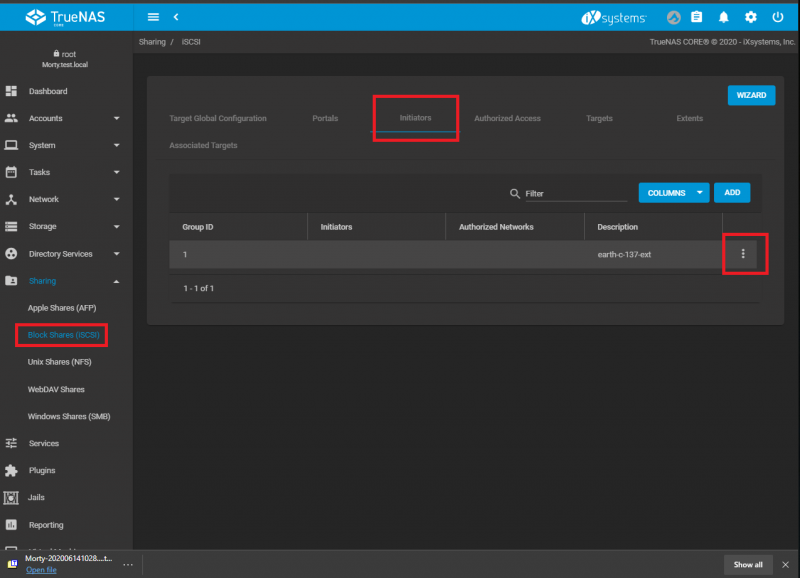
To get started, we need to click on the Sharing Menu and then click on the Block Shares (iSCSI) submenu. Once here, we are going to click on the Wizard button and begin creating our iSCSI share.
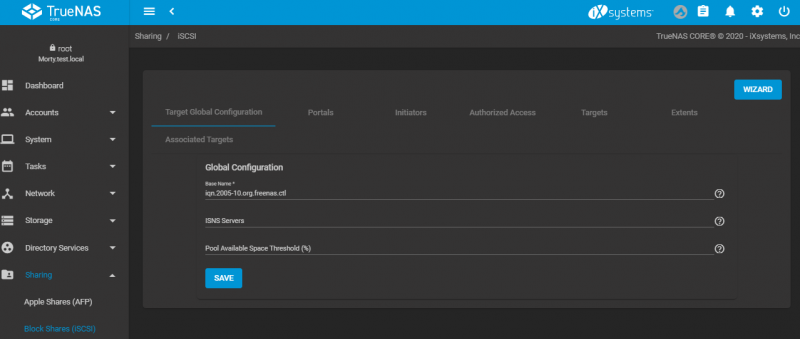
We need only to give our share a Name, we are going to name ours earth-c-137-ext and select the ZVol we created earlier as our Device, then press Next.
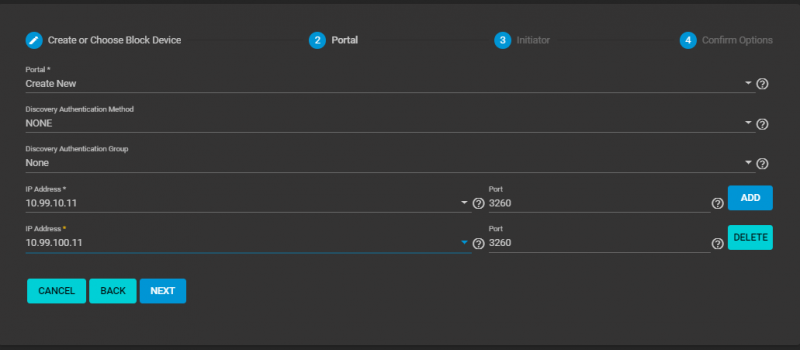
Then we need to create a new Portal. We are going to select our first IP Address and press Add. Then we are going to select our second IP Address and press Next.
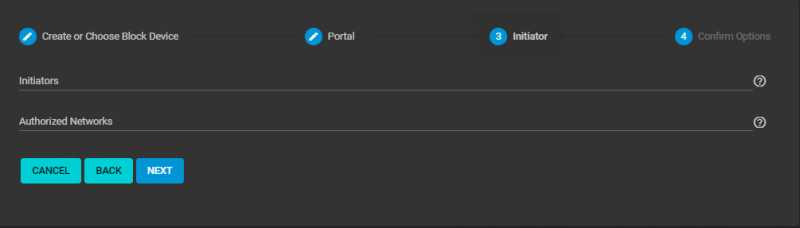
For Initiators we are going to leave this blank for now. We will be locking this down and securing our storage network in the next article. We can then press Next, then Submit
With that completed, we need to turn on the ISCSI Service. Click on the Services menu, and toggle it on to Running and set it to Start Automatically.

Getting ESXi Setup
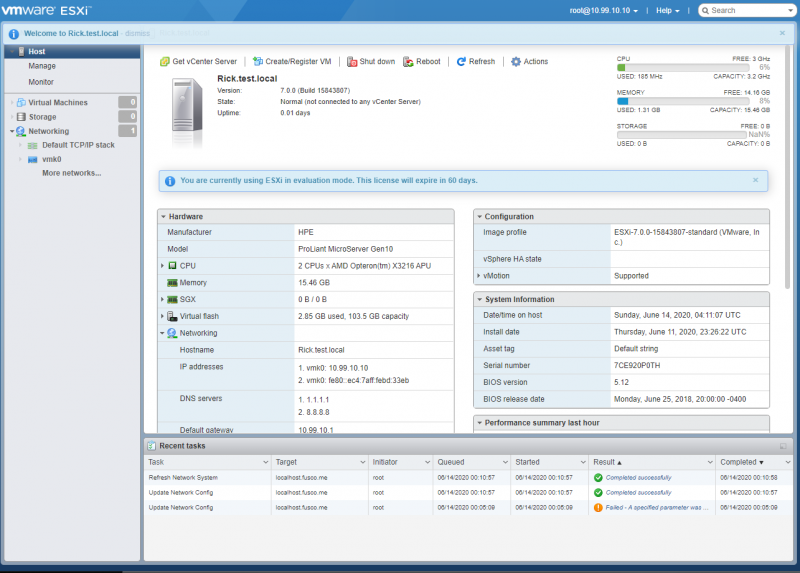
With the initial configuration out of the way, we can now go to the web interface of our VMware ESXi server and sign in with the username root and the password we created during our installation.
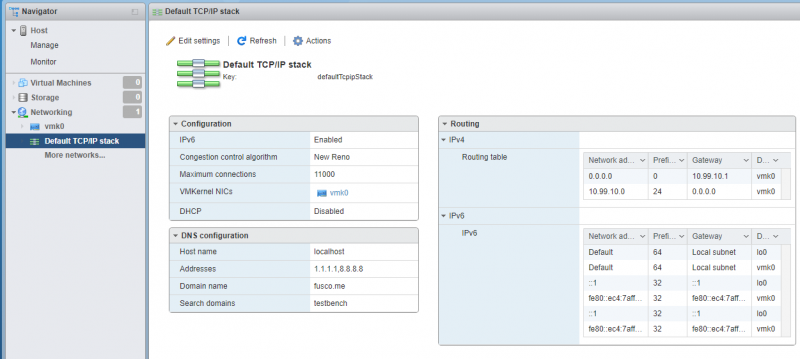
On the VMWare ESXI Home Page you will see a navigational menu on the left-hand side of the screen. Click on the Networking menu section. Each section in VMWare ESXI is sorted by tabs going across the top, these are the submenu choices. From here we are going to click on the TCP/IP Stacks tab and then click on the Default TCP/IP Stack option.
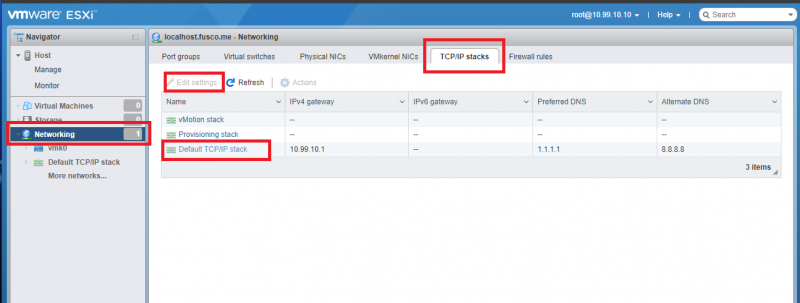
When the new window opens, we are going to click Edit Settings.
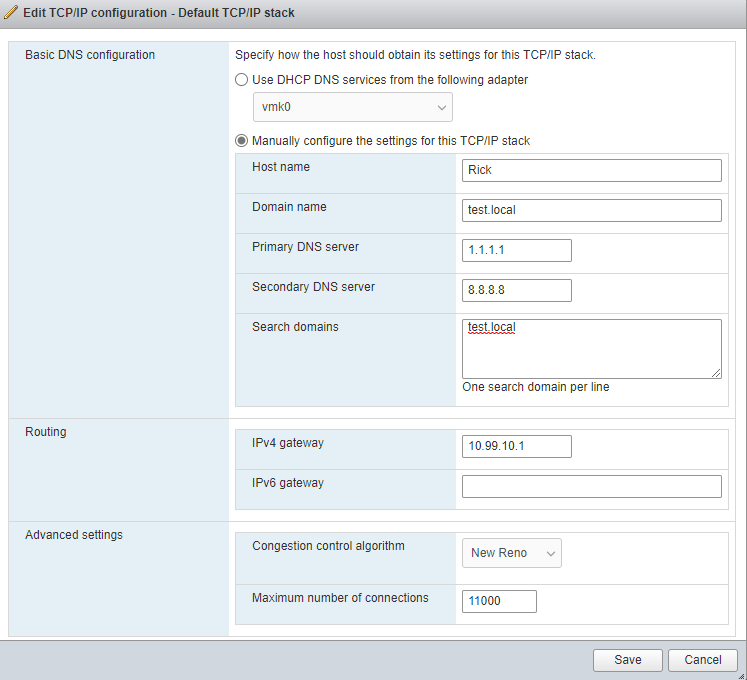
We should now be able to define our new ESXi server with some basic information. Starting with the Host Name field to name our server we named ours Rick.
We will now enter the Domain name to your local domain, we are just using test.local. If you had an actual domain you would use in VSpehere, you would enter it here as that domain. Finally, we will set our Primary and Secondary DNS servers so that our ESXi server can reach the internet and resolve addresses. We are using Cloudflare and Google, but you may want to use an internal server instead. Now we can press Save.
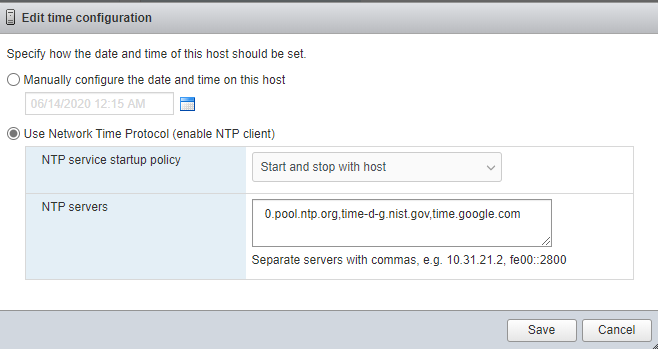
With basic identity defined, we are going to go to now go to the Manage menu. In the System tab, click Time & Date and then click Edit NTP Settings. Keeping your time accurate is extremely important in servers as if time becomes inaccurate on a system problems can arise when it tries to communicate with other systems.
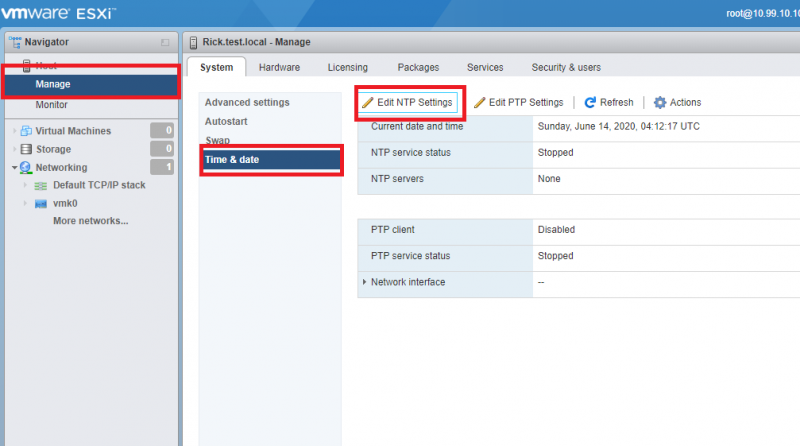
Once in the new window, we are going to click the Use Network Time Protocol (enable NTP client) radio button and change the NTP service startup policy to Start and Stop with Host. In the NTP Servers section, we then need to tell our system where to get the time from. We are using 3 different sources, 0.pool.ntp.org, time-d-g.nist.gov, and time.google.com, then press Save.
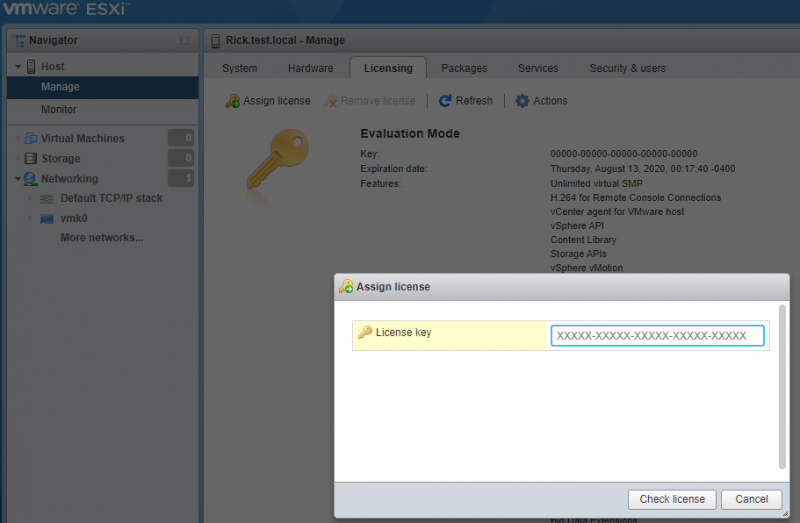
Next, we are going to input the free license key we got from VMWare when we downloaded ESXi. In the Manage menu still, Click on the Licensing tab and then click Assign License. Once in the new window, copy and paste your key and press Check License.
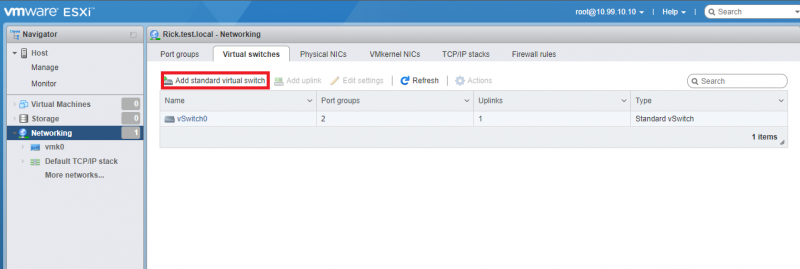
Configuring our Second Network Interface on ESXI
With the basic configuration complete, we can now configure our second network interface. Go back to the Networking menu and then click on the Virtual Switches tab. Here we are going to press Add Standard Virtual Switch.
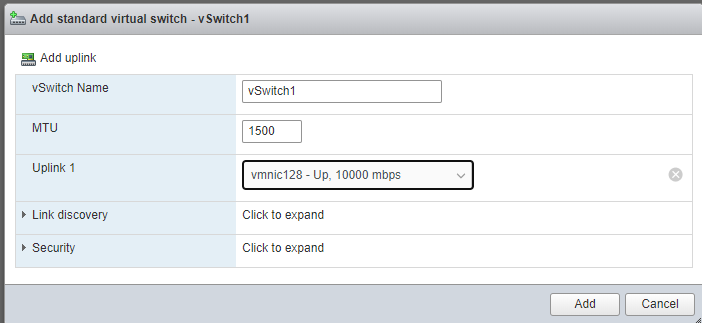
Here, we are going to name our new vSwitch vSwitch1, and select our second active network interface, and then press Add.
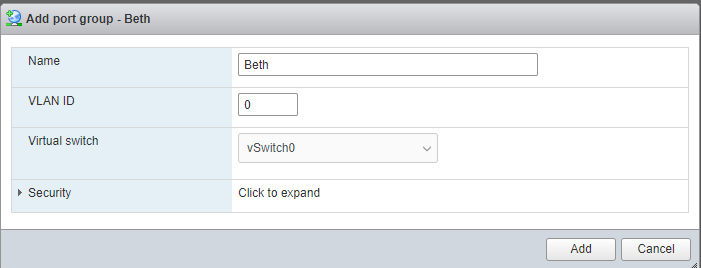
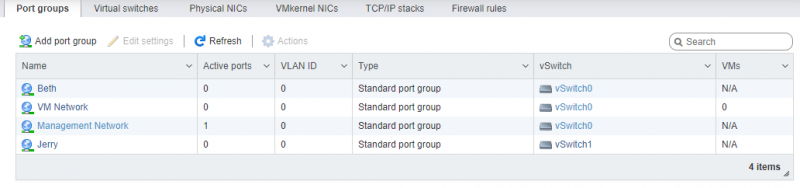
Now, go back to the Networking menu and click on Port Groups. Before we continue, its worth pointing out that It’s easy to get confused here. A vSwitch is a virtual switch, think of it literally as that, a managed layer 2 switch living inside of the hypervisor. A port group, on the other hand, is a way of logically carving up that switch into different segments. One reason you would do this is to put them into separate VLANs, much like on a physical switch. What we are doing here could be done in one vSwitch with two port groups, but we chose to do it in two to try and make it easier to visualize what is going on logically.
With that said, click on Add Port group. We are going to create one and Name it Beth and select vSwitch0, then press Add. Really, you would want to name this Port Group something more specific, like ISCSI 1 + Guest, but we are having fun with our theme. Unlike with hostnames, if an attacker got this deep into our network, obfuscation isn’t really going to help us much here.
Then we are going to then press Add Port group a second time. We are going to create this one and Name it Jerry (or ISCSI 2) and select vSwitch1, then press Add.
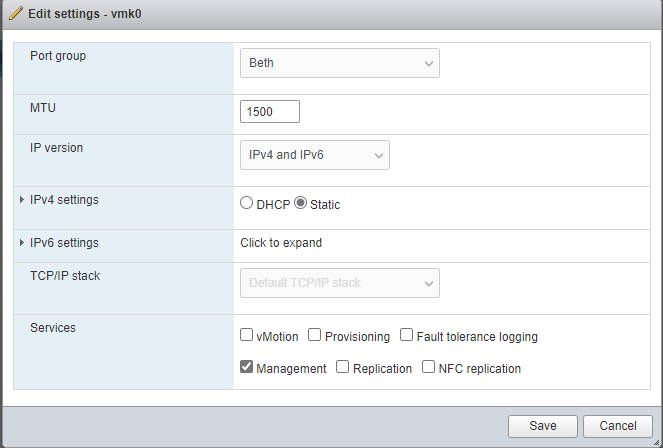
Next, go back to the Networking menu and click on VMKernel NICs. A VMKernel NIC is a special, dedicated virtual port that is used by the hypervisor for things like management and storage. Click on vmk0 Then press Edit Settings. Once here, we are going to change the Port Group from Management Network to Beth, and then press Save.
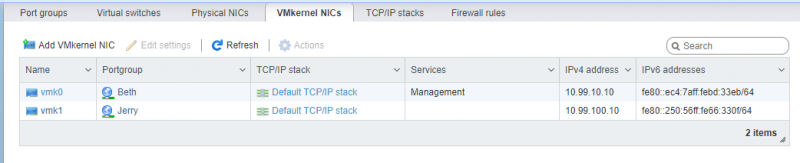
Once that is done, then press Add VMKernel NIC. Select the Jerry Port Group and expand the IPv4 Settings menu. Select Static and then in Address type 10.99.100.10 and in Subnet Mask type 255.255.255.0. Then press Create.
That is all for now, we have our networking configured, our important settings changed, and we are ready to move on to TrueNAS Core. Leave the browser tab for ESXi open as we will need to come back later.
Connecting the Two Together
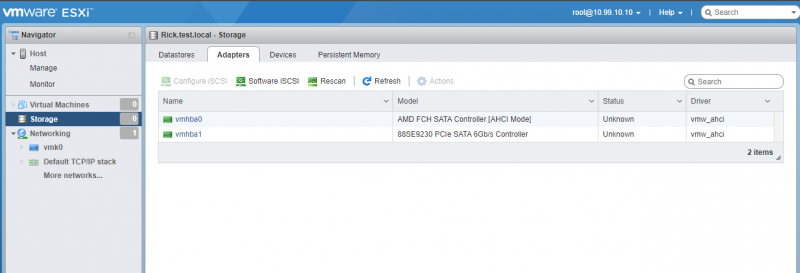
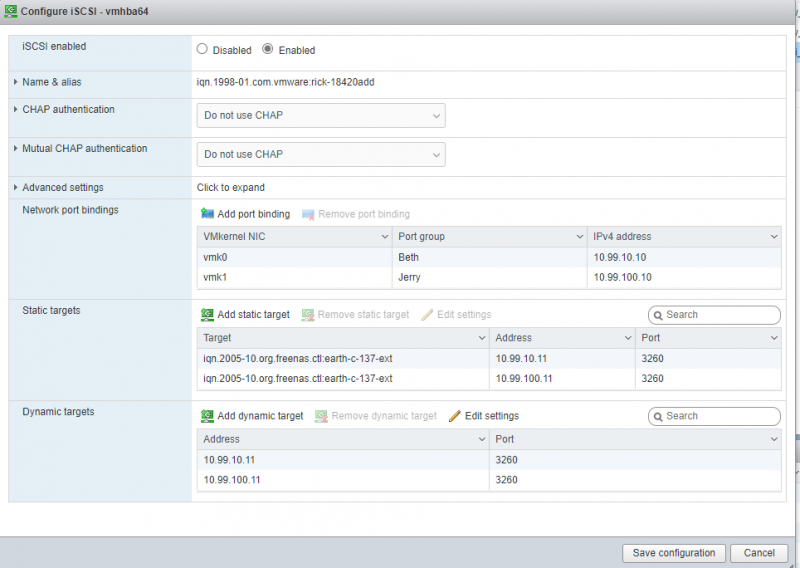
With our TrueNAS configuration now mostly done, sign back into your ESXi host and click on the Storage menu, and then the Adapters tab. Press Software iSCSI.
Once in the new menu select the Enabled radio button. In Network Port Bindings, press Add Port Binding and select vmk0, then press Add Port Binding again and select vmk1. Next, press Add Dynamic Target and type 10.99.10.11 and then again and type 10.99.100.11 Finally, press Save Configuration.
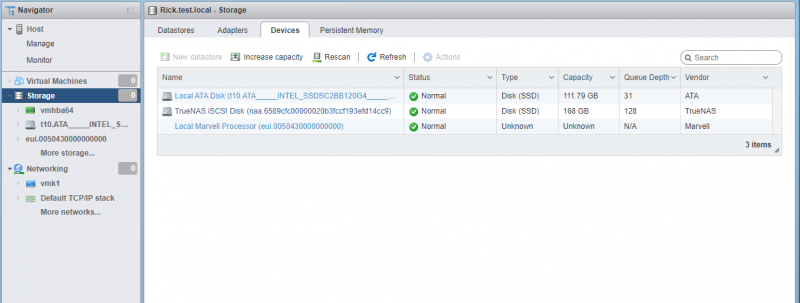
After that, we can move to the Devices tab in the Storage menu. Once there we need only to press Rescan and our TrueNAS storage device should show up. Click on the TrueNAS ISCSI Disk and press New Datastore.
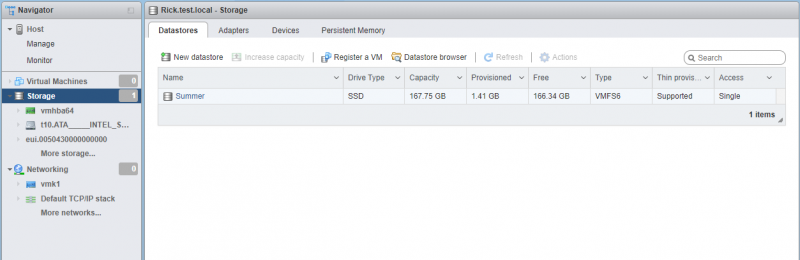
Once the new window opens up, we are going to give it a name. We are going to name ours Summer. Press Next and Then Press Finish. Finally, click on the Datastores tab and you will see your newly created datastore.
Now, let us go back to the Adapters tab and click on Software iSCSI. We can then confirm that we have automatically created static targets.
We can now press Cancel and the go back to our TrueNAS configuration browser tab to finalize a few things. Once there, click on the Sharing menu, then click Block Shares (ISCSI). Then choose the Initiators tab and click on the Three dots menu and choose Edit.
Uncheck the box that says Allow All Initators, Put a checkbox next to each of the two VMWare entries in the list, and press the arrow where it says Allowed Initiators. This will lock down the system so that you can help prevent unauthorized access.

Snapshots
Another key feature of TrueNAS is the ability to do snapshots of your data. For SMB Shares, TrueNAS’s implementation of ZFS snapshots allow us to do things like Windows Shadow copies, and in the event of a file being deleted or crypto locked, we can roll them back to a previous state.
For iSCSI like in this lab, it allows us to expose automatically scheduled snapshots of VMs running in ESXi. If one of your VMs craps out because it got a virus or was broken by a misconfiguration, you can roll back the VM to its previous state. An important thing to note: this feature will not work with the free version of ESXI, and would require either an enterprise license or an active VMUG subscription. This is because VMWare locks out the API integration that allows this to work in their free version. It is important to also note: this will use storage space.
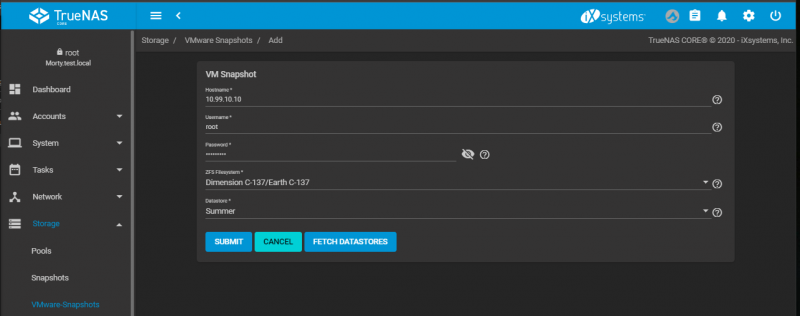
To get started, click on Storage and then click VMWare-Snapshots, once on that page press Add. Enter the IP Address of our ESXi host in the Hostname field and the credentials we created for ESXI in the Username and Password Fields. Under ZFS Filesystem select the ZVol we created earlier, and under Datastore select the Datastore we created in ESXI. Then press Submit.
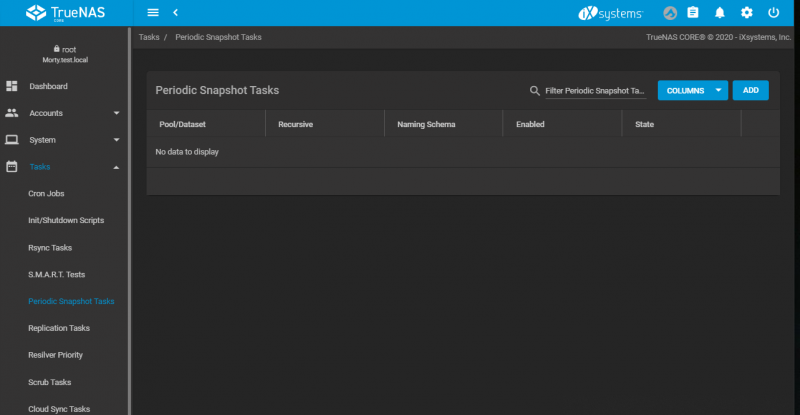
With that being done, we can now create our scheduled task for Snapshotting. Click on the Tasks menu and then click Periodic Snapshot Tasks and press ADD.
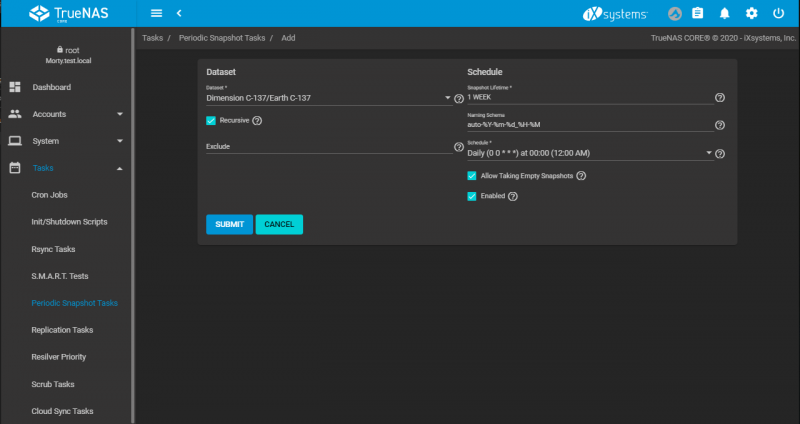
Select the ZVol we created earlier under the Dataset section. Since we have limited space in our Zpool, we are going to change the Snapshot Lifetime to 1 week, but leave the schedule set to daily at midnight. You can leave everything else at default, and then press Submit.
Final Words
With all of the efforts we put forth into making this a reality, we hope it will help many of you out there, both new and seasoned veterans of the IT world. Our goal here was to illustrate that even with budget servers and switches and free open source software, we can build a highly robust miniature datacenter.
TrueNAS Core took a lot of time to set up and configure, and we feel the end result is worth it. We stuck with VMware because it truly is the gold standard in the Enterprise. Love it or hate it, our green IT friends really should be familiar with how it works. As far as the Mikrotik, for the price, it is a pretty nifty gadget, and this was an interesting use case to see it flex its muscles. I am convinced for a home lab it is a must-have to get people going and learning. I am still on the fence with using it in a production environment with its lack of LLDP in SwOS, RouterOS’s clunky UI, and its power budget restrictions.
All that being said, we hope you had fun because that is what homelabbing is all about!


If you want trouble in your network use “.local”
Thank you so much! This is by far the best guide for beginners I’ve been searching for months.
Are there plans to extend this with a Proxmox setup instead of VMware?
Hi Edward. Yes. I am actually working on a version of this type of content using Proxmox :)
1. Use a real domain name you own, not a made up .local one. Using non-valid tld’s will on create headaches.
2. Why ISCSI over NFS?
Hi Chris,
NFS is a file sharing protocol (layer 7, Application Layer) where as ISCSI is a block storage protocol (layer 4, transport layer). It is always better from a performance perspective to do eliminate as much overhead as possible. Using a block storage protocol like ISCSI or FiberChannel at a lower layer in the OSI model does that. Additionally, those protocols have more error handling and data-integrity checks built in than NFS does, which makes the better in terms of the santctity of your data as well.
Why the second link on the 100 VLAN? Necessary? Redundancy? Just for fun?
Second question: “Creating a ZVOL in the original way we outlined above, TrueNAS will always think the pool is 80% full.” Does this mean to imply never no more than 80% full? Or does TrueNAS always show the pool to be at 80% usage regardless of actual utilization?
I would personally like to see more using ISCSI. Do all modern Intel NICs support ISCSI?
Thank you for this great three part write up!
Could you expand this series to have two ESXI servers, single TrueNAS server, and use of vMotion?
Would you need to change this setup from iSCSI to NFS so both ESXI servers use a single shared location for vMotion to work?
hi Bruce. That is out of scope for now, but I certainly could do a more detailed VMWare guide if there is enough interest.
Bruce Wentler, I have three identical esxi host and one iscsi shared storage and vMotion etc works.
Ahm, AFAIK NFS instead of iSCSI is needed when you want to build a Cluster of some hosts based on a vCenter using vmotion and stuff.
No, you simply open iSCSI from all ESXs to the one iSCSI storage. ESX will use its own distributed file system on this iSCSI storage and handle multiple host access.
At least this is how I understand our setup of 3 ESX hosts to one NetApp storage with one LUN offered over iSCSI. Someone correct me if I’m wrong.
This is a great write up! I would love to see these home lab series become something that is on going so we could integrate things like vmotion, more redundancy and then add some common home workloads!
Now for my question. Where are the snapshots supposed to show up? I am not seeing them in ESXI
Excellent write up, and timely since I have already collected much of the same gear to assemble in much the same way.
One thing I don’t quite understand is where each of the OS’s are installed in the stack. The article mentions that it is easy to install an OS (I concur) and points to excellent instructions… but there is no discussion of the boot media configuration, nor of which OS is running on bare metal.
I assume ESXi is acting in its typical hypervisor role, and that TrueNAS core is installed as a VM within it… (although you mention the TrueNAS OS install first..) but how are the boot media configured? I assume they are separate disks from the NAS pool. Can they be partitions of a secondary RAID of SSDs configured by the bios on the motherboards SATA ports? Or ought each OS be installed on a dedicated drive?
Ahhh… I see.
This write up uses separate hardware for hypervisor and storage, with a core switch and iscsi between them for interconnection.
I was planning to install TrueNAS as a VM within esxi, with pci passthrough from an HBA for the nas drives and motherboard sata ports for both boot drives. Sounds like many of the same concepts come into play, but it may be tricky for me to sift out what applies and what does not.
Is ESXi the host or is ESXi installed within FreeNAS?
Esxi has its own hardware and FreeNas as well. They are not the same host.
Sorry I didn’t reply in a timely way.
In my setup, esxi runs as a bare metal hypervisor on my supermicro server, while TrueNAS runs as a VM within esxi… both on the same hardware.
I did this for several reasons:
-TrueNAS only offered BSD-based virtual machines at the time of build
-I needed hardware pass-through for graphics card (Plex’s hardware transcoding,) USB (UPS management software and a USB Print server)… which I couldn’t figure out in TrueNAS virtualization
Comments are closed.