
External drives are a vital part of my day-to-day technical work, and the faster they operate the faster I can complete my work. Today we are looking at a trio of USB enclosures sent to us from Sabrent that offer M.2 NVMe to USB connectivity. The USB interface is operating at 10 Gbps, so while it will be fast it will still bottleneck a PCIe Gen 3 SSD.
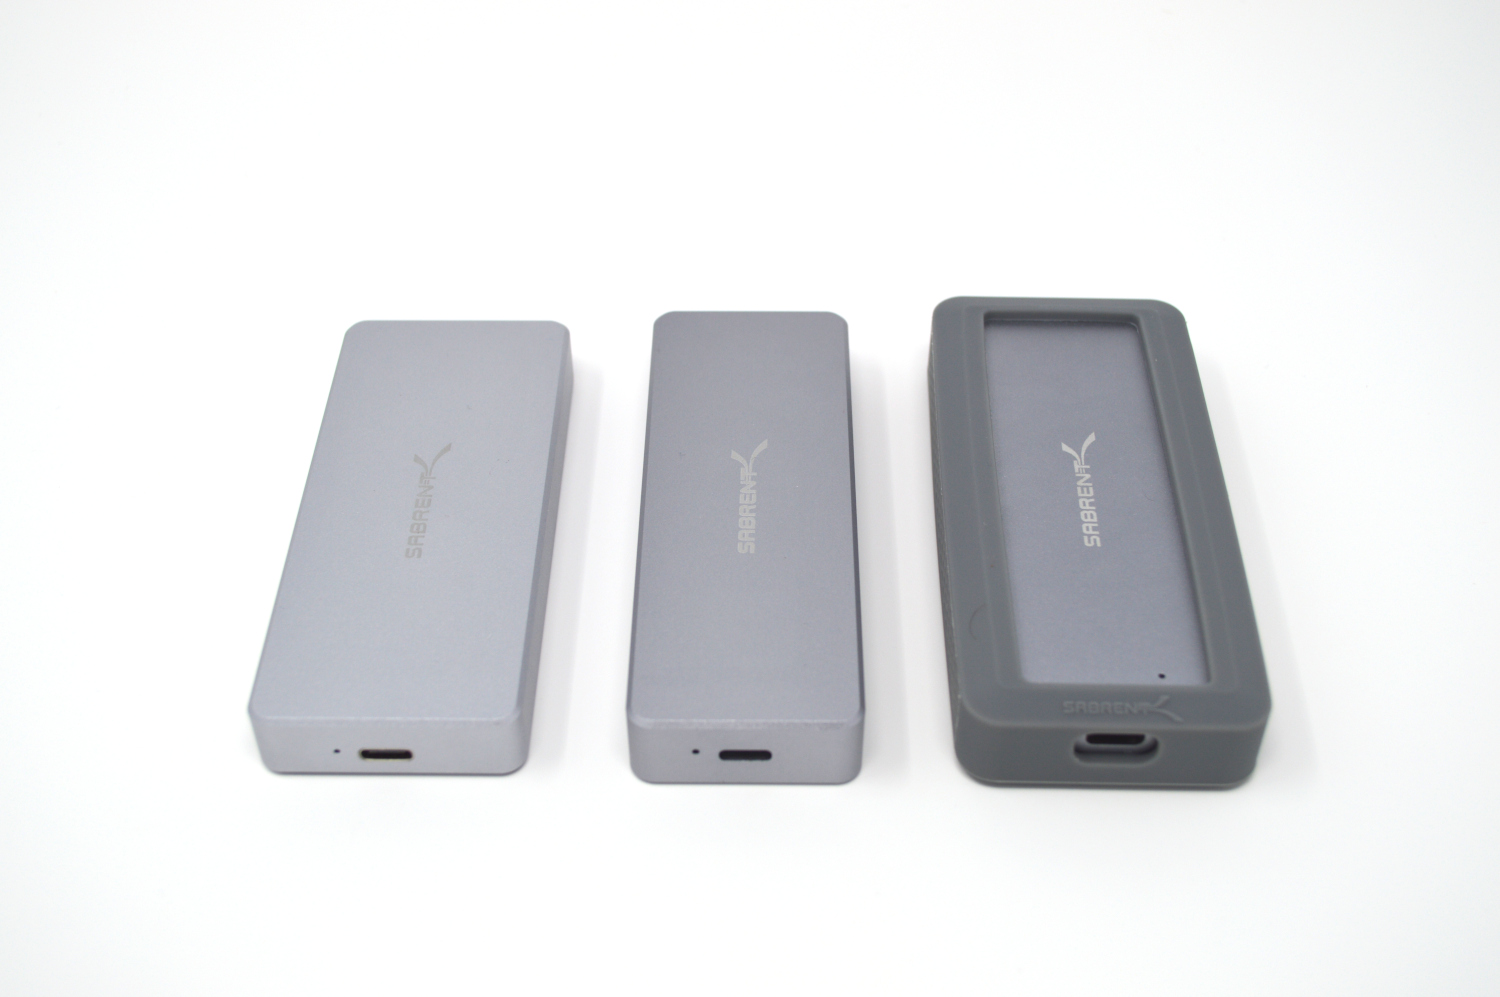
Sabrent EC-NVME: The normal one
Perhaps the most basic of the enclosures, the EC-NVME has no special extra features. Instead, it does exactly what it says on the box – converts a M.2 NVMe drive to a USB 10Gbps interface.
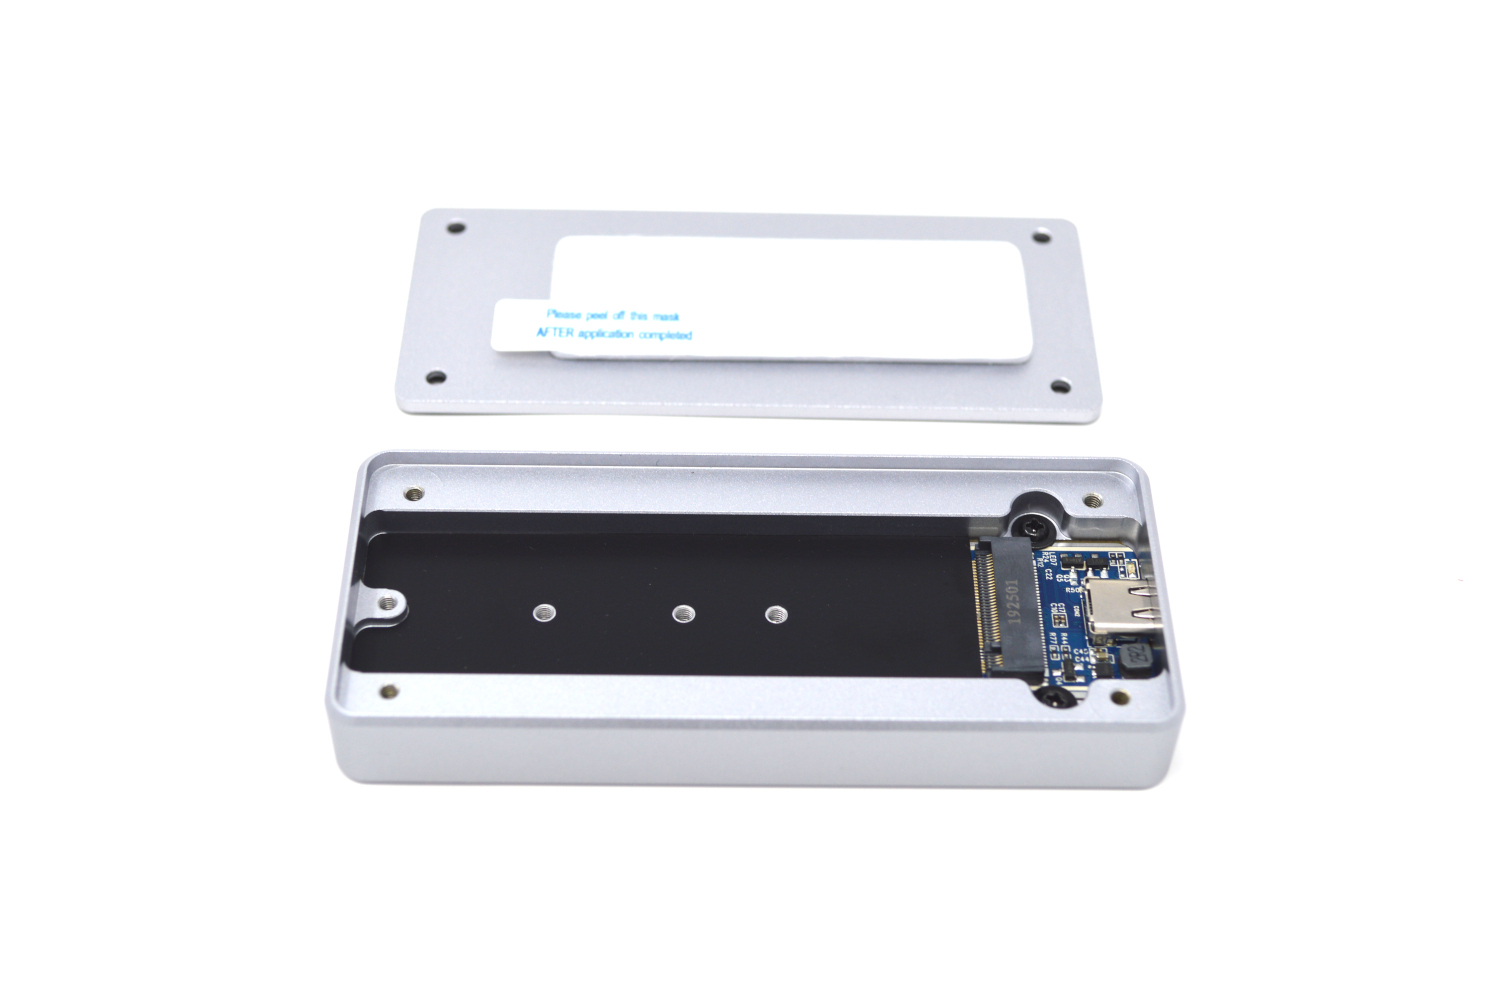
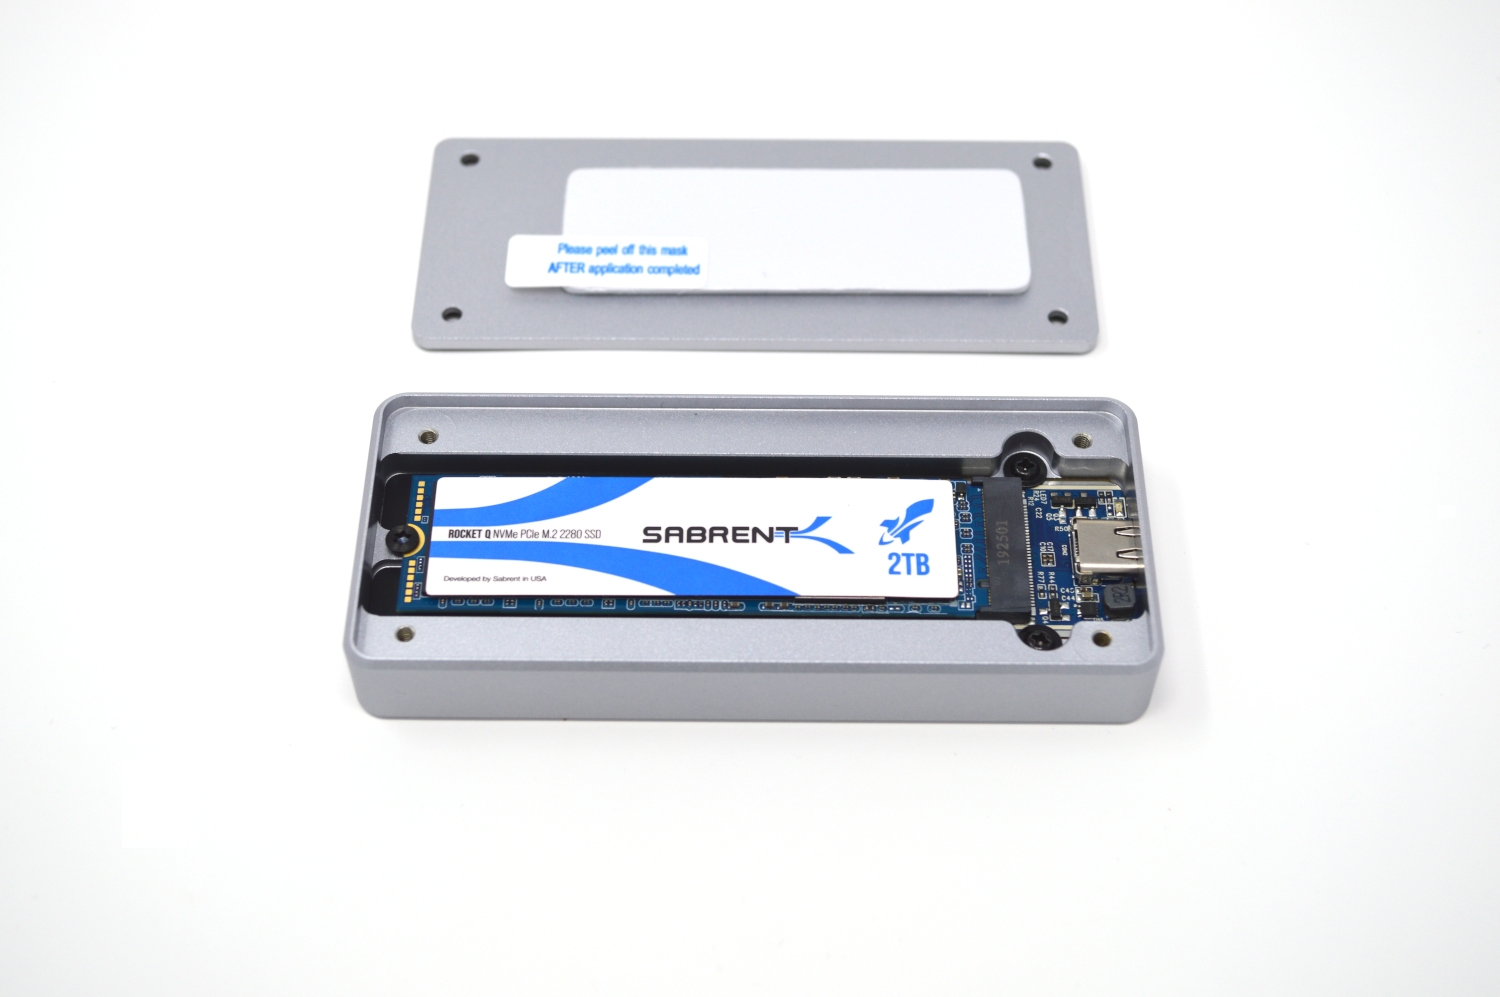
Inside the aluminum chassis, there are some provisions for cooling SSDs. You can utilize M.2 2230 (30mm), M.2 2242 (42mm), M.2 2260 (60mm), or M.2 2280 (80mm) NVMe SSDs in this enclosure. There are a total of four screws to open the chassis and another screw to hold the NVMe SSD in place.
Sabrent EC-TFNB: The tool-free one
My personal favorite among the trio is the Sabrent EC-TFNB. This is a tool-free variant of the enclosure. This is the version of the enclosure that stays in my toolkit, allowing quick and easy access to any M.2 NVMe drive without having to pull out the screwdriver.
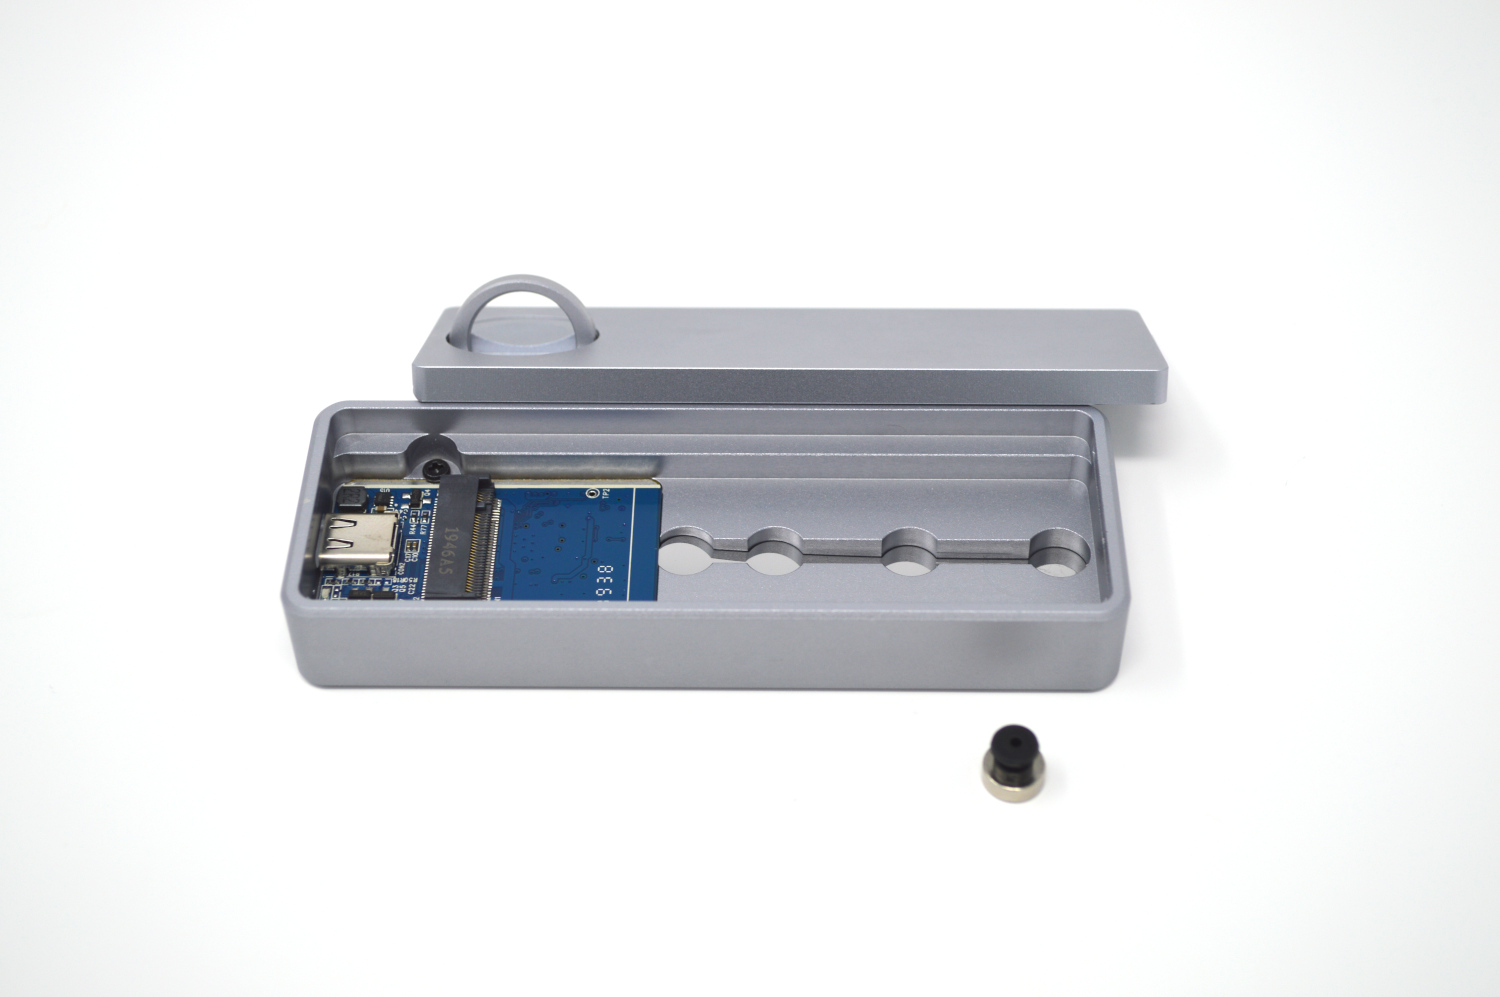
Using a solution like this is actually a great way to utilize an enclosure if you have to service many M.2 SSDs. For example, if you are a field technician and need to constantly clone or swap SSDs on-site, this is a great tool since you can quickly install and remove a SSD.
Sabrent EC-WPNE: The waterproof one
This variant is essentially the basic EC-NVME, but with IP67 waterproofing added to the mix as well as a rubber bumper to aid in drop resistance.
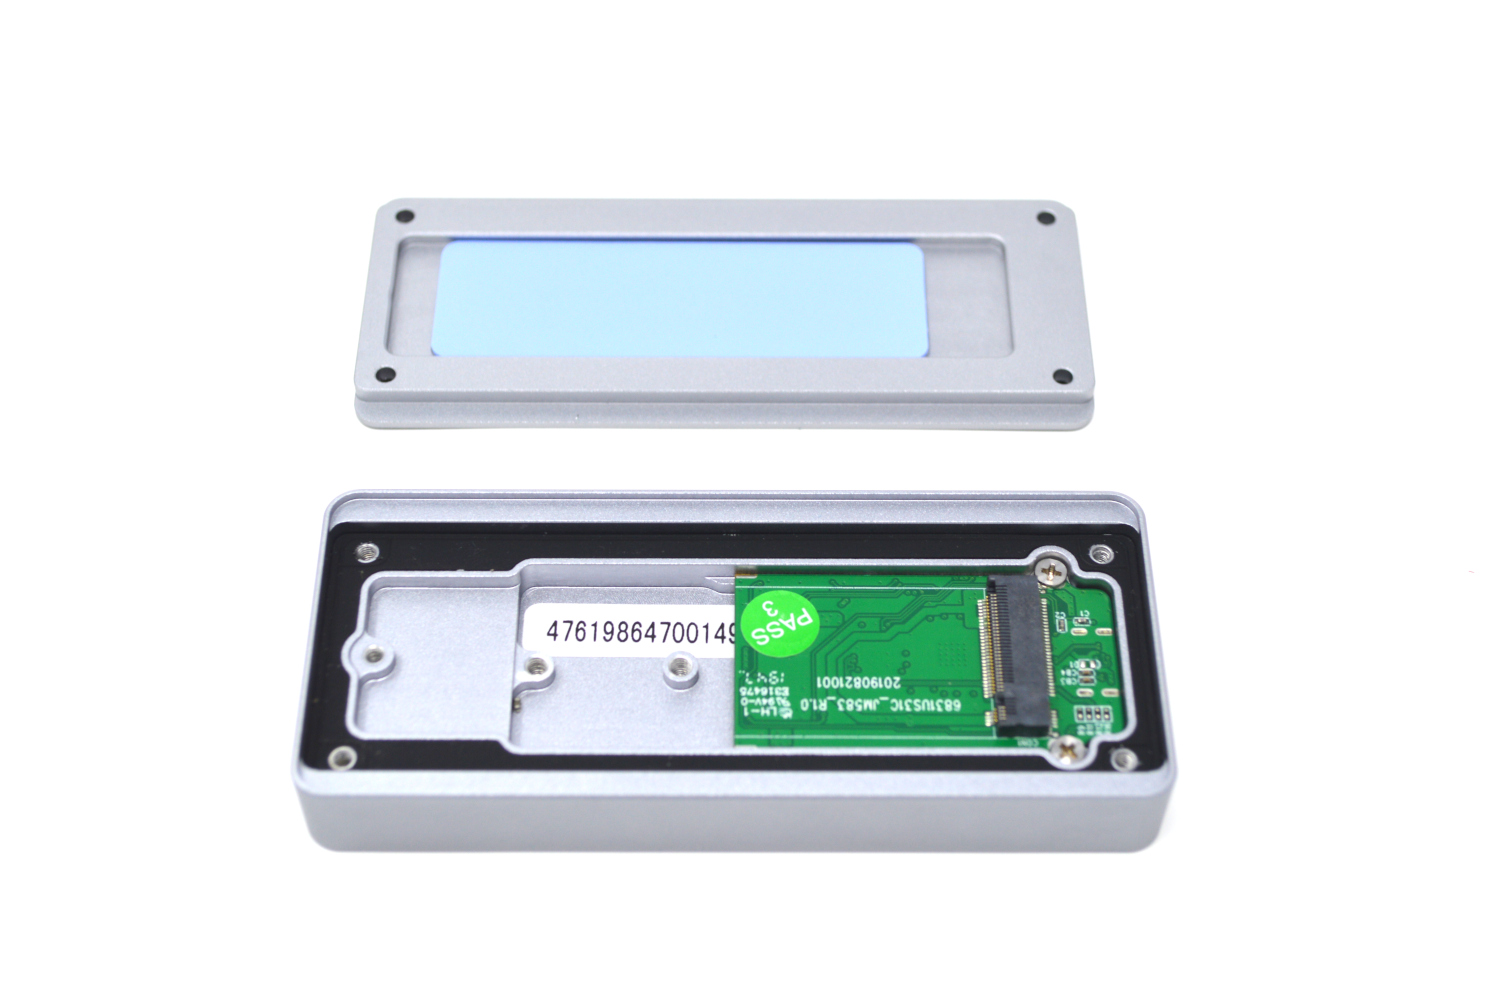
If you are on a job site with a lot of moisture or need a bit more protection, then this is a good option since it will help keep your drive dry. If you do not encounter much moisture, then this is probably overkill.
Common Features
All three enclosures are built from an aluminum housing that also serves as a heatsink to whatever NVMe drive is installed. This can be a bit of a double-edged sword, as we will discover later on.
Additionally, all three enclosures are based on the JMicron JMS583 controller. This controller converts a PCIe Gen 3 x2 link to 10 Gbps USB.
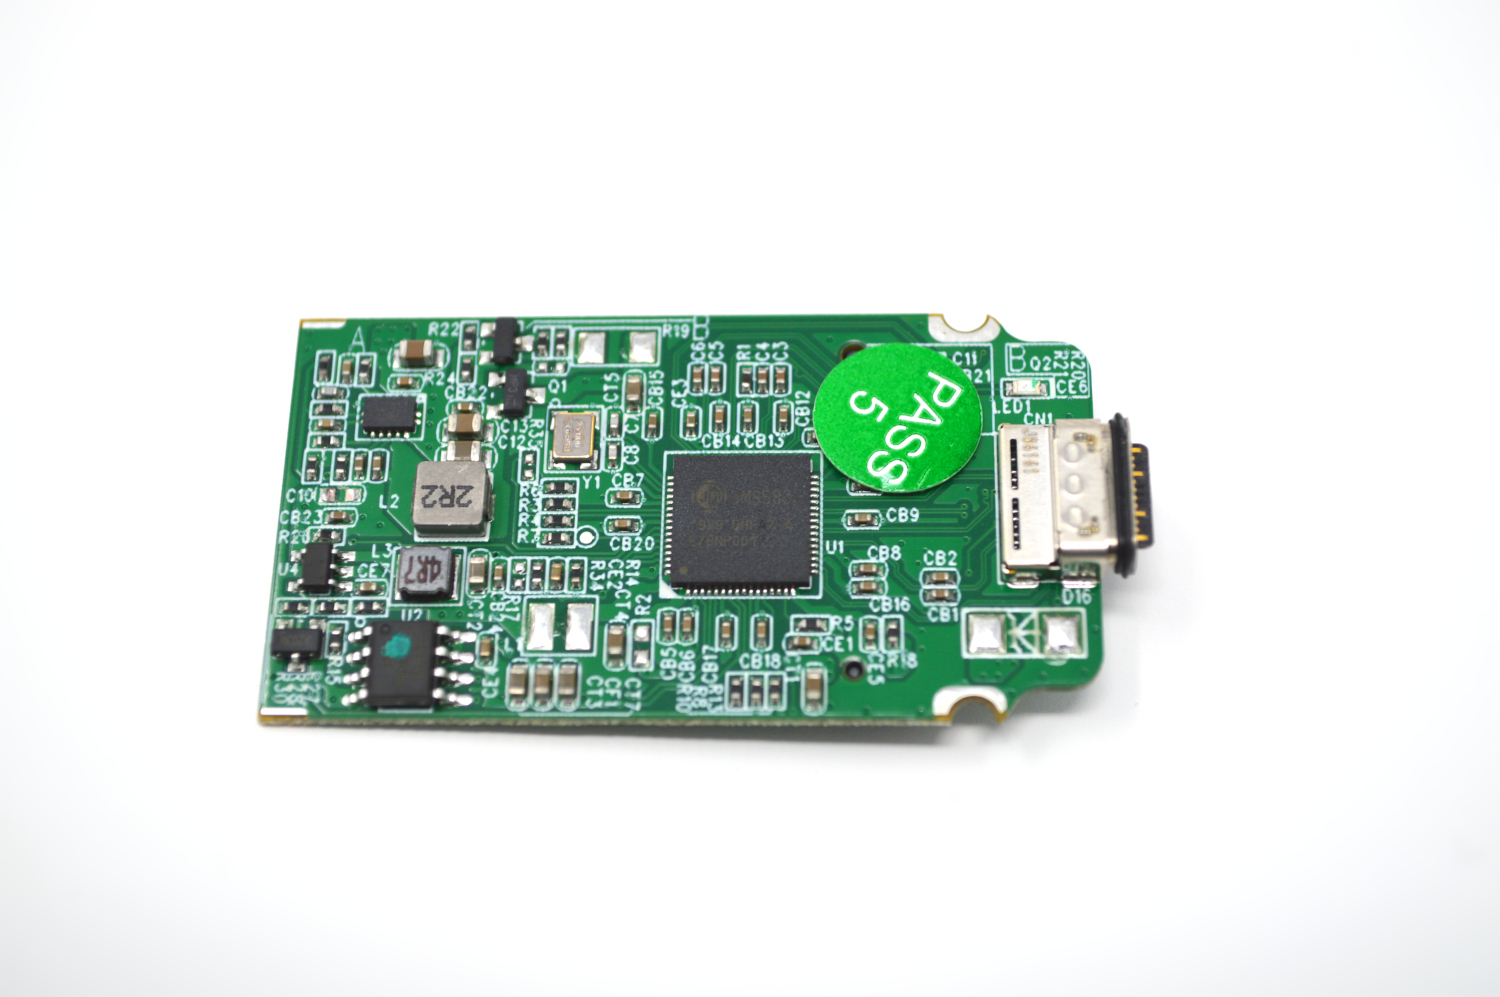
Since all three enclosures are based on the same controller, performance with them should all be identical. This leaves only their other features to differentiate between them.
The contents of the box for each enclosure is similar, but with some slight variations. The tool-free version is the simplest, containing only the enclosures and two USB cables; one type-A to C, and one type-C to C.
The other two enclosures come with the tool necessary to open up the enclosures and install their drives. The waterproof EC-WPNE comes with standard Phillips head screws, and a small screwdriver and the two USB cables.
The EC-NVME unit seems to be intended for more permanent drive installation, as it comes with Torx T8 screws and the appropriate driver for that; most folks likely do not carry around a T8 tip driver with them, so whatever is put into the EC-NVME enclosure will likely stay there. Curiously, this enclosure comes with a single USB type-A to type-C cable, but an adapter tip is bundled and attached to the cable to allow it to operate with type-C on both ends.
First Impressions
All three enclosures make a positive first impression. Their aluminum construction gives them a bit of weight that makes them feel sturdy. They are still relatively slim since the M.2 format drives they are designed to hold are quite small. The waterproof EC-WPNE is the bulkiest, with its bumper guard installed. There is some slight weight variation between the three, but the heaviest is still below 300g; as a result, they feel solid in the hand but still do not add much weight when dropped in a bag. The lid on the tool-free version rattles a little bit when shaken, but that goes away when a drive is installed. Other than that all three feel like they are just a solid block of aluminum.
All three enclosures include a thick thermal pad on their removable underside panel to facilitate better heat transfer to the exterior of the enclosure.
SSD Installation
For the Sabrent EC-NVME and EC-WPNE, four screws on the underside of the enclosure come out and then grant access to the inside. From there, installing the M.2 drive is the same as anywhere else; slide it into the socket and then screw it down. Once done, reattach the underside panel.
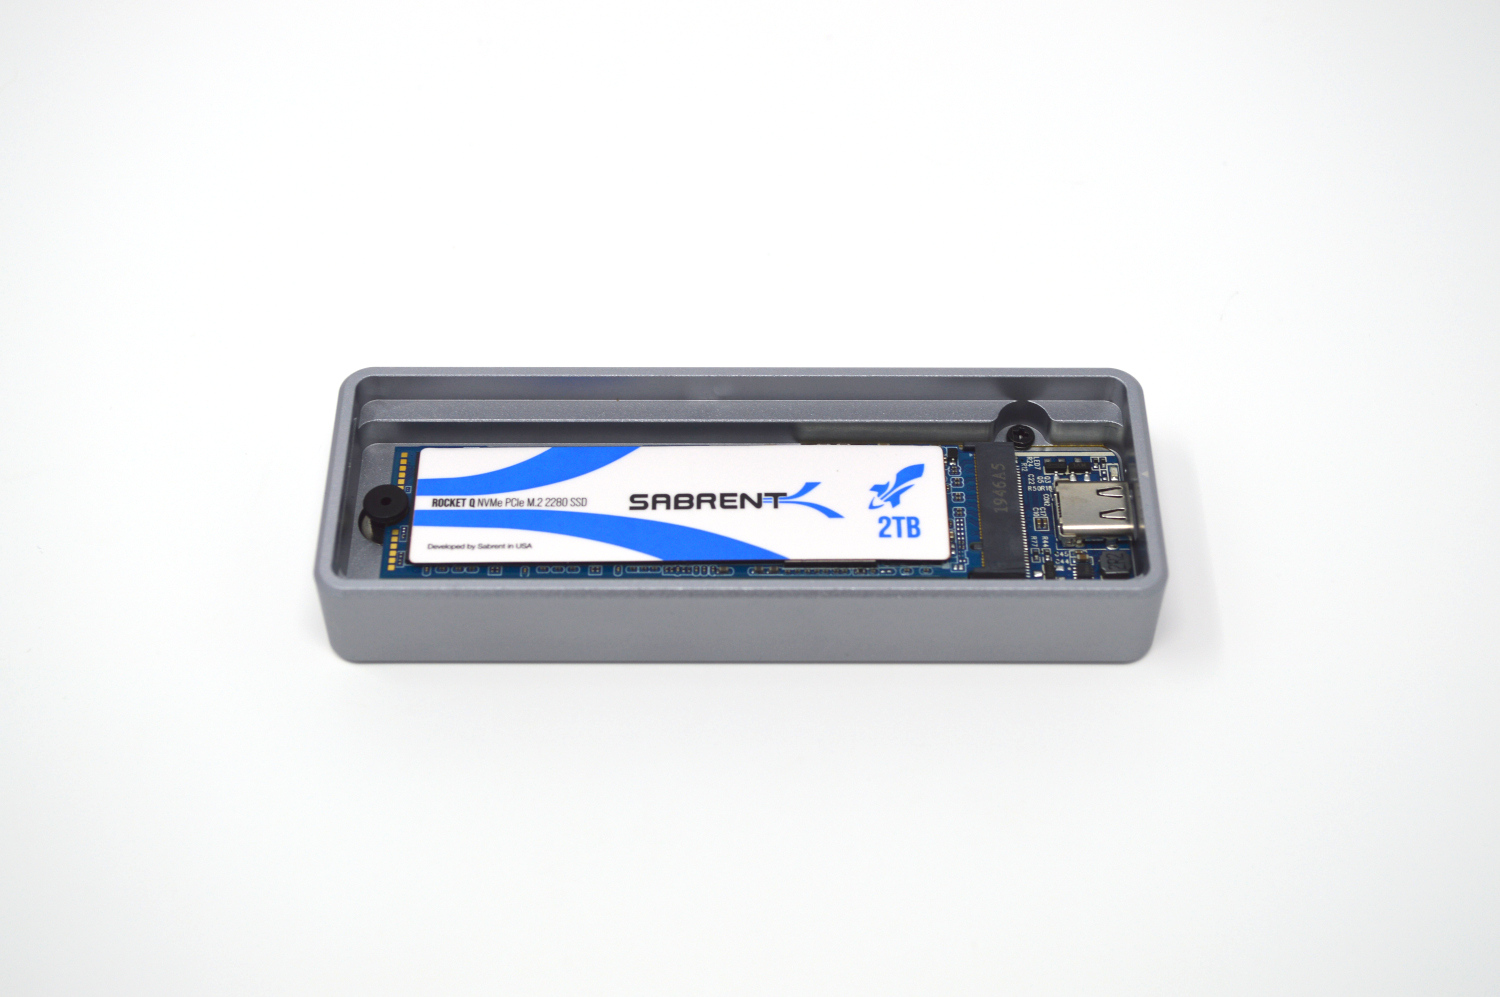
The EC-TFNB is slightly different, which makes sense given the tool-free design. The bottom panel is removed via a twist latch mechanism, and rather than screw the M.2 SSD down a magnetic retention mechanism is used. This is very slick.
In all cases, once our test drive is installed it is time to plug them in and see how things fare.
Testing
We are using the following configuration for this test:
- Motherboard: ASUS PRIME X570-P
- CPU: AMD Ryzen 5 3600 (6C/12T)
- RAM: 2x 16GB DDR4-3200 UDIMMs
- Boot SSD: Samsung 840 Pro 256GB
- Test SSD: Sabrent Rocket Q 2TB
The enclosures were tested when attached to one of the Prime X570-P’s USB 3.1 Gen 2 ports. The SSD used in our testing was recently reviewed here on STH as well, so take a look at that review for a better idea of the capabilities of that drive when installed natively in the same system.
CrystalDiskInfo was ran just to see what information was passed through the USB interface.
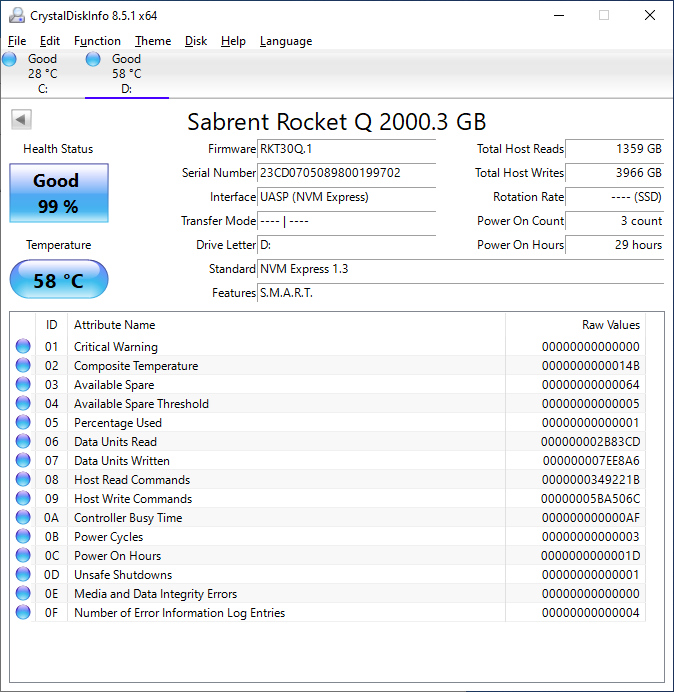
While CrystalDiskInfo was slightly confused about the transfer mode, it was still able to access the S.M.A.R.T. data, as well as the total host reads and writes.
We ran the enclosures through their paces in a small subset of our normal SSD review suite. We will not be listing individual benchmark results for all three enclosures, since they all performed identically. This makes sense given the common controller design they all share. First was CrystalDiskMark:
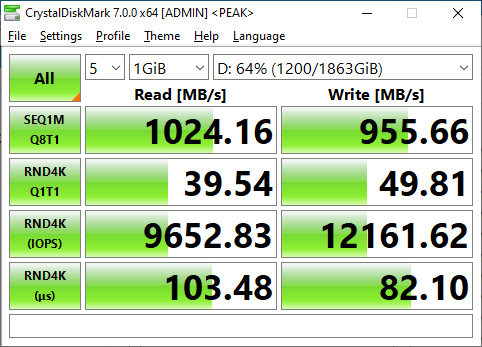
As expected, the 10Gbps interface limits the overall performance potential of our Sabrent 2TB drive. In addition to the sequential bandwidth being limited to around 1000 MB/s, the extra latency introduced by the JMS583 controller and USB interface also has an impact on the 4K random results. With that said, carrying around 1000 MB/s in your pocket is nothing to sneeze at, and is far faster than any mechanical drive-based external storage.
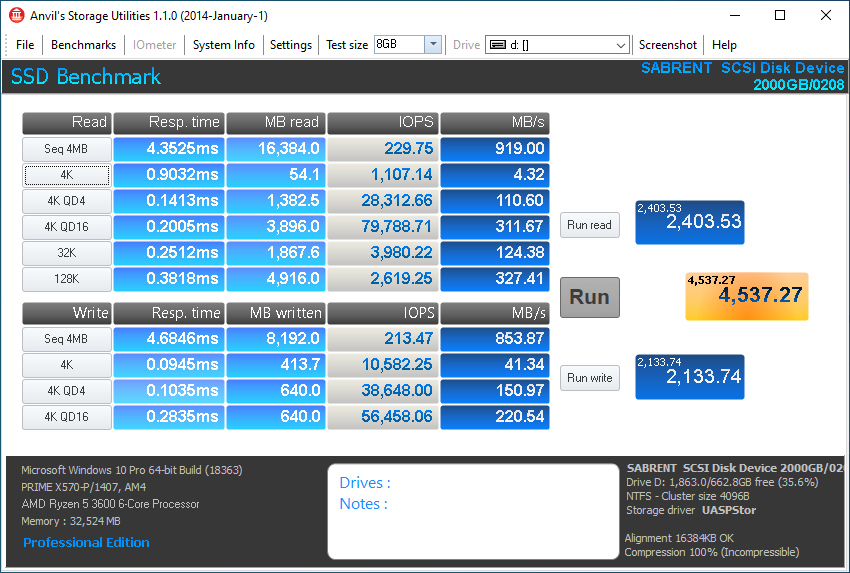
Anvil has a very similar result to CrystalDiskMark, with the sequential transfer rates getting close to saturating the 10Gbps USB link, and the added latency imposing a penalty to random 4K results as well.
While both tests reveal reduced performance compared to operating the SSD without using the enclosure, we knew that going in. Overall though, performance is still stellar for an external enclosure and should be the fastest form of external storage available other than something attached via Thunderbolt. This new generation of 10Gbps external SSDs performs much better than previous generations. We saw that with our Crucial 1TB X8 USB 3.2 Gen2 SSD Review where the capacity was fixed.
Thermals
Speaking of shining, it is time to discuss temperature. Anyone with experience with M.2 NVMe SSDs knows they can get quite hot. As mentioned earlier, the aluminum design of these enclosures allows them to act as a heatsink for any drive installed. There is one drawback to that design; the enclosures get very hot. Installed normally in the motherboard, the Rocket Q 2TB SSD got up to 64C in our testing. When installed in the enclosure, the SSD actually ran a little bit cooler than that, but the exterior of the enclosure made it up to 61C as measured by a handheld IR thermometer. That is plenty hot enough that holding the enclosure during operation was uncomfortable. The waterproof EC-WPNE gets bonus points here though, since the rubber bumper gives you something to hold onto that is not burning hot.
Waterproofing
I lack the means to empirically test the IP67 waterproofing rating on the Sabrent EC-WPNE, but it held up to casual testing. With the drive installed, I dunked the drive in a glass of water as well as ran it under a faucet. Neither of which I would normally subject a drive to. Still, neither case had any negative effects.
Conclusion
Fast external 10Gbps storage based on standard M.2 SSDs is important. It allows you to directly connect high-capacity and high-performance storage directly to devices. For example, one could use this on an 8K or even the new BlackMagicDesign Ursa 12K cinema camera with a high-capacity and high-quality SSD and then directly connect it to a server or workstation to either edit on or ingest quickly. Tool-less designs can also aid in making the drives ideal for field service work. Aside from our HPE ProLiant MicroServer Gen10 Plus Ultimate Customization Guide we also have Project TinyMiniMicro where these types of M.2 SSDs can be used to greatly expand compute devices that do not have enough local storage.
Both the EC-NVME and EC-TFNB are priced at around $45, while the waterproof EC-WPNE commands a small premium at $60. Of the three, my favorite is definitely the tool-free version (Sabrent EC-TFNB), and it has a permanent place in my technician’s bag. If you are in the market for external storage and, like me, previously always purchased mechanical drives, it may be time to consider faster and more rugged SSD drives, and these Sabrent enclosures get a nod of approval from me.


I have 2 enclosures of the EC-NVME model, very happy with then, solid metal construction and just works with the drives that I put in them, some random Samsung NVME SSD’s that I had laying around (SM961 and PM961 which I think are the OEM version of the 960 models).
Be careful mentioning the cameras, theoretically they could work based off their performance.
However,
I’ve got the Black Magic Pocket 6K and it does not work with it. I’m assuming it’s due to a lack of power being outputted from the USB C port to run the drive at data speeds required for 6K 50FPS RAW
My understanding is that the JMS583 behaves differently depending on which version of the firmware was installed. In particular, early versions had buggy UAS implementations and many firmware versions didn’t work well with Linux.
Any chance of testing these on something other than Windows for compatibility? It would also be nice to report the exact firmware version that came installed and whether updates are available.
Eric,
I’ve opened up the tool-free version since I have it handy on me, and it’s running the A2 variant of the JMS583 controller. I’ll be honest, I don’t know how to check the firmware, but I understand that most of the fixes to issues encountered with the JMS583 were implemented in the A2 revision.
I picked up their SB-1TB-PRO drive which also uses the JMS583 controller and I’ve had terrible compatibility with it even after firmware updates. It only works properly on 1 of my 3 computers that support USB 3 Gen 2. On the other two, the drive locks up constantly during writes. I’ve been talking to their support but have not gotten anywhere with them yet.
I’m glad to see that at least some of them in the wild actually work.
I have 2 Jmicron JMS583 based SSD enclosure. They both the original version of the chipset, even though they were purchased new only about a month back.
1) cables are critical. the cables that came with the unit are much less stable and slower than the top quality certified 10g cables that I purchased separately or those that came with my Samsung T5 portable SSD.
2) Firmware, while helpful, didn’t fix all my issues
3) using motherboard based USBC 3.1G2 port was stable in situations where my case mounted port was not. This could point to the (fractal designs define6 C) case, but none of my other devices had issues with the case front port, so I write this up as more cable sensitivity.
Lookout for the JMS A-2 chipsets, they are supposedly much better.
Comments are closed.