
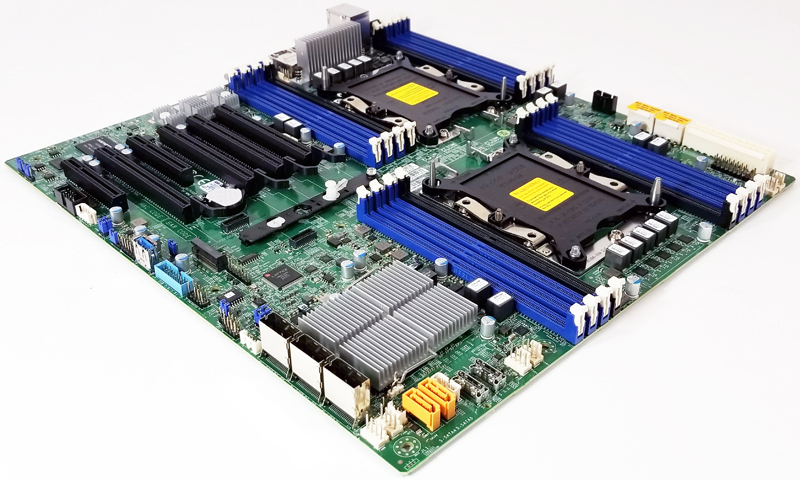
The Supermicro X11DPi-NT is a dual socket Intel Xeon Scalable motherboard that has everything onboard to be a solid storage platform. This is also the first dual socket motherboard we are reviewing utilizing the Intel C622 PCH. You can read more details about this in STH’s Intel SP Lewisburg PCH Options Overview. One of the primary advantages is that it has built-in Intel 10GbE which immediately adds value at the platform level over previous generations.
Before we get too far into the review, we expect list pricing in the $560 range which is about what we would expect for a motherboard with this level of features. The Supermicro X11DPi-NT is a platform designed to expose many high-end features rather than saving every last penny for a minimal configuration. As you will see in this review, the platform is a major evolution compared to what was on the market only a few months ago.
Supermicro X11DPi-NT Specifications
Here is the spec table for the Supermicro X11DPi-NT E-ATX motherboard:
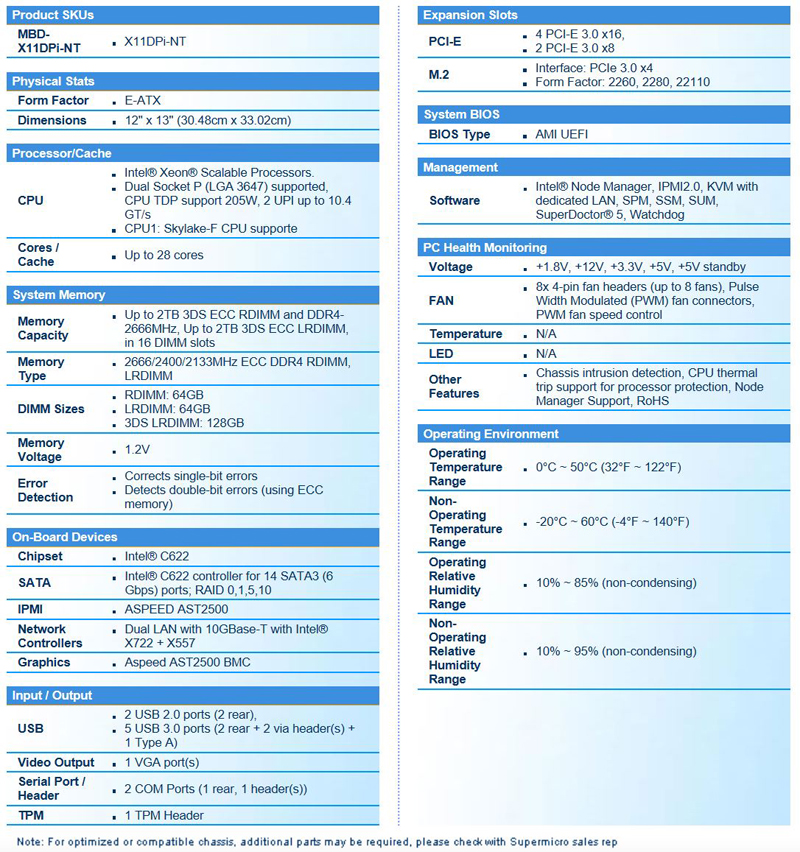
Here are a few of the highlights:
- Intel Xeon Scalable Processors, Dual Socket P (LGA 3647) supported, CPU TDP support 205W, 2 UPI up to 10.4 GT/s, CPU1: Skylake-F CPU supported
- Intel C622
- Up to 2TB 3DS ECC RDIMM and DDR4-2666MHz, Up to 2TB 3DS ECC LRDIMM, in 16 DIMM slots
- 4 PCI-E 3.0 x16,
- 2 PCI-E 3.0 x8
- M.2 Interface: PCIe 3.0 x4
- M.2 Form Factor: 2260, 2280, 22110,
- 2 PCI-E 3.0 NVMExpress x4 Internal Port(s)
- 1 VGA port(s)
- Intel C622 controller for 14 SATA3 (6 Gbps) ports; RAID 0,1,5,10
- Dual LAN with 10GBase-T with Intel X722 + X557
Test Configuration
Our basic test configuration for this motherboard:
- Motherboard: Supermicro X11DPi-NT
- CPU: 2x Intel Xeon Silver 4108 – 8 Core/ 16 Thread
- RAM: 12x 16GB DDR4-2400 RDIMMs low profile (Micron)
- SSD: OCZ RD400
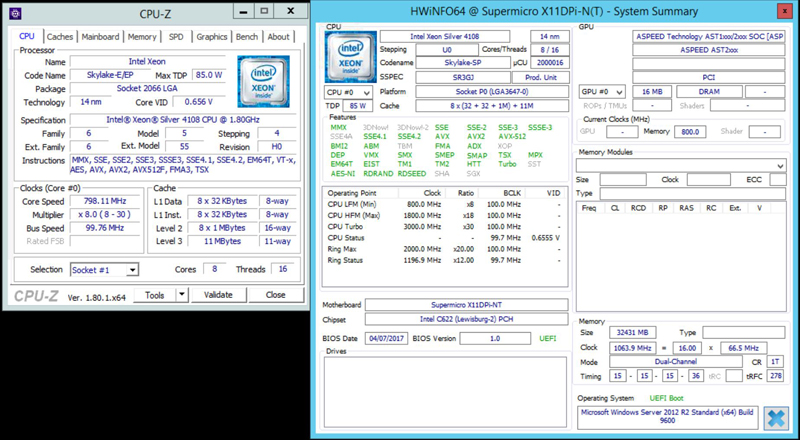
Our test setup will be running a pair of Intel Xeon Silver 4108 processors. These are eight core, 16 thread CPUs. Speed is 1.8 GHz, but they do Turbo up to 3 GHz which is a nice boost in speed. The Silver 4108 processors with an 85W TDP run fairly cool which makes them perfect for 1U and 2U servers.
The Supermicro X11DPi-NT is rated to cover processors up to 205W for the first iteration of the Intel Xeon Scalable family. We are using the Intel Xeon Silver 4108 as they provide a huge boost to performance over the Intel Xeon Bronze line at a relatively low price premium. Although the TDP is 85W, they sip power making the Intel Xeon Silver 4108 a solid choice for this motherboard.
Supermicro X11DPi-NT Overview
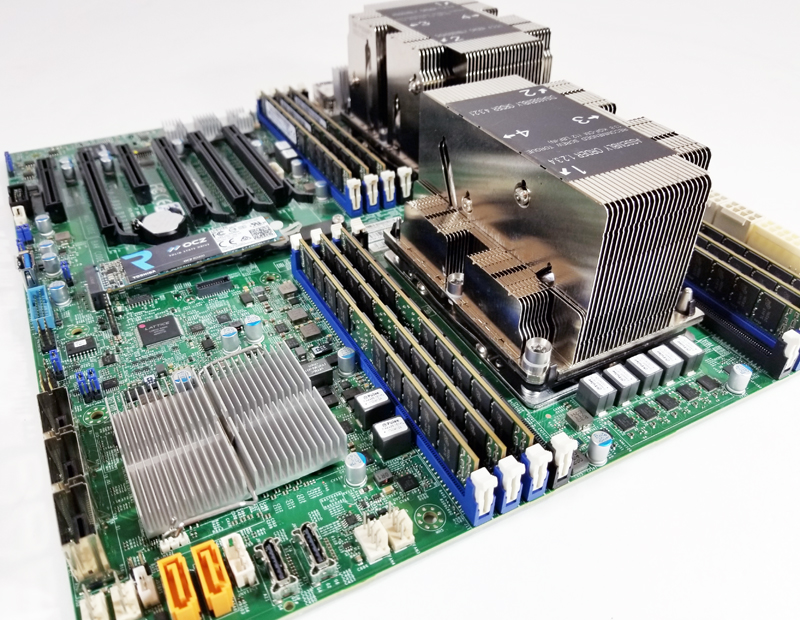
The X11DPi-NT is a large motherboard with a size of 12″ x 13″ (30.48cm x 33.02cm). Supermicro has the motherboard optimized for three different servers, SYS-6029P-TRT, SYS-7049P-TRT, and SYS-2029P-C1RT, these fill 2U and 4U server sizes.
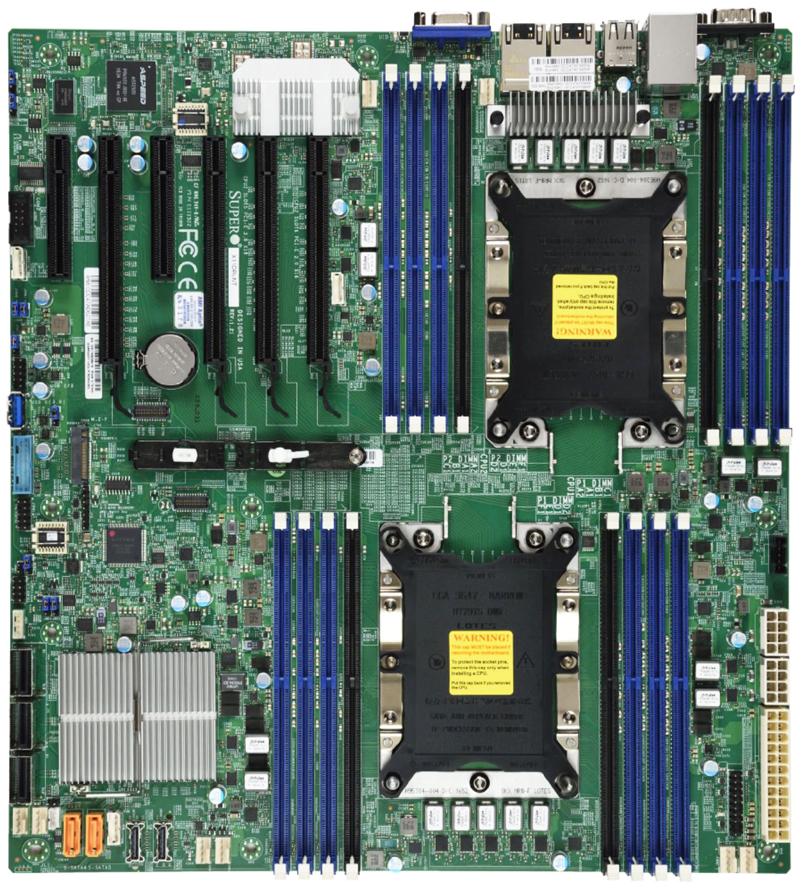
Two huge LGA3647 sockets dominate the motherboard which takes up the bulk of the board space. Memory slots flank each socket with six DDR4 slots (blue) for each processor. We can now push memory capacity up to 2TB with the new platform with supporting CPUs.
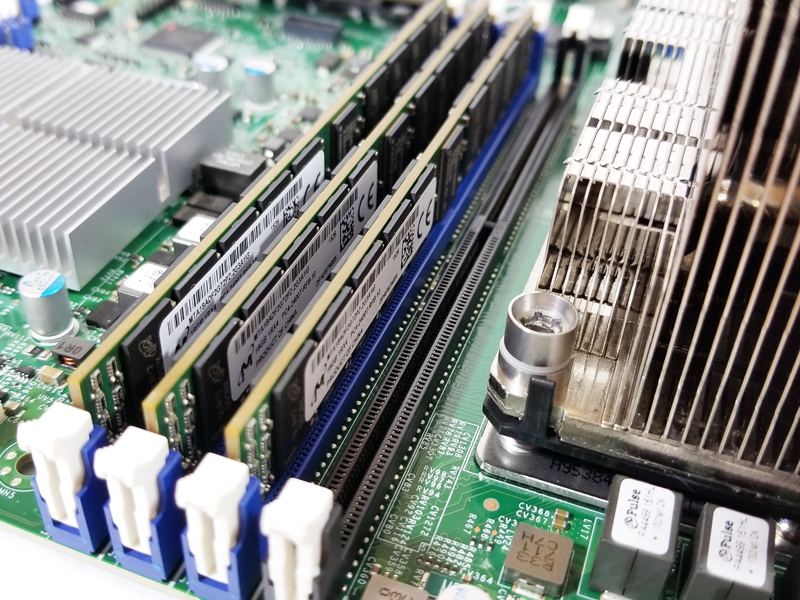
On each side of the processors, we find four slots, three blue, and one black. According to the motherboard manual, the black DIMM slots reserved for future NVDIMM support. One of the key advantages of the Intel Xeon Scalable processor family is that it is a six channel memory controller design. What this means from a practical perspective is that if you are comparing a DDR4-2400 Intel Xeon E5-2600 V4 dual socket platform to a DDR4-2400 dual socket Intel Xeon Scalable platform, you get 50% more memory bandwidth by adding two more DIMMs per CPU.
If you are accustomed to sockets with retention (e.g. the last six generations of Intel CPU platforms), the new LGA3647 mounting is a completely different approach. In previous Intel Xeon versions, one would start by carefully placing a CPU into a socket, then applying a cooling solution to the CPU socket. With the new Intel Xeon Scalable family, on uses a retention bracket to secure the CPU to the cooling solution then places the entire assembly into the socket. Being very careful to follow instructions we ended up with our processor attached to the heat sink as shown before insertion:
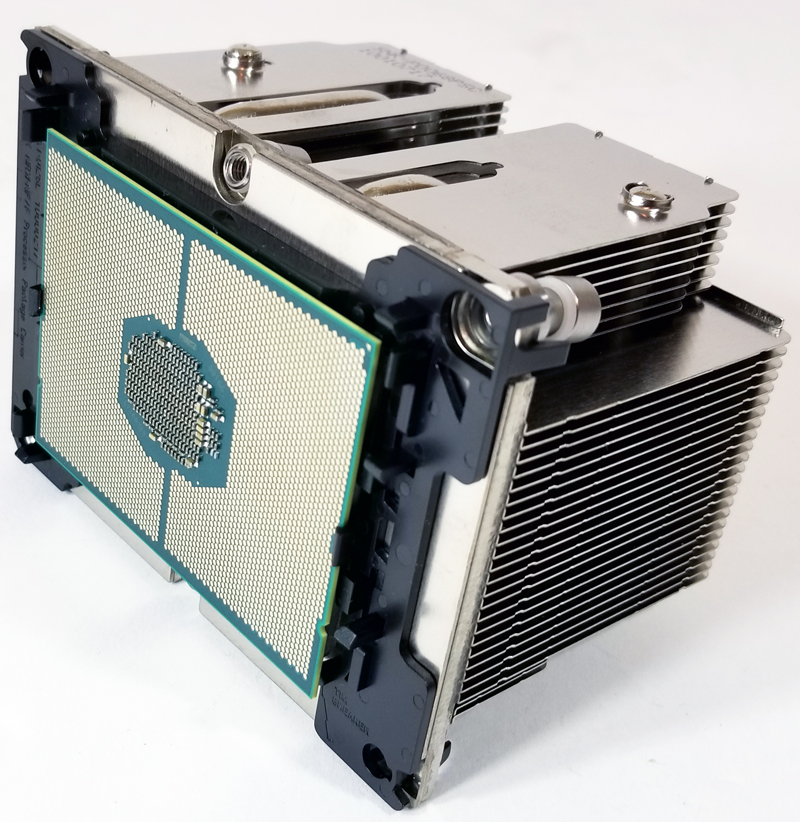
The motherboard manual includes ten pages devoted to installing processors; the heat sinks include a simple piece of paper with instructions. The basic idea is to attach the processor to the black processor clip paying careful attention to the triangle on the corner of the processor and black clip; these must line up. This assembly snaps in place to the heat sink which has TIM applied. Flipping the heat sink over will show a white triangle at the corner which aligns to the triangle on the socket itself. After securing the processor to the heat sink, insert the assembly into the socket by lining up the guide posts. Again pay special attention to the triangle orientation when installing.
We completed the processor install procedure many times here, and after a few tries it’s rather easy to do, just follow the instructions, and you should be fine. Compared with the AMD EPYC socket, the serviceability is much better. With the LGA3647 socket, one has four T30 screws to get the assembly set. With the AMD EPYC there are three Torx screws and four Phillips head screws.
One problem we found was with tightening bolts 3 and 4. If you tighten them too much or too little, the boot process would hang with error code B7 which states a memory issue. Back off or slightly tighten the screws and try again, which normally fixes this issue. The manual states to use a T30 Torx Driver and use 12 lbf of torque. At STH we have many system integrators and VARs that read our reviews so if you have not done so already, this is a new procedure which takes a few tries before it becomes second nature.
Using low profile memory sticks and the heat sink installed as shown will give you clearance for larger PCIe cards.

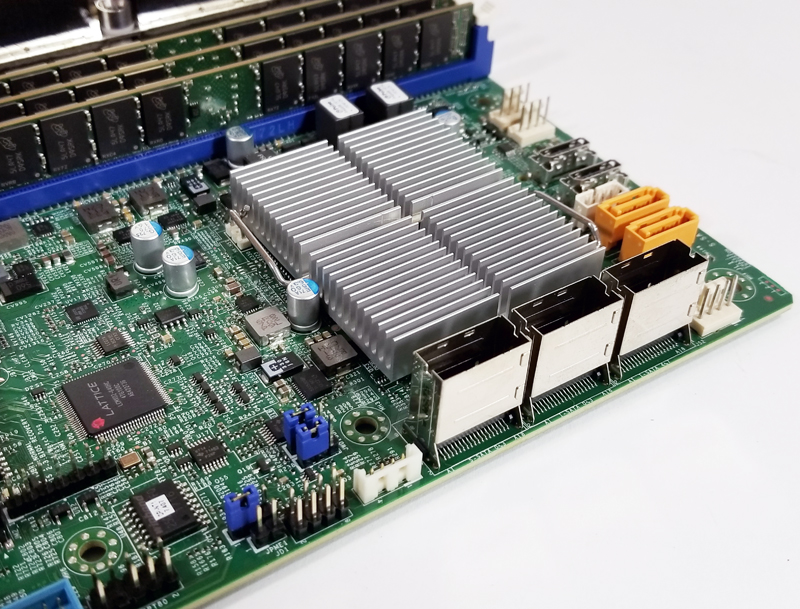
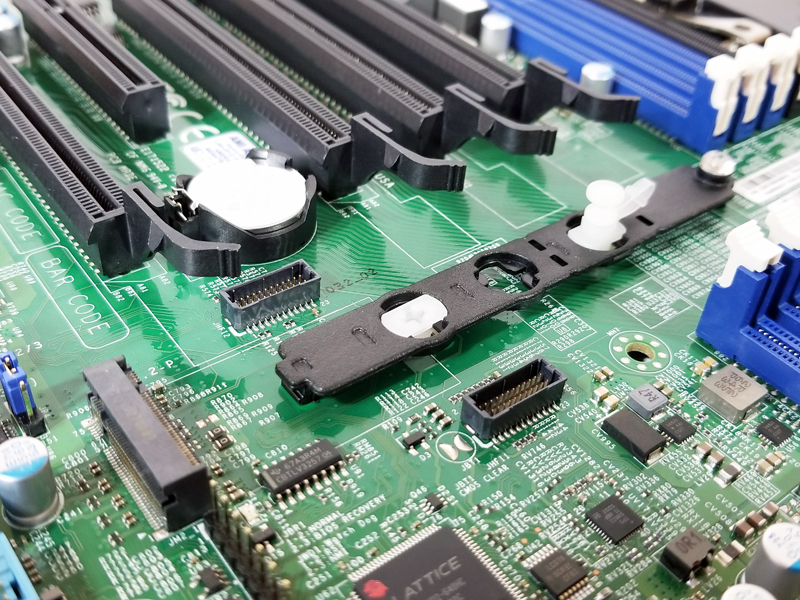
Next, to the two orange SATA3 ports which support SATADOMs, we find two Oculink connectors which provide connectivity to NVMe SSDs and backplanes. We will be reviewing platforms that utilize these connectors in the near future.
Three SFF-8087 connectors allow up to four SATA III 6.0gbps ports each; this gives a total of 12 ports and the additional two 7-pin SATA ports allow for the Intel C622 PCH 14x SATA III 6.0gps ports to be used. If you are upgrading from an Intel Xeon E5 2600 V1/ V2 platform you can connect 40% more SATA drives and more drives at 6gbps speeds than you could in that generation.
For those building systems based on the Supermicro X11DPi-NT that means that you can use a 12-bay 2U SATA server with two SATA DOMs and 2x U.2 NVMe hot swap rear bays for a storage server without using any expansion slots for SAS HBAs or PCIe cards. That level of integration is a key benefit from this new generation of Intel platforms.
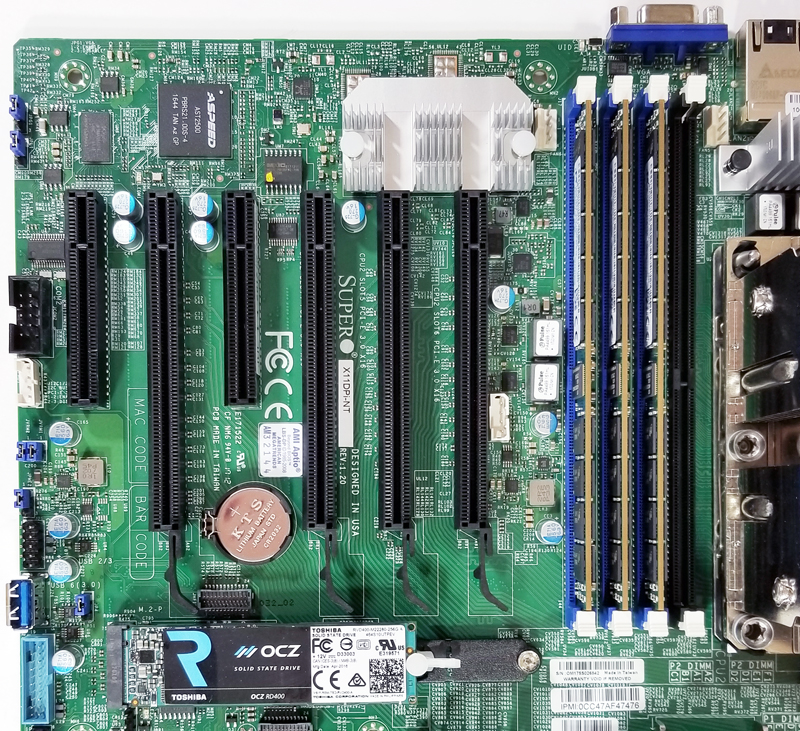
With four x16 slots on the Supermicro X11DPi-NT, one has the option to install GPUs, 100Gbps networking cards or other expansion devices. Rounding off the PCIe slots there are two additional x8 slots which are appropriate for 40GbE/ 50GbE cards, SAS3 HBAs/ RAID cards and higher-end NVMe add-in cards. The bottom line here is that there are a ton of PCIe expansion slots.
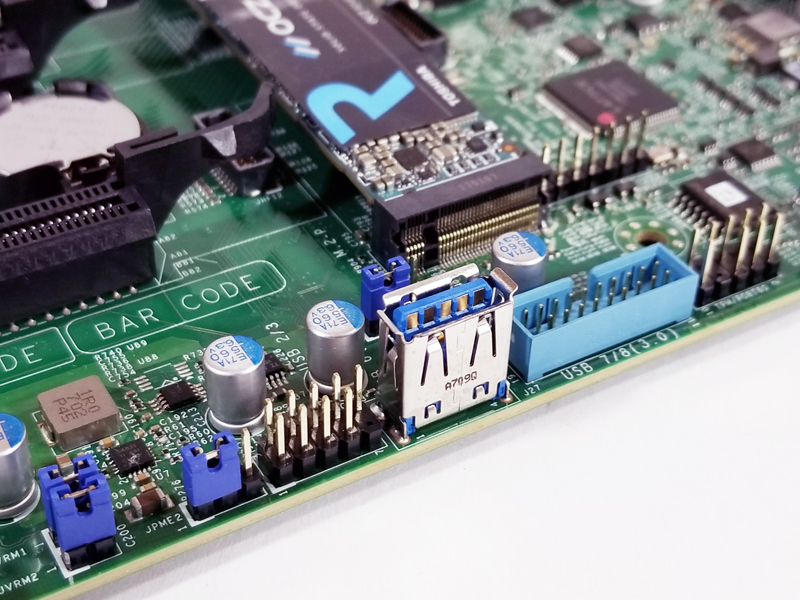
Included on the motherboard is a USB 3.0 Type A port which works well for USB boot drives as well as a USB 3.0 front panel connector.
We also find M.2 NVMe support which can be useful as a boot drive location or as a caching device. In previous generations of motherboard m.2 support, there was an array of mounting points that required moving a screwed-in stand-off to adjust to the SSD size. This was tricky in dimly lit racks. The new mounting bracket for the M.2 drive is significantly more flexible and allows for drive sizes up to m.2 22110 (110mm long.) That is important because usually, 22110 drives are the smallest size drives that can offer power loss protection onboard.
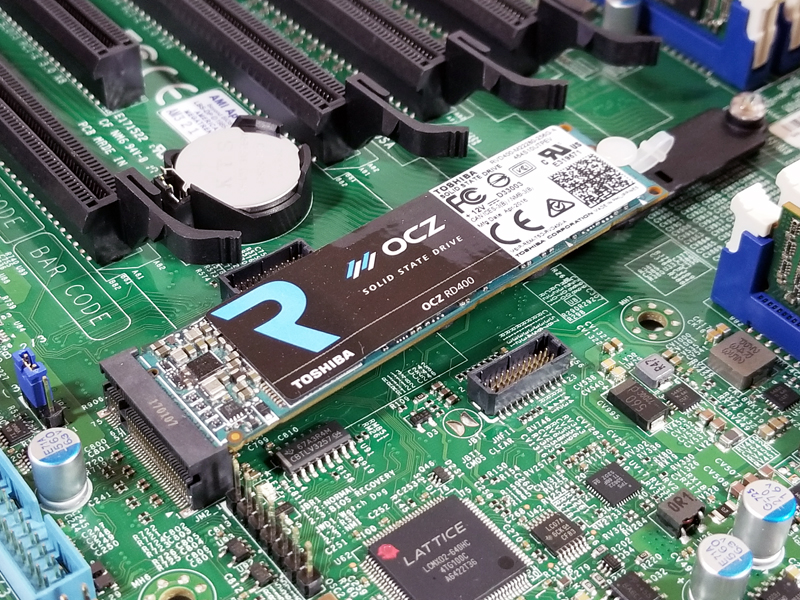
We can see here our Toshiba OCZ RD400 mounted in the solution. One of the other benefits is that instead of requiring an additional screw, we were able to service the m.2 drive with tool-less access.
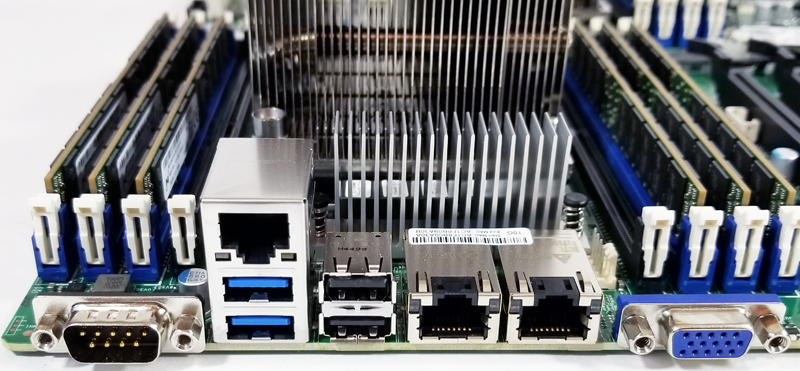
Network ports are Dual LAN with 10GBase-T with Intel X722/ X557 networking. These are backed by the Intel C622 PCH. In previous generations of Intel platforms 10Gbase-T support required an extra motherboard or add-in card adding significantly more cost to the solution. In this generation, Supermicro utilizes a higher-end PCH that has 10GbE capabilities to provide seamless 10Gbase-T networking.
Rounding out the rear I/O there is a dedicated out-of-band RJ-45 management port providing IPMI access via an ASPEED AST2500 BMC. There are two USB 3.0 ports, a pair of USB 2.0 ports, and both VGA and COM ports to assist in physical access.
Supermicro X11DPi-NT Management
Supermicro’s new X11 platforms out of band management are very much like what past WebGUI appears and functions.
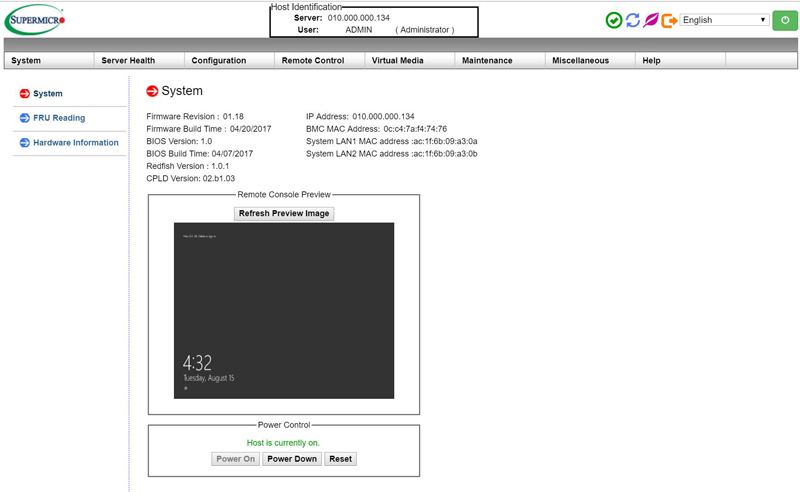
Supermicro’s new X11 IPMI supports HTML5 iKVM. We like this, no more Java console to fool around with and trouble shoot. If you click on the Remote Control Image you can still use the Java interface if you wish.

One of the neat things about this solution powered by the AST2500 BMC is that you can enlarge your screen to make it easy to read. If you run a 4K display on your workstation and found JAVA BIOS screens hard to read, HTML5 is your answer. Now it is simple to enlarge it to whatever size you want.
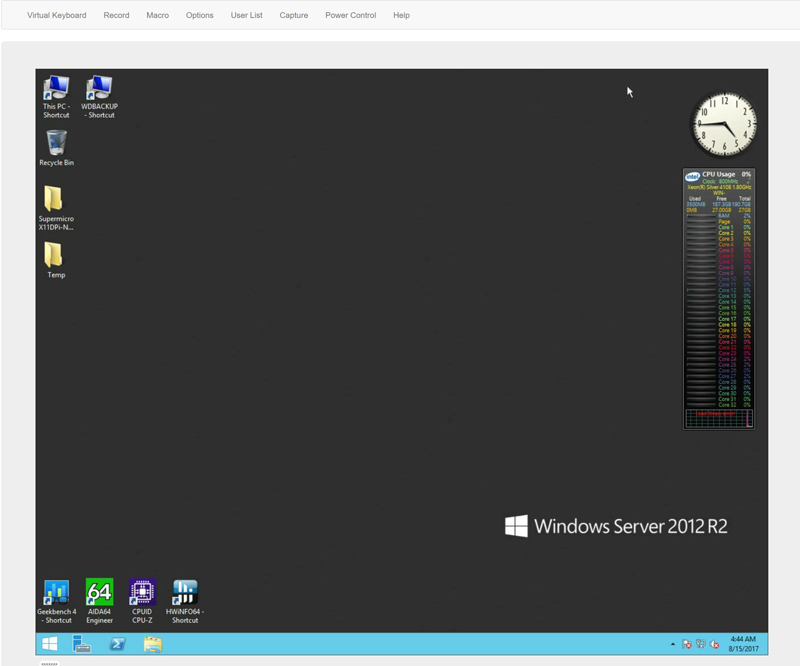
One area that we would like to see improved is the ability to mount remote media over the HTML5 iKVM. We were told that this is an in progress feature.
Linux-Bench Test
We ran the motherboard through our standard Linux-Bench suite using Ubuntu as our Linux distribution. Linux-Bench is our standard Linux benchmarking suite. It is highly scripted and very simple to run. It is available to anyone to compare them with their systems and reviews from other sites. See Linux-Bench.
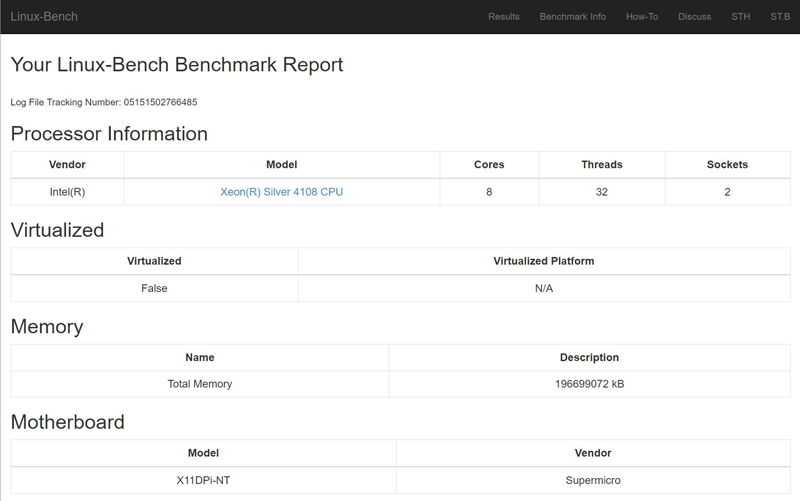
The full test results for our Linux-Bench run can be found here.
Supermicro X11DPi-NT Power Consumption
Power consumption can vary a large amount depending on processors used and the number of HDDs/ SSDs/ expansion cards used. Here we test just a basic system.
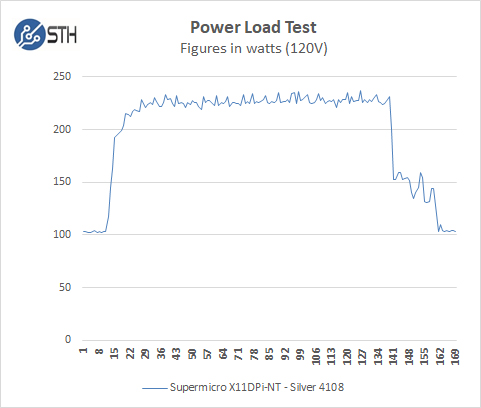
For our tests, we use AIDA64 Stress test which allows us to stress all aspects of the system. At default BIOS settings, we see 236.7watts at max power use.
- Power off BMC only: 14.3W
- OS Idle: 101W
- AIDA64 Stress Test: 236.7W
That is very good for a dual socket system with 12 DIMMs and 10Gbase-T networking.
Conclusion
The Supermicro X11DPi-NT is a well-rounded motherboard that is a significant evolution from the four previous generations of Intel platforms. Immediately noticeable to anyone upgrading from previous generations is a multitude of supported storage connections, from 14x SATA3 ports to the new Oculink and m.2 to connect NVMe drives. Network connections at the back include two 10Gbase-T ports for high-speed network connections using the premium Intel C622 PCH. For those upgrading from previous generations, one gets a long laundry list of new features such as:
- Newer CPUs with more cores, more RAS features, and new instructions (AVX-512)
- 50%+ more memory bandwidth
- Better NVMe support
- More PCIe lanes
- More SATA III 6.0gbps requiring fewer external HBAs
- 10Gbase-T networking without an add-in card
In terms of impact, the Supermicro X11DPi-NT represents a watershed level of new expansion capability at the platform level. If you have felt that over the last four years the Intel Xeon E5 platform has been relatively the same, you were not alone. The new Intel Xeon Scalable platform is the most compelling upgrade case Intel has made in half a decade and the X11DPi-NT shows off virtually every feature the new platform has to offer.


The idle consumption is good compared to older generations motherboards, but in the Epyc 7601 Part 1 review, a dual Epyc 7601 system with an external NIC, 16 DIMM and two CPU with much higher TDP, idled at ~100W too.
A comparative between two Xeon Silver 4114 on this motherboard vs two Epyc 7281 on the Supermicro H11DSi-NT would be quite interesting, since those are similarly priced.
Where Intel’s new Xeon Scallable trully shine IMHO is on the 4-socket servers.
I was quite shocked reading the part where you have to find the perfect pressure on the CPU screws 3 and 4. Sounds like case vibration could cause it to loosen up a bit and the system would crash.
The system admin would have to go there with a screwdriver and micro-adjust the screw position in a trial and error process.
Marcelo – I have done close to 100 LGA3647 installs. Once you do your first the solution actually works very well.
Just as a suggestion, it would be nice to include a block diagram from manual in motherboard reviews. This is the only information missing for me which I had to go and obtain from supermicro website.
Really nice review!
Looking at the pictures, two top 16x PCIe slots look a bit close to the memory slots.
We are considering to install NVIDIA GTX1080Ti which takes the 280mm length.
Is it possible to install 4 GPUs without interfering with the memory slots?
Comments are closed.