
Recently we removed a 1/2 rack of servers from one of our data centers. That included our last two Microsoft Hyper-V 2012 R2 servers that hosted two VMs with historical STH Bench data for development. To make things slightly more interesting, the domain controller had been removed so we had Hyper-V hosts that were not responding to GUI tools and we had one day to move data off them. Not a great situation, but we wanted to show how you can quickly convert a Hyper-V VM to KVM. In this case, we are putting the VMs on a Promxox VE cluster so we can get the VMs on an all-flash Ceph storage array. Proxmox VE is a Debian Linux based platform that combines features such as KVM virtualization, containers, ZFS, GlusterFS and Ceph storage as well as cluster management all with a nice Web GUI. If you are simply using a Ubuntu, RHEL or CentOS KVM virtualization setup, these same steps will work minus the Proxmox GUI views.
Converting Hyper-V vhdx Virtual Machine for KVM Usage
The total process took a long time as we only had 100mbps of bandwidth between the three data centers free for this project. The actual hands-on-keyboard time took a matter of minutes for both VMs. The trick is that our KVM system did not work with vhdx Hyper-V virtual machine drives so we needed to convert them into a qcow2 image (more on why later.)
Step 1: Export the VM to get a clean VHDx snapshot
Hyper-V has a great snapshot and replication feature. The Hyper-V hypervisors we had setup had a very fast 40GbE interconnect and SSD storage so we could take many snapshots. The first step is to export the VM so you can have one vhdxx virtual drive to transfer and convert. If you can use the GUI, this is a few clicks away.
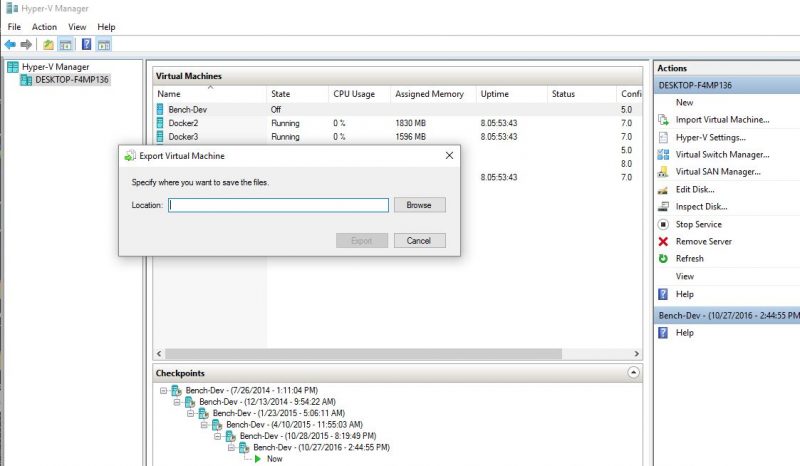
If you cannot get to a Hyper-V Manager GUI, then you will likely want to use the Export-VM command via PowerShell. If you get really stuck and cannot open a remote PowerShell session to the Hyper-V host, you can use RDP (if enabled) or iKVM on the server to get to a PowerShell prompt.
Using the Export-VM command via PowerShell or via the Hyper-V Manager GUI ensures that you get a single vhdx file ready to transfer and convert.
Step 2: Send the vhdx to the target KVM virtualization host
This step is really easy, especially if you exported the VM to a network share location. If so, you can simply copy the resultant vhdx to the new server. If you cannot, we have seen various other combinations of USB drives, SFTP clients and other methods to get the vhdx drive to the target server.
Step 3: Check the image before proceeding
Since the transfer was likely many GB in size and we are going Windows to Linux, it is always good to check that the vhdx image does not have errors before proceeding. Here is the command where “Bench-Dev.vhdx” is the file we transferred.
# qemu-img check -r all Bench-Dev.vhdx

As you can see, the vhdx file passed with no errors reported.


Why the step with qcow2 when you want to use ceph anyways (where one would typically use raw format)?
Nice guide but I don’t think it covers Windows 2012 Server conversions completely.
Hi, followed the guide but it appears that the disk isn’t bootable. I converted using qemu-img on Windows (https://cloudbase.it/qemu-img-windows/) prior to transferring the files to Proxmox as I was getting an error as indicated below:
root@proxhost:/var/lib/vz/raid1/temp# qemu-img convert -O qcow2 sourceimage.vhdx /var/lib/vz/raid1/images/105/vm-105-disk-1.qcow2
qemu-img: error while reading sector 24641536: Input/output error
I’m running qemu-img 2.2.1, is a newer version required in order to accomplish this conversion?
J Copeland You need to convert file in Linux using qemu-img, not Windows. Then it will work fine.
I tried this. My UEFI Linux VMs came across fine, but the UEFI 2012 R2 servers just blue screen on startup (came from Hyper-V Server 2016).
Blue screen? Than you uses from harddisk controller in your Proxmox VM config. Switch to IDE0 for your boot drive.
Not booting? Note that your VHDX contains a UEFI partition, so you need to change that BIOS in your Proxmox VM setup to UEFI Bios (standard it uses a normal BIOS)
We need an updated guide for the latest Proxmox. It seems that RAW disk format is the prefered now and you cant change it to QCOW when you create the VM.
Maybe
$qm importdisk 101 serverimage.qcow2 local-lvm could
help nowadays, I’m trying it at the moment. Seems to work with vhd and vhdx too (?)
To be honest: Who needs a manual like that should not convert any kind of VM.
To be honest again: This doesn’t cover hyper-v generation 2 with UEFI. Those kind of machines will always end up with a bluescreen following this guide. For generation 1 it is not necessary to first create a machine and then override it’s qcow2 or raw.
“To be honest: Who needs a manual like that should not convert any kind of VM.”
That is an obnoxious, elitist, ridiculous statement. I’ve used Hyper-V for a while but am switching to Proxmox. It’s for my own uses, not in a corporate or production environment, and I want to learn — and there’s a ton of stuff *to* learn.
If you are moving a Gen2 VM from Hyper-V, you will need to set the bios to OVMF to use UEFI. Then add an EFI disk.
– When the vm starts after importing the disk, hit ESC to go in and disable Secure Boot for the time being. You can turn that back on after if you want.
– The main issue the VM won’t start is because it doesn’t have the virtio drivers and it won’t see the disk. Even though we imported them above, they still won’t work, at least they didn’t for me. Once you load them into the vm using the dism tool, it should recognize the disk and boot.
Comments are closed.