
The StarTech USB 3.0 drive eraser is a very simple device. It is built to manage the erasure of one SATA hard drive or SSD at a time. While we used to have custom servers just to do this exact task, we have been using these units since 2016 with great success. In fact, when our original 2016 unit failed, we purchased another. The StarTech USB 3.0 Drive Eraser has become the tool we use to quickly erase drives and get them ready for re-deployment in Ceph/ OpenStack clusters as an example.
StarTech USB 3.0 Drive Eraser Mini-Review
Overall, the StarTech USB 3.0 Drive Eraser is a very simple device. The technical model number for the unit is SDOCK1EU3P. Here is the front of the unit where there is a LCD display, up and down navigation arrows and both an OK and Escape button. That structure shows the simplicity of the device. You can navigate up and down through the simple menus and you can confirm or escape. That is it.
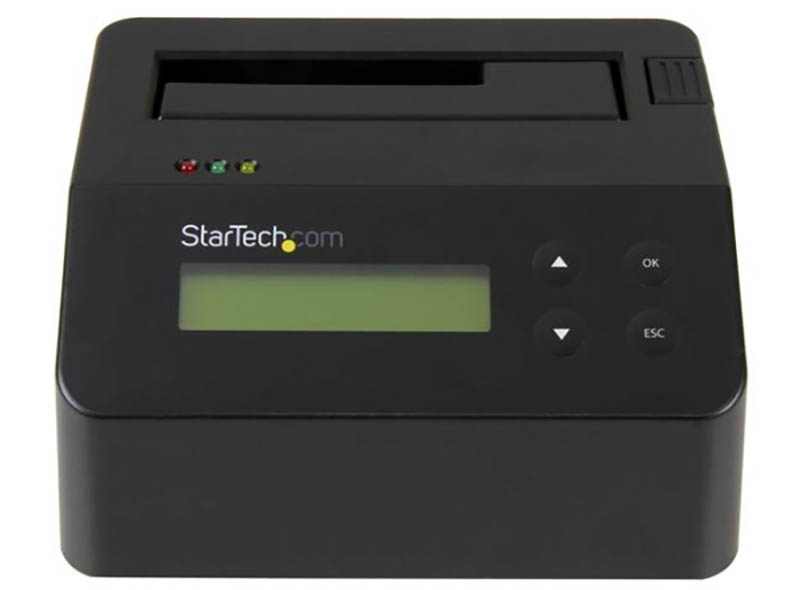
Atop the unit, there is the drive bay. You can use either a 2.5″ hard drive or SSD in the cutout. If you have a 3.5″ drive, the flap simply folds down as you insert the drive. Ejecting the drives is done via a mechanical button and lever on the side of the unit.
Overall, this has worked well for hundreds of drives we have erased. There are a few items to note. First, this is a SATA only device. It will not work with SAS drives. In fact, it is a SATA II 3.0Gbps device so while SATA III drives will work, they will not do so at full speeds. Second, you need to remove drives from their trays and insert the bare drive. That is important since if you have a drive tray with four screws, the process can take slightly longer. We would love to see the StarTech USB 3.0 Drive Eraser be able to erase drives directly from their hot-swap drive trays as it saves labor.
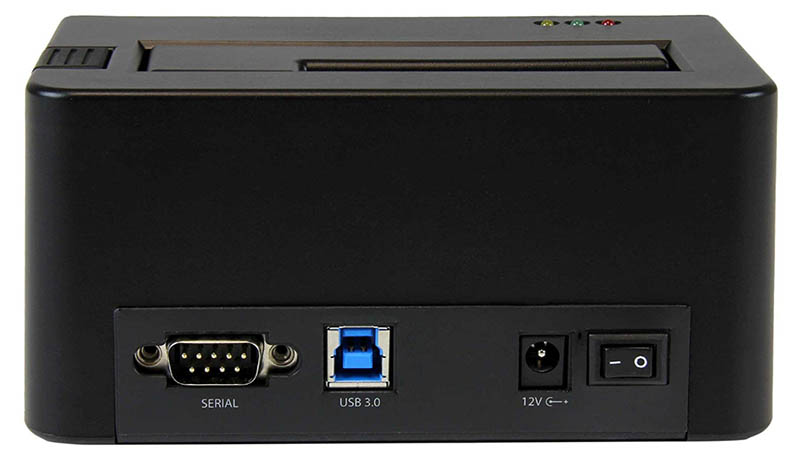
The rear of the unit has a DC input and power switch. When you turn on the unit, it actually has a short bootup process that takes a few seconds. One can also connect the unit to USB 3.0 and use it as a dock. Finally, there is a serial port for serial printers. As you erase drives, the StarTech USB 3.0 Drive Eraser can capture the serial number, date, time, and method of wiping and print that information directly.
The key drive erasure modes are:
- Quick Erase
- 1-Pass Overwrite (NIST SP 800-88 Rev 1 – Clear)
- 3-Pass Overwrite
- 7-Pass Overwrite
- Custom Erase
- Secure Erase (NIST SP 800-88 Rev 1 – Purge)
- Enhanced Secure Erase (NIST SP 800-88 Rev 1 – Purge)
These can be selected via the LCD display and executed with an “OK.”
It really is that simple. We made a quick ~3-minute video on how it works and what is inside the unit if you want to check that out on YouTube. This is certainly the case where a video is easier to use to show off how the unit works and what is inside.
We purchased our original unit in 2016, but it failed earlier this year. We used that one to show what is inside the StarTech USB 3.0 Drive Eraser.
Final Words
Looking at our purchase pricing, this was $210 in 2016 and around $205 in 2019. That makes it one of the most costly USB 3.0 docks out there. It is also a USB 3.0 5.0Gbps device but it is limited to SATA II 3.0Gbps drive speeds making only a USB 3.0 drive adapter for cases where something faster is not available. At the same time, if you are erasing many SATA drives per week, this saves a lot of time.
Many of our readers are going to see this and think, $200 for a drive eraser is silly. Previously, we used a small PC setup solely to wipe drives. We have phased out hard drives for everything except backup storage in the lab, and SSDs erase quickly. $200 is not that much for a device that is silent, low power, and easy to use. On the other hand, if you look at it from a hardware perspective, this is a relatively pricey unit.
In the end, we use the StarTech USB 3.0 Drive Eraser as a tool in the lab. We purchase a lot of tools in the lab for specific tasks. When it came time to re-evaluate how we do this, even given we are transitioning to SAS3/ NVMe in systems, it was still something we purchased again and continue to use it weekly.


 mini-review shows why we use these units as tools in our lab on a weekly basis to erase SSDs)
I still find that thermite is the better solution :)
I’d love to see a call-out about how the various “secure erase” options (most likely implemented via the standardized ATA commands) should always be preferred over the overwrite options. Pure overwriting of a block device should be considered obsolete (imo) due to flash media using FTL for wear leveling, and to some extent dead sector remapping on spinning-rust drives.
The problem with that is you are relying on the security of closed-source, un-audited drive firmware to perform the erase.
My thermite comment was actually serious.
I agree with Rob, and, Jeff! Why not both?
My recipe on Linux is three steps: to fill up the drive with pseudorandom garbage (dd if=/dev/urandom), then use hdparm/nvme tool to issue a secure erase which will issue a thanos snap to all the flash modules, and finally check that everything is filled with the pattern from the tool (usually full of 00, 11, aa, 55), with hexdump.
On mechanical media the second step was to use /dev/zero to fill up the drive. I have since then eradicated all mechanical magnetic media from my home, except for the offsite backup.
I hope this information is useful to some readers; I’ve owned a retail store for about 9 years … and transitioned from primarily mac repair and sales to a strong emphasis in data recovery; I’m becoming more and more proficient with the following recovery systems:
PC-3000
DeepSpar
Atola
and others…
1a. Wiping data multiple times is completely irrelevant today. This requirement (the old farcical “DoD wipe” is from the epoch of the GMR (Giant Magneto Read-write Head). … the data tracks were wider and there was less certitude that a write would necessarily ‘oblate’ the information. Nowadays? ONE! Write! And it’s gone gone. Do not waste your time …
1b. DoD Wiping a SOLID STATE drive is even worse! Why? Because they have a finite number of writes before they go bad. Furthermore, many drives (notably Samsung) use Firmware encryption … and with [just] a quick erase — will delete the decryption key, which even if the NSA / CIA had but one artifact from a terrorist with a snuke — if it required bypassing the security within that Firmware/encryption? It AIN’T happenin. Unless perhaps the mfr has a method and they’ve decided to assist the interested party.
2. Many of these docks with light firmware built-in are similar … to that effect, the Kanguru variant (very hard to find now) has:
a. GUI interface
b. Block-level copying
c. Skip bad blocks after x attempts reading…
d. Wipe drives (sometimes macOS won’t erase a drive)
e. DoD wipe (worthless)
f. Clone drives…
g. Many other features. These things are COOL. Truly.
I’ve tried many of these standalone duplicators, and aside from the [real] data recovery systems (allows user-defined time-out periods for instance) are obviously exceptional. Aside from that, I’d had very good luck with the Kanguru.
Comments are closed.