
We have been looking to build a quieter Supermicro MicroLab platform for some time based on the Supermicro Super-chassis CSE-721TQ-250B and an Intel Xeon D motherboard. While Supermicro does offer some actively cooled solutions for the system, we have an excellent setup running well under 25dba (without hard drives spinning.) This is certainly not an OEM solution, but for a few dollars and a few minutes we were able to achieve low noise without any high-pitched, and annoying, fan noise. Please do note, we did try about 14 different solutions before we arrived at what we are presenting today so one can consider this a “best of breed” solution. It is also not something we will see in an OEM server design.
The Background
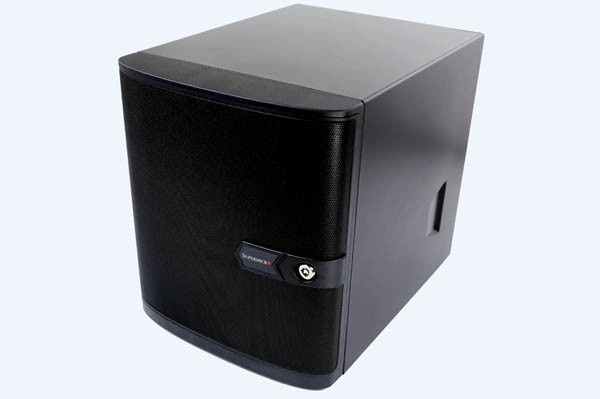
We reviewed the Supermicro SYS-5028-TLN4F in early 2015 and knew right away that it was a winning platform. There are now entire sites dedicated to selling these appliances. The compact tower has a built-in 250w 80Plus Gold PSU and just about everything one would want for a Xeon D platform.
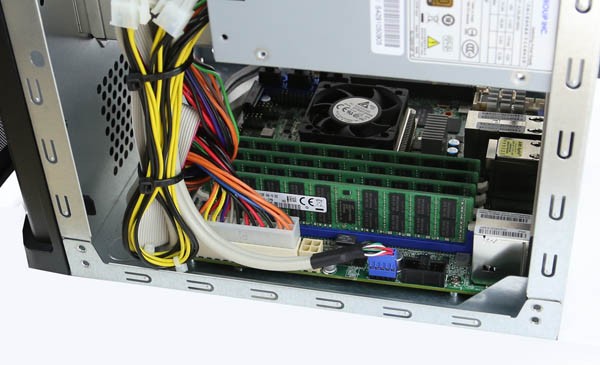
The onboard X10SDV-TLN4F processor has an actively cooled heatsink on the Xeon D-1540/ D-1541. The fan is made by Delta and is very similar to what we saw on the Intel Atom C2000 series from Supermicro. One can see that in the CSE-721TQ-250B this setup has a lot of room. The heatsink/ fan profile can fit in a 1U server so it is low profile.
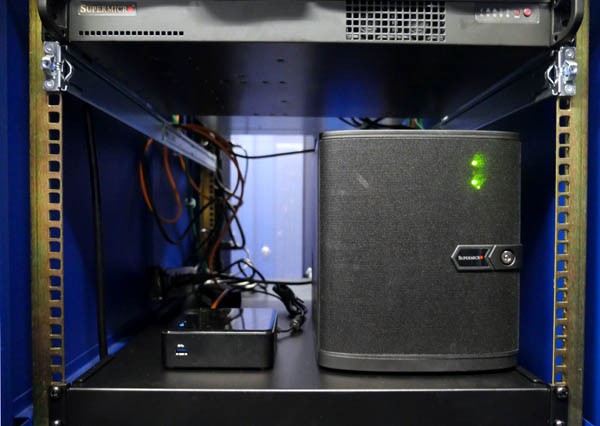
Again, if you are using these machines in a location where the absolute best acoustics are not required, get a system with the built-in Delta cooler and call it a day. We have had one running in our Fremont colocation facility for some time now and that fan works extremely well.
Alas, I am someone who has a dual Intel Xeon E5-2650 V3 with a GeForce GTX970 desktop complete with 10GbE, NVMe and 16x SSDs running under 29dba because I cannot stand noise. The Delta fan will run at about 27dba idle and into the mid-30dba range under load. I felt there is room for improvement so I ordered parts and got to work.
How you can build your own near silent Micro Lab
Specific to this build we purchased a number of parts via Amazon.com since they have extremely fast and inexpensive shipping to the Silicon Valley. Here are the minimum parts you need for the quiet case mod:
- Chassis and PSU: 1x Supermicro Super-chassis CSE-721TQ-250B off of Amazon for $169 and delivered the next day thanks to Prime
- Additional fans: 1-3x Noctua 60x25mm A-Series Blades with AAO Frame, SSO2 Bearing Premium Fan – Retail Cooling NF-A6x25 PWM for $14.99 with same day shipping via Prime the non-PWM version can also be used especially as auxiliary chassis fans
- Motherboard: 1x Passively cooled Xeon D motherboard, we used the Supermicro X10SDV-4C-TLN4F
- (optional) One can install a different 120mm fan but the real gains over the stock fan with appropriate PWM settings is marginal

You can read our Supermicro X10SDV-4C-TLN4F review, but this system comes with an onboard Intel Xeon D-1518 35w TDP SoC. The Intel Xeon D-1518 is a 4C/ 8T part which works well given our limited 64GB of RAM and applications we want to run on this machine. We do expect retail availability to improve over the next few weeks.
While the above will get you a chassis, PSU, motherboard, CPU and cooling, you still need to add temporary and non-volatile storage, e.g. drives and RAM. For those using the platform as part of a cloud lab, you may only need RAM depending on your network boot infrastructure. Here are the additional parts we used:
- RAM: 4x 16GB DDR4-2133 RDIMM
s
- SSD: 2x Intel S3610 200GB
+ 3x Intel 750 400GB
- HDD: 4x Toshiba 5TB 7200rpm
(not installed for sound testing)

We will have more on the 3x Intel 750 400GB drive addition later but this is a solid all-around platform.
Assembling quiet cooling
Key to making this system extremely quiet is the Noctua 60x25mm NF-A6x25 fan. I generally prefer saving money and using PWM fan settings over buying aftermarket fans but for $14.99 each these have a nice feature: rubber mounting pins/ fasteners. Most fans use metal screws to attach to the chassis but we found a great way to re-purpose the rubber pins in this system. The fans are also thicker than the stock fan at 25mm so we can get more airflow with a lower fan speed (and noise). We are going to use these fans in two places, but first we are going to cover the CPU fan.

Key to this entire installation for the heatsink fan is to NOT insert the pins fully into the heatsink unit. We pulled the pins through the direction of exhaust airflow only to the point where the last visible line is covered. See the above desktop mock-up for what this looks like.
We then adjusted the depth of each pin to match the stock Supermicro heatsink’s mounting screws. The idea is that one wants to rest the fan just above the heatsink. Here is an illustration as we were working on this process.
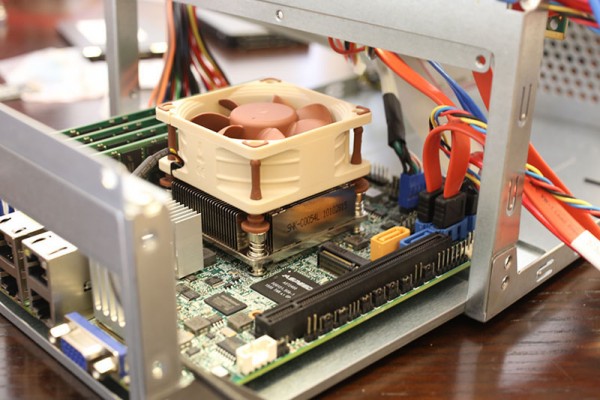
There are advantages and disadvantages of this mounting method. The primary advantage is that the larger fan can spin slower while cooling the CPU. Beyond this the vibrating fan and heatsink are both in contact with the rubber/ silicone pins, not each other. This ensures no vibration based noise is present. A significant disadvantage (and why no vendor will send you this as a solution) is that it does depend on gravity to keep the mounting pins in contact with the heatsink screws. Between gravity pushing down and the head size of the pins causing friction on the screws and being bounded by the heatsink fins, in normal operation there is no place for the fan to go. If however you were to turn the unit upside down the fan will come off unless you tape it, build a mounting plate to secure it, secure via wire or some other means. No OEM would ever ship a cooling solution like this because it will not survive their shipping tests. For a server that is sitting on a shelf, this fan is going nowhere in this configuration and effectively makes vibration noise zero.
The fan’s exhaust, in addition to the 120mm chassis fan, will be enough to keep the power delivery and 10Gb MAC components cool. We have run this setup for seven days at 100% CPU utilization and the Noctua pins have been able to handle the heat while the system components are adequately cooled.
For most installations, ordering the passively cooled Supermicro motherboard and the $15 Noctua fan is enough. For those who are adding m.2 SSDs or non-GPU PCIe add-in cards, extra cooling can be required. What we did here was to remove the front of the CSE-721TQ-250B and use three of the rubber pins to mount to the front air venting.
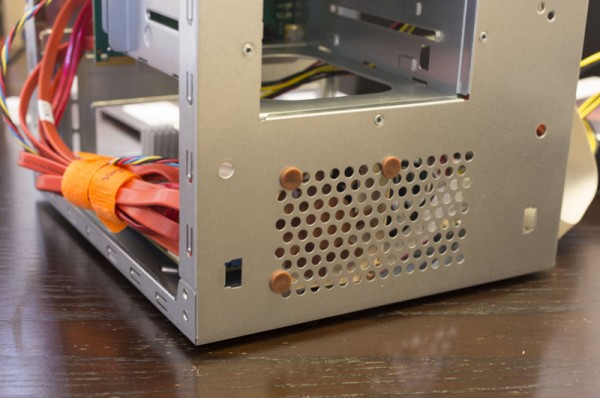
From experience if you do add a fan (or two) here, proceed with the installation prior to having components installed as the space is a bit tight. One will see we are only using 3 pins because the air vent holes were not made for this type of installation. We used this particular configuration (two pins installed closest to the PCIe expansion slot) to give the fan a slight angle toward the components we need cooled.

A benefit here is that we have another case with rubber dampening fan vibration to the chassis, ensuring the unit is very quiet. One can see our over abundance of SATA cables, we did not order shorter length cables from Amazon or Google Shopping Express so those appear as though they are taking 9 days to arrive. Oops!
Noise Reduction
We used our Extech sound meter to test noise using an active cooler we salvaged from another machine and this Noctua cooler.

As one can see, our results were excellent. What is not depicted here is the lack of higher pitched fan whine. The higher pitched noises can be annoying in an office environment so moving from the industrial Delta solution to the quiet Noctua solution did have some additional benefits in terms of sound.
Conclusion
Just to gauge the difficulty of this, I had my brother-in-law do the assembly. He has never built a server before but found building one with even these modifications was extremely easy. On a 1-10 difficulty scale this modification is probably a 2/10 for someone with smaller hands and maybe a 3/10 if you have larger hands. Many of the pictures above are just test fittings so in future pieces you will see that mass of cables get removed.
External References
Here are the official spec pages for the Noctua fans:
Here is a link to the Supermicro chassis spec page:


I am thinking about using one of these motherboards for a pfsense build. I also would like this to be in a rackmount configuration. Any suggestions other than the 1U servers that supermicro sells? I would also like this build to be extremely quiet. Comparatively how loud is the Atom based C2758 to this build?
This is exactly what I need!… but with 12x 3.5″ slots :(
Any suggestions for a good case & cpu for that? :)
With 12x 3.5″ drive bays, looking at one of the storage focused boards with the onboard LSI SAS2116 may be worthwhile.
In terms of chassis, there are a lot of 3U 12 bay options out there. For something quieter you need 9x 5.25″ bays and 3x 4-in-3 5.25″ to 3.5″ bay converters. Alternatively something like a Fractal Design Arc XL might work with a 4-in-3 adapter.
You could alternatively try making a Silverstone DS380 JBOD.
Keeping these boards quiet in rackmount configurations is tough due to space constraints (an alternative may be using a rackmount shelf if you have space.)
The Delta fan is similar to a C2750/ C2758 fan but the Xeon D SoCs do run hotter under load.
Thanks for posting stuff like this Patrick. This is great! :)
Would it also be possible to modify one of the actively cooled motherboards to use a different fan? That way the setup would be a little more secure. Just curious
I love noctua! What a difference they make. All my systems are now and will be cooled by Noctua!
Could these accommodate something like 3x IcyDock 8x 2.25″ in one 5.25 bay? I’m assuming the hot swap is a 4x 3.5 in 3×5.25? This checks all the boxes for me, however I need something for SSD only- no 3.5″, and more than this solution out of the box can provide.
This is not the ideal platform for that type of setup. The drive cage and backplane is very integrated with the chassis.
Do you have any experience with tower servers with a small imprint, preferably with a dust door, that would be suitable for what I described? The istarusa s-917 is the closest I could find.
Hi guys,
This is about a year too late but do you recall what temperatures you got with the Noctua fan on top of the proc? I got the 6+ (6 core version that came with a stock fan) and I replaced the Delta fan with the Noctua. With Fan setting in the BIOS set to Standard (50% duty cycle + temp control), the fan spins at about 1300 RPM and CPU temperature is about 62c with minimal work in the background. Does that sound normal?
Thanks!
Gene – did you add the front case fan(s) as well? I am logged into a node with the mods above and it is serving images around 150mbps. Not a huge load but running at about 10C lower.
Hi Patrick,
Yes – I do have a front chassis fan slightly angled to cool off my RAID controller and M.2 SSD. What setting do you have for your fans in the BIOS? You can actually see it via the IPMI interface (which I have to keep resetting because it loses the sensors…). Right this moment, the CPU is at 63c at maybe 25% utilization.
Thanks!
Gene.
Did you use the PWM version of the Noctua fan? Or did you go with the non-PWM version? Or PWM for CPU and non-PWM for the case? I’ve read that the fans “hunt” when not using the Supermicro ones.
Thanks,
-Ryan
Ryan – you want to set the fan speeds manually in IPMI.
Hi Patrick and everyone.
I know this is old, but I’m switching from the 1U to the cube as its in my apt now. In hopes of getting it super quiet, did you use the FLX or PWM fans for the front case fan? The article is a bit ambiguous.
Also, anyone have insight on how hard it would be to take off the delta fan so as to replace with the noctua?
Thank you.
Brendon
I actually thinking about doing the opposite of what Brendon asks, and wonder if adding the Noctua fan will make it unfit for a 1U chassis like the E300.
Is there any suggestions for getting the drives cooler? Mine are SAS3 and run about 48-52c… they get HOT!! I have the stock Supermicro fan for the back of the chassis but seems its not pulling as much air through the drive cage.
Many thanks for the detailed suggestions!
I have a D-1528, and i am running odm (open drone mapper) for image processing.
You mention that you ran tests for 7 days 100% cpu, and my question is what temps do you see on your haswell pch bridge? and your cores?
my current reading from sensors is:
pch_haswell-virtual-0
Adapter: Virtual device
temp1: +111.5°C
I’ve just done this. I’m worried about the rubber pins melting. Is it safe for my motherboard? They’re so close to the CPU….
Comments are closed.