
At STH, we use Proxmox VE in part of our infrastructure. Proxmox VE as of version 3.4 has had ZFS support that can be enabled at the time of installation. Some time ago we did a short piece on installing Proxmox VE with a mirrored (RAID 1) ZFS boot device. We recently added a testing server that had an additional two solid disks that we wanted to add to a server and thought it would be a good time to do a quick tutorial. Proxmox allows you to setup a ZFS on Linux zpool at the time of installation. After the server is setup, there are still additional steps required to add secondary storage. Of course, ZFS on Linux is not the battle hardened implementation we find on Solaris or even FreeBSD OSes so one should use caution. On the other hand, if you are setting up a simple server, this is a good place to start. For this we are going to install on two Samsung 480Samsung 480GB datacenter SSDs GB SSDs.
Step 1: Figuring out the block devices you want to use
This is an extremely important step in the process. Step 1 is really figuring out which devices you want to use. There are probably a near infinite amount of options on how to figure this out but we are just going to use lsblk. PVE’s standard remote login via SSH logs a user in as root so there is no “sudo” required as on may see in other debian tutorials.
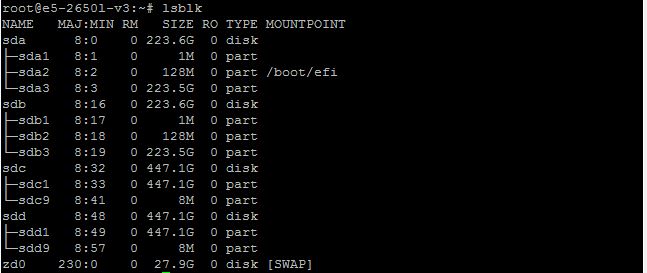
As we can see here, there are two 240GB drives (223.6G) and two 480GB drives (447.1G). This is a bit of a cheat, but since we setup the server using sda and sdb as the boot mirror, we know that the 480GB drives are the ones we want to use. In this instance they got the sdc and sdd labels. While our example is simple, as the number of devices increases, so does the care required in adding another pool.
[Ed.] Just wanted to be clear (as Brian Puccio commented below) that we are using /dev/sd_ for device names. This is generally used for development/ test platforms as we are using here. Here is a guide on the different ways to designate devices for zpool usage. You can use the other methods to designate the drive/ devices instead of /dev/sd_ however the steps are the same.
Step 2: Check zpool status
The next step is to see which zpools are already setup. As we can see here, sda and sdb are mirrored in rpool.

While one could omit this step, it is best to take a quick look around so you can determine a sufficiently different label for the new pool.
Step 3: Create the zpool mirror
The next step we are going to use a fairly simple command:
zpool create -f -o ashift=12 r1samsung480gb mirror /dev/sdc /dev/sdd
Here is the breakdown:
- zpool create – this is telling the system that we want to create a new zpool.
- -f – likely will need to “force” the command so that is the flag for forcing despite warnings.
- -o ashift=12 – this is not required, but is a general performance tuning option that might be worth trying.
- r1samsung480gb – this is the name of the zpool. Replace this with whatever you like but it is best to avoid using mirror to start the name, hence r1 for RAID 1.
- mirror – this is telling the system we want to create a mirror.
- /dev/sdc /dev/sdd – (note the space between them) is used to tell the system which devices to use. We determined this using the lsblk command above.
Here is what it looks like after we issue the command then issue another zpool status:

One can see we now have the second mirrored zpool we can use.
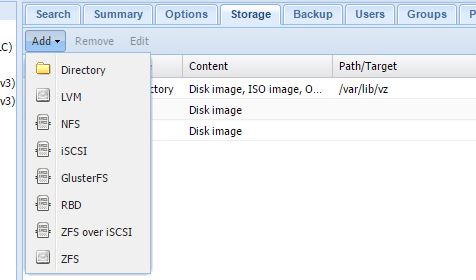
Step 4: Add to Proxmox
The final step is getting Proxmox VE to use the zpool. Up until this point, the above was fairly standard ZFS commands. Now that the zpool is created, we need to have Proxmox VE utilize it.
Login to the Proxmox VE web UI and go to Datacenter -> Storage -> Add then select ZFS
The ZFS pool drop down should match the zpool names from zpool status above. Thankfully it does and we can see r1samsung480gb
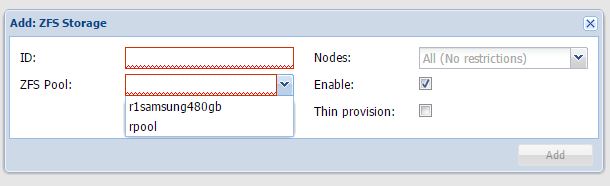
One also needs to give it an ID. This is what the storage will be called in Proxmox. A personal preference is to name it something different than zpool so that when checking status we know which is which label.

As one can easily see, our creativity is severely lacking. Change other settings as you need to and click Add when done.
Step 5: Done!
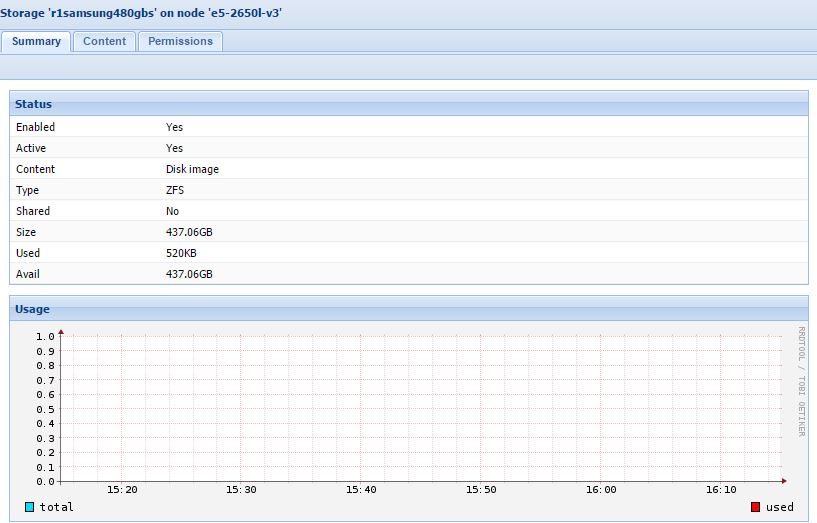
At this point one is ready to use the new mirrored ZFS storage pool. With Proxmox, not only is the pool now active, but one can use it to store KVM virtual machines.
If you want to add cheap hard drives or solid state drives to your ZFS server or Proxmox VE converged appliance, then check out the STH forums where there are usually awesome deals on inexpensive storage posted by members.


Any reason for using /dev/sd_ in this tutorial? Most things I’ve read recommend using /dev/disk/by-id/_ to create a pool to avoid any drive relettering issues later on.
http://zfsonlinux.org/faq.html#WhatDevNamesShouldIUseWhenCreatingMyPool
http://zfsonlinux.org/example-zvol.html
https://pthree.org/2012/12/13/zfs-administration-part-viii-zpool-best-practices-and-caveats/
Brian – You are 100% right that that is a better way to do this. I just use /dev/sd_ for quick test systems (no production data.) Will amend shortly with that as I can see that the guide was not overly clear on that usage point.
Any reason for using /dev/sd_ in this tutorial? Most things I’ve read recommend using /dev/disk/by-id/_ to create a pool to avoid any drive relettering issues later on.
I posted a comment yesterday with a few links to citations, but it’s still in the moderation queue.
Sorry, disregard, it’s showing up now!
Comments are closed.