
Over time we have looked at several workstations from Lenovo, ThinkStation P410, and P700. These range from entry level, mid range and now we have the high-end ThinkStation P910 to look at today. The ThinkStation P910 is an updated P900 which we ran three years ago now. The P910 can run the latest processors from Intel and take advantage of NVMe storage options.
Lenovo’s ThinkStation P910 highlights several features, Usability, Flexibility, and Reliability.
- Usability – Modular components give a clean look and feel while allowing for quick and tool-less upgrades while also allowing the P900 to scale higher than before.
- Flexibility – New FLEX bays allow for ultimate customization; pay for what you need.
- Reliability – The P-series runs cooler than ever with a new tri-channel cooling system and unique air baffle; cooling key components more effectively and preserving the life of the workstation.
Lenovo ThinkStation P910 Key Features
- Motherboard Support for Intel Xeon E5 V3 and V4 CPUs
- Socket Type Socket R3 (LGA 2011)
- Memory Slots 16 total Slots, 8 per CPU
- Memory Support 1600/1866/2133/2400 MHz
- Audio Realtek ALC662
- Ethernet Intel Clarksville WGI218LM
- SAS Optional via Flex Adapter
- Firewire Optional
Expansion Slots
- 4x PCIe x16
- 2x PCIe x4
- 2x PCIe x1
- 2x Flex Connectors
Max Storage Devices – 14
Max configurable storage devices of each type (some options are exclusive of others):
- 3.5″ – 6
- 2.5″ – 10
- M.2 – 4
Dimensions (W x D x H)
- 7.87″ x 24.4″ x 17.5″
- (200 mm x 620 mm x 446 mm)
The processors equipped in our P910 are two Intel Xeon E5-2620 v4’s, which fall right in the middle of supported CPU range. Equipped with a NVIDIA Quadro P6000 which is the top end supported graphics card. This combination gives this Lenovo ThinkStation P910 incredible graphics processing power as you can see in our NVIDIA Quadro P6000 review.
Close look at the Lenovo ThinkStation P910
Packaging is simple for this ThinkStation like others we have reviewed, It is a large shipping box with two large foam inserts provide protection during shipping, down the side is the keyboard box and up top is the accessory compartment. The included keyboard and mouse are standard Lenovo accessories which we have used before.
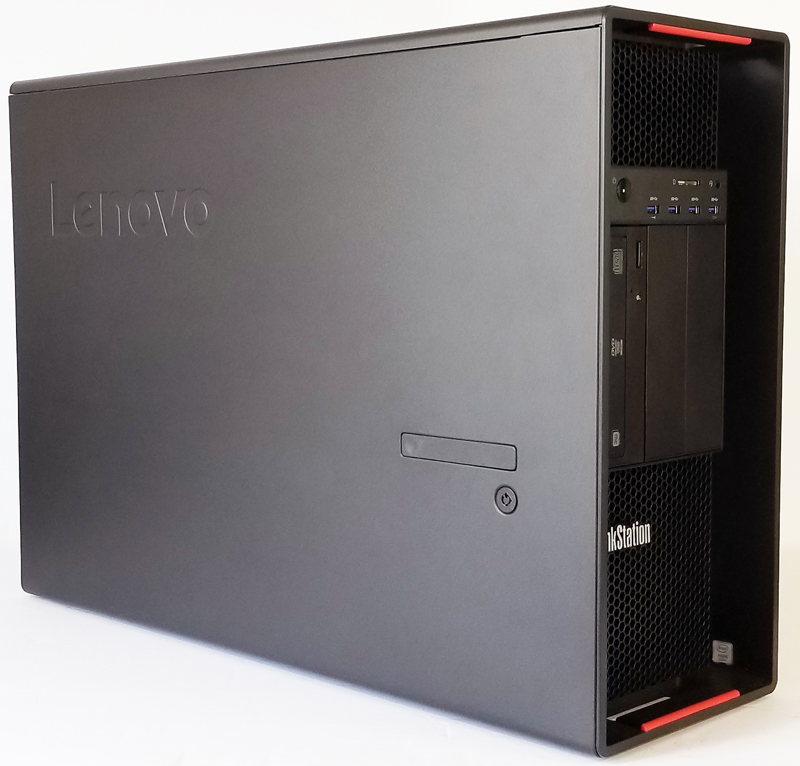
Here we have taken out the P910 and set it up on our table. The P910 is a large case at 7.87″ x 24.4″ x 17.5″ is size. The Red touch points highlight areas where hand grips are located to aid in lifting the large P910.
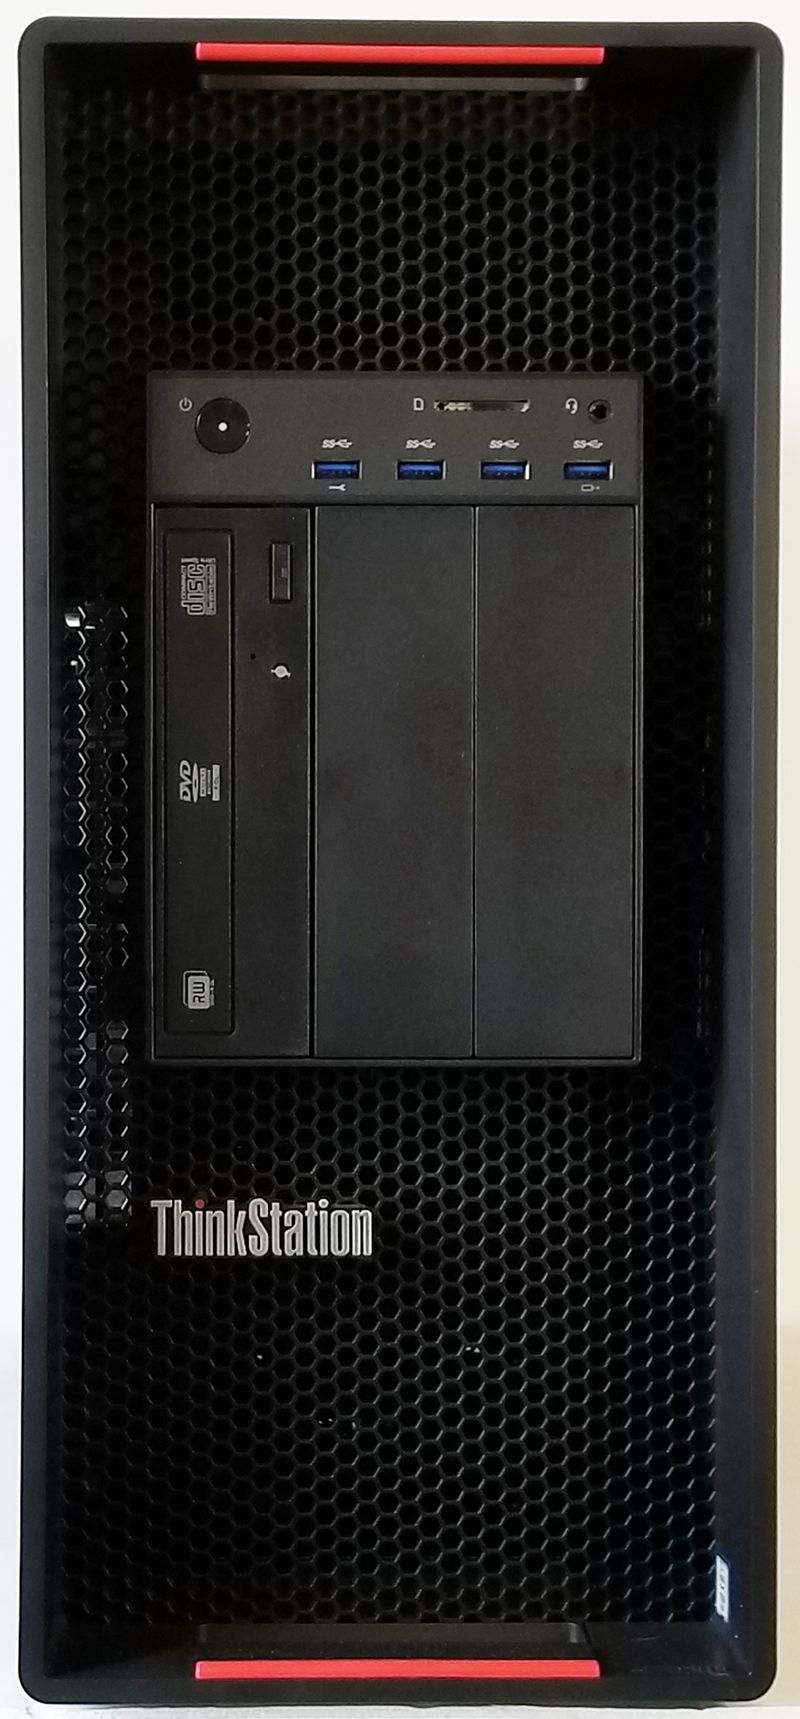
When we look at the front of the case, the first thing that sticks out are the four USB 3.0 ports, media card reader and headphone/ microphone jack. That is enough I/O to avoid running cables from the back of the tower to the desktop in most cases. We often see workstations with two front panel USB ports so this is a significant upgrade.
Here is a list of the ThinkStation P910 front ports and connections
- Flex Bay with Optical installed
- 2x Flex Bay empty
- Media Card Reader
- 4x USB 3.0 ports
- Headphone Jack
- Microphone port
- Power button
We also see the HexPerf Honeycomb Design used on the ThinkStation line up.
We would like to see the orientation of the optical drive rotated 90 degrees. The way it is now, when you eject a DVD it can fall out and onto your desk if placed in a standard tower orientation.
Let us turn the case around and take a look at the back of the P910.
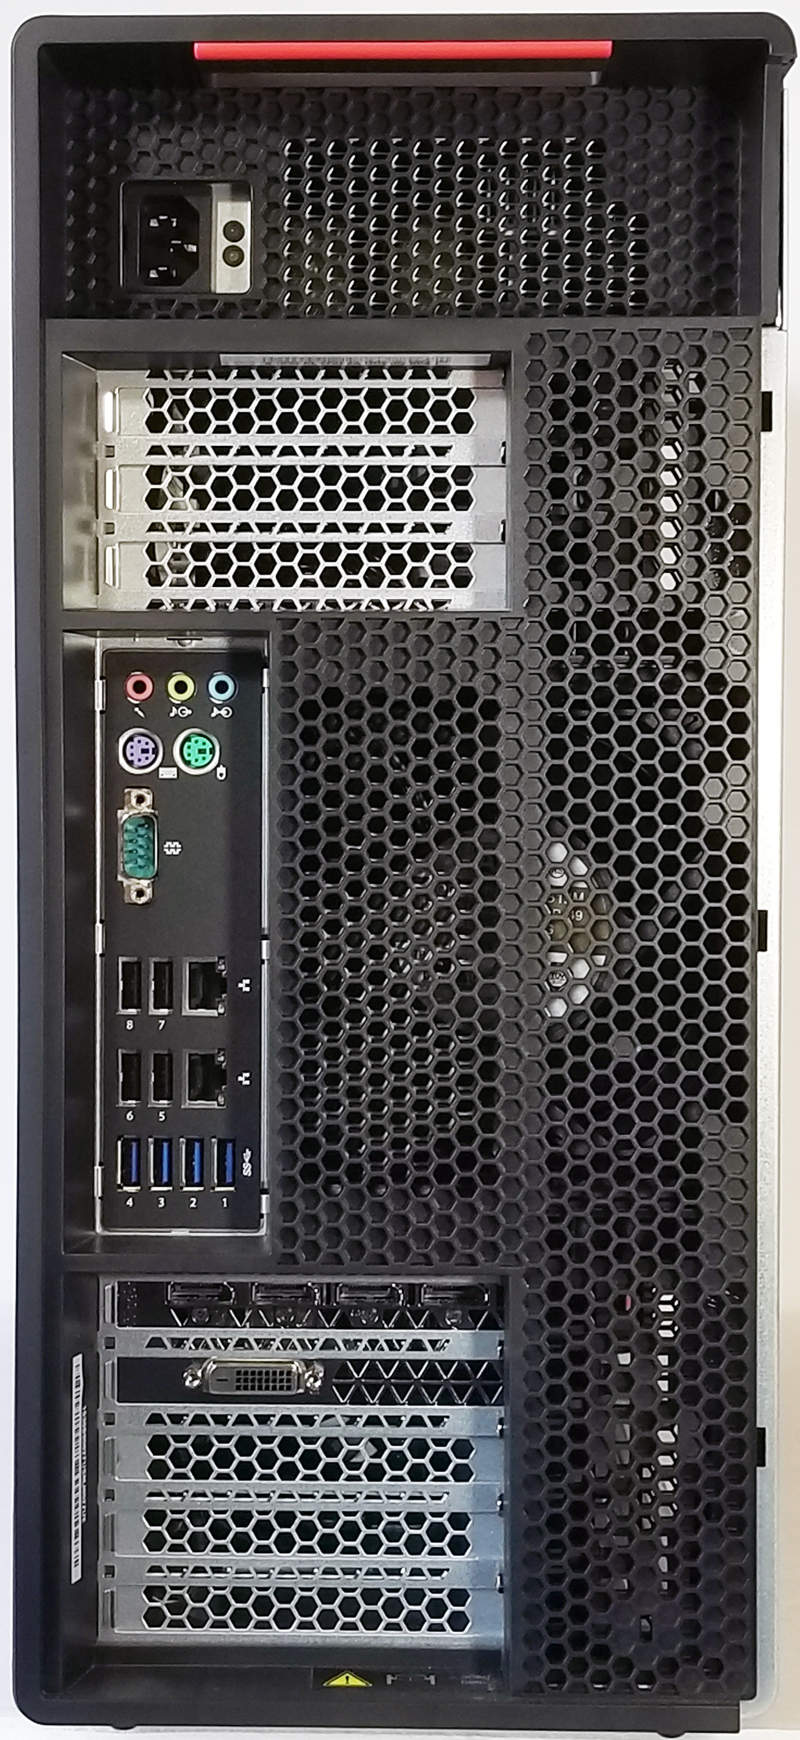
Overall, the dual LAN connections are welcome, as are the plethora of USB ports. Lenovo even adds legacy PS/2 keyboard and mouse ports along with a serial port.
Here is a list of ThinkStation P910 rear ports and connections
- 1x audio line in, 1x audio line out, and 1x mic in.
- PS/2 Keyboard and Mouse ports.
- 1x Serial port.
- 2x stacks with 1x LAN and 2x USB 2.0 ports.
- 4x USB 3.0.
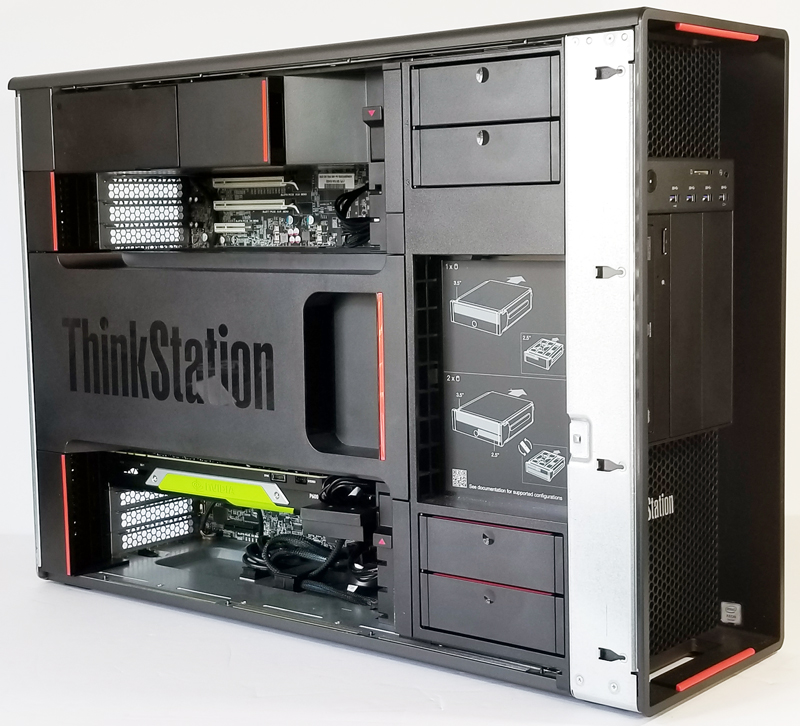
On the side of the P910, there is a locking lever which releases the side door. Let us take off the side cover and look inside.
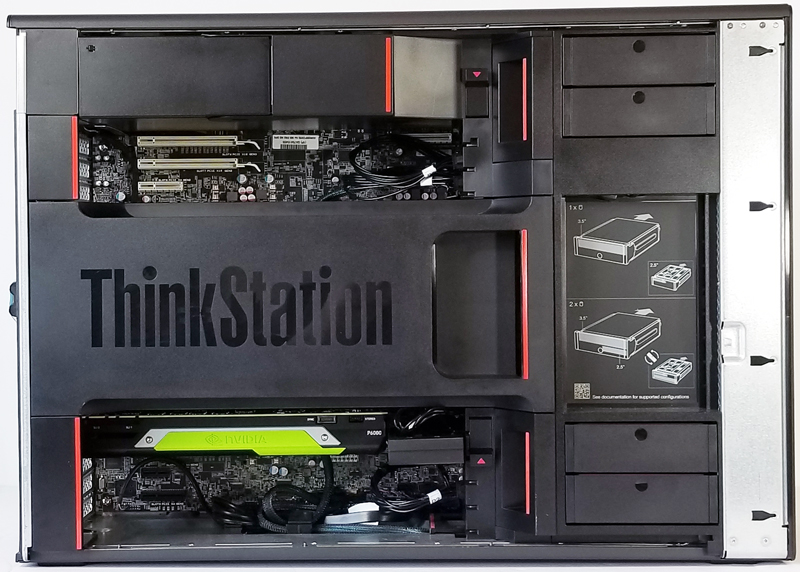
Here we have taken the side cover off the P910 so we can get a peek inside. The first item we notice is the large Tri-Channel Cooling Shroud patented by Lenovo, which spans the middle of the case. This aids in cooling the CPU’s underneath. It uses fewer fans and helps reduce noise levels. We can see many red touch points in this picture, each highlight an access point for quick and easy component changes.
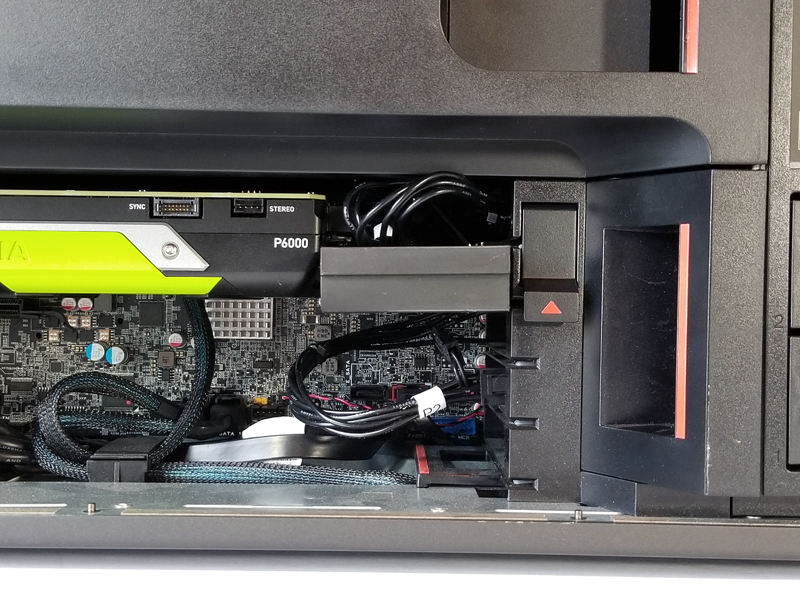
In the bottom area, we find a NVIDIA Quadro P6000 which will supply the graphics horsepower for our P910. Just to the right of the P6000, we find one of Lenovo’s Flex Connectors, there slots for two of these in the P910.
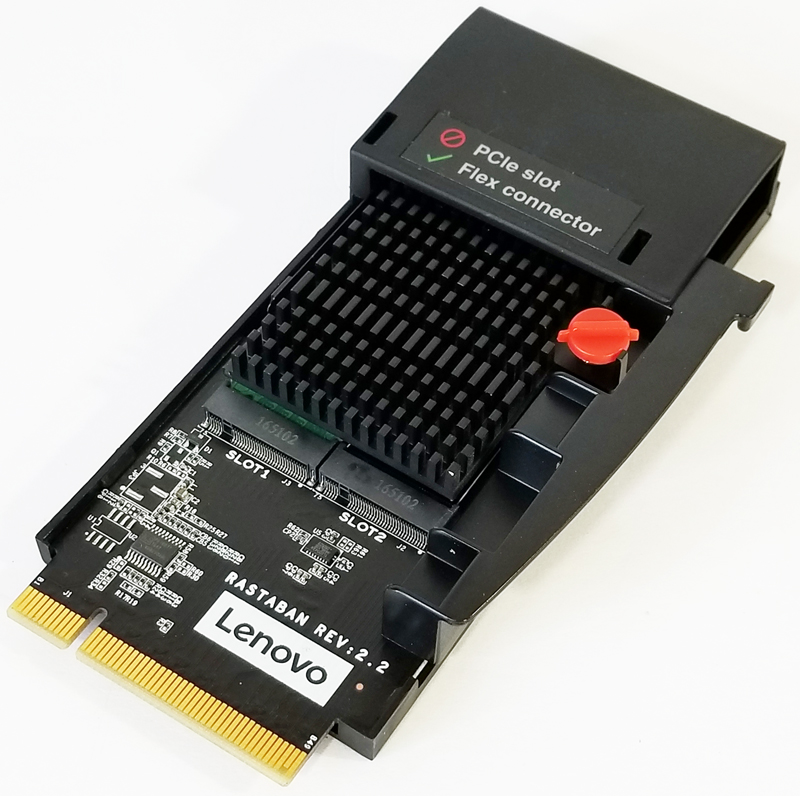
Here we have a look at the Flex Module installed in our P910. Under the heat sink is a m.2 form factor Samsung SM961 1TB NVMe SSD. We see there is also a second slot which gives the module extra storage expansion room for up to 4x m.2 SSDs.
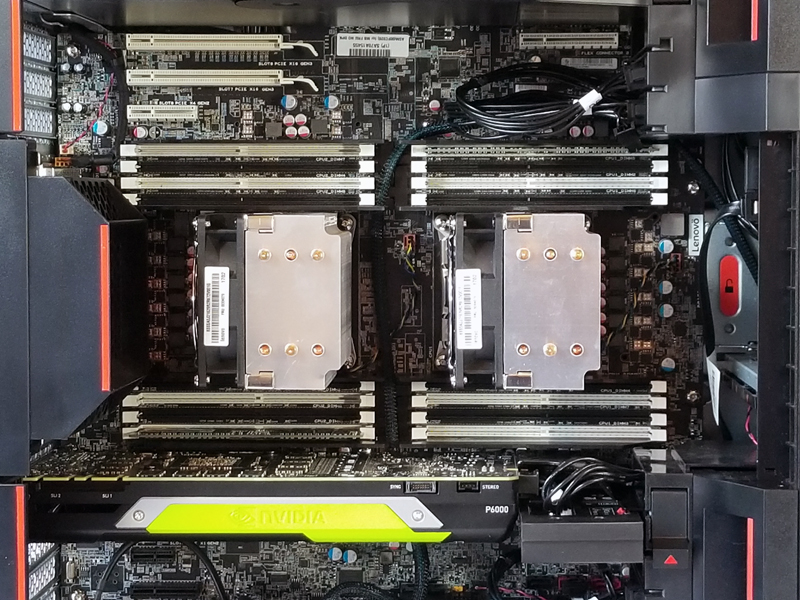
Moving on, let us take off the air cooling shroud and get a look at the CPU/RAM area underneath. Cooling fans at the front and back end of the case push air through the CPU heat sinks, boosted by additional fans mounted on the heatsink itself. Channels in the air shroud also direct air flow across the RAM sticks for cooling.
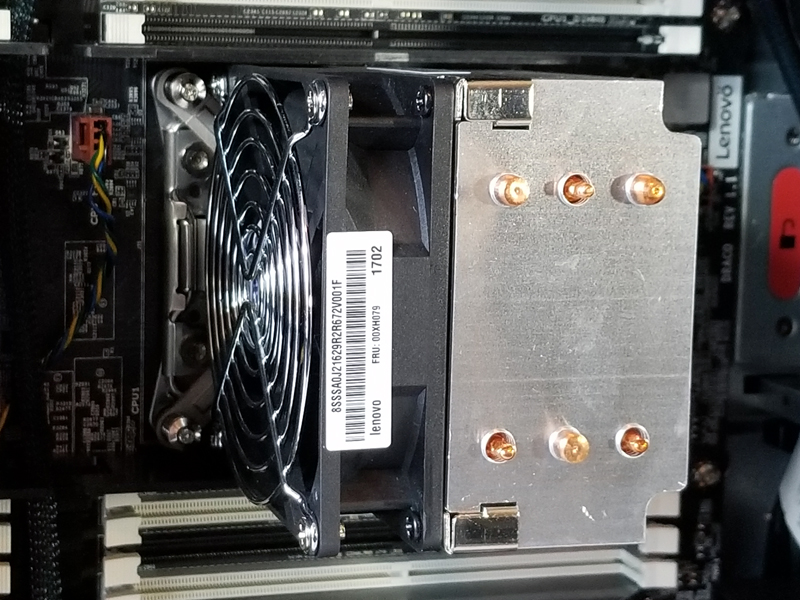
Here we take a closer look at the CPU heat sinks. Aided by the channeled airflow shroud, Lenovo can use a smaller heatsink that performs very well.
BIOS
Let us take a look at the P910 BIOS. On startup, a message will come up that allows you to press “Enter” to enter the BIOS. You will then get a screen that allows you to select startup devices and other options, select enter BIOS to continue. Layout and content of the BIOS is very similar to the P410 we reviewed earlier.
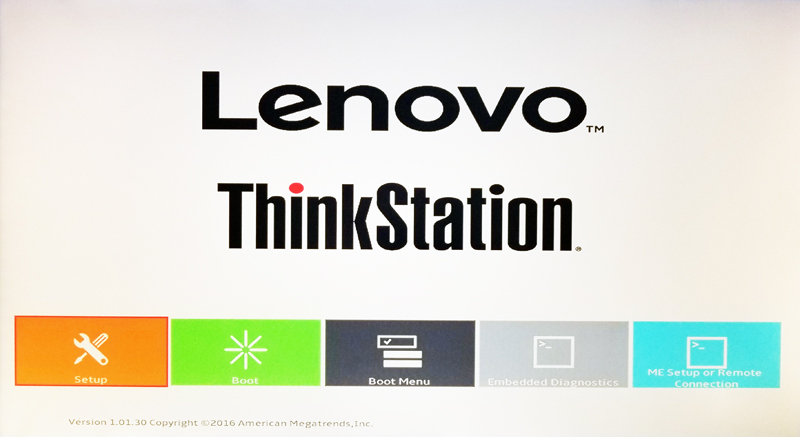
The next screen is the main front end to the P910 BIOS; we will select Setup to see what the BIOS looks like.
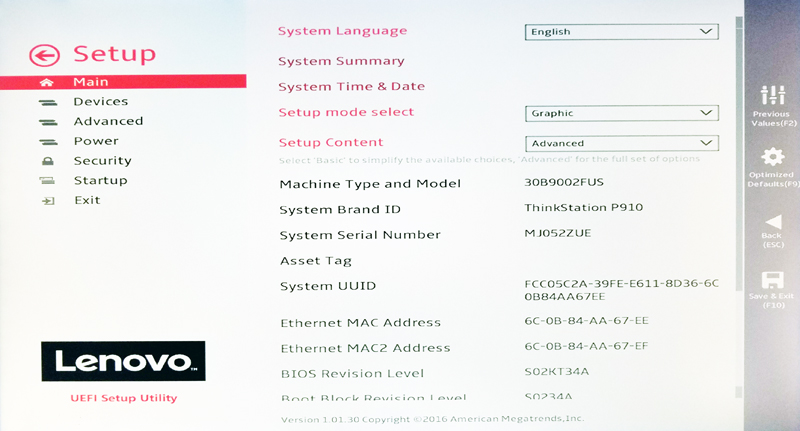
Lenovo’s UEFI BIOS; options are similar to what one would expect when entering the BIOS.
We must note that Lenovo has done a great job on this new BIOS design, it’s very clean and easy to get around.
Bundled Software
Lenovo Companion is an application which offers a wealth of features. If you are buying this class of system, you are generally doing so for excellent vendor support. To provide that support, the Lenovo Companion is a major portal for the experience.
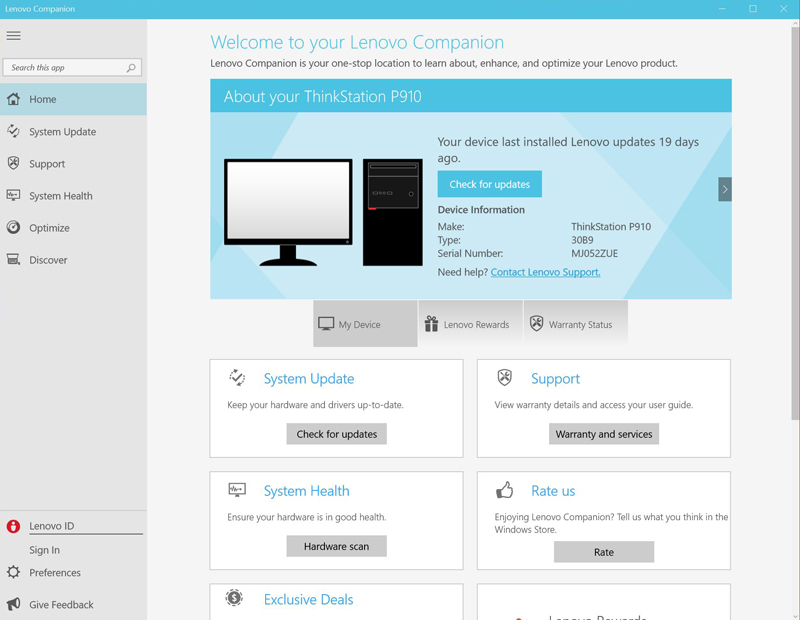
Here are some of the key features from Lenovo.
- Maximize your system’s performance
- Ensure your system is up-to-date
- Access insights & advice from Lenovo experts
- Keep current with the latest technology news
- Do more with Apps for You
- See and hand-select which system updates you want to install
- Disable apps from launching at startup, directly from Companion
- Quickly purge your PC of unnecessary files
- Easily access helpful tips specific to your system
For more information, head over to Lenovo Companion to read more.
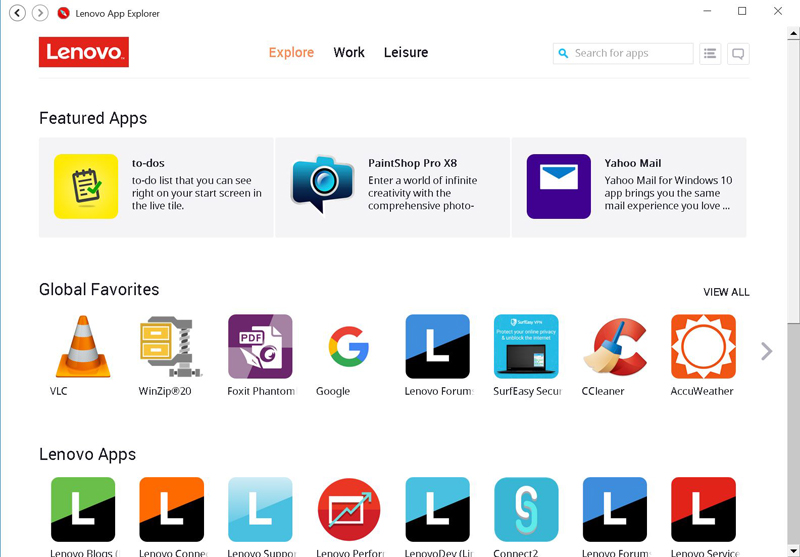
App Explorer is very much like Google Play Store which you would find on your Android phones. Its a central location to find apps you may want to use on your P910.
Lenovo Performance Tuner (LPT) is software that gives users the ability to fine-tune their individual experience based on their specific software demands.
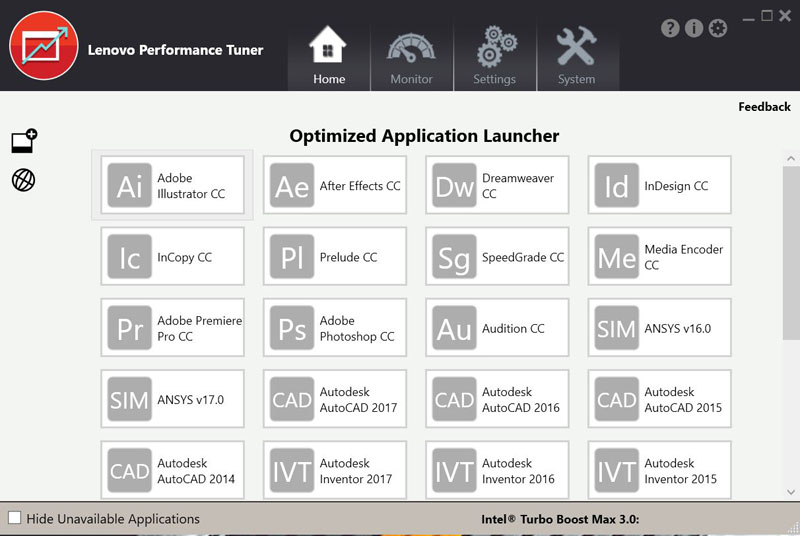
After you install your applications of choice, launch the Performance Tuner and select the application to optimize.
The software has the following features:
- Application Affinity
- Application Priority
- Power Management
- Resource Monitoring and Tuning
- Graphics Management
- BIOS Management
Lenovo has also created predefined profiles for some of the top applications to help adjust and manage resources; all completely open to customization in a couple of ways:
- Users now have the ability to designate an application to run on the specific core(s) they chose to keep the system running smoothly.
- Power and Resource optimization for both Single-core and Multi-core applications.
Test Configuration
For testing, we used the P910 in Reviewer’s Configuration.
- CPU: 2x Intel Xeon E5-2620 V4 Processors (8 cores/16 Threads each)
- Memory: 2x 8GB (16GB) DDR4
- GPU: NVIDIA Quadro P6000
- Storage: Samsung SM961 1TB NVMe SSD
- OS: Windows 10 Pro 64
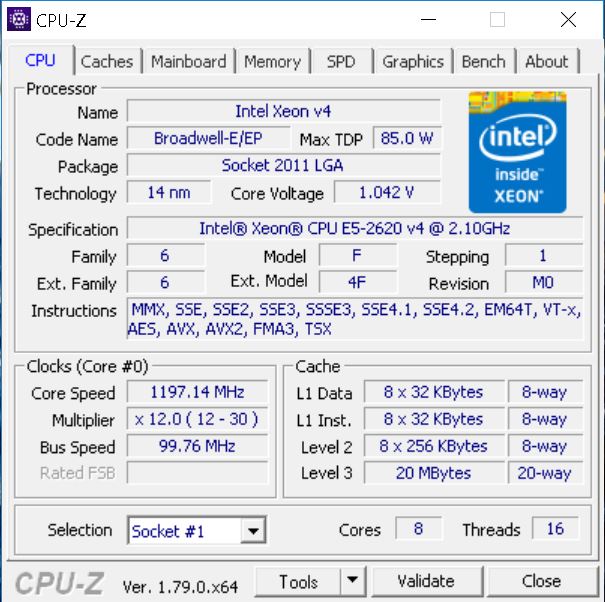
Our P910 came equipped with two Intel Xeon E5-2620 v4 processors. These are not the fastest processors in the list of available processor options for the P910; they do offer a relatively large core count which will help in multi-threaded applications.
It also comes equipped with NVIDIA’s high-end Quadro P6000 which we took a look at on a separate review. There is no need to repeat all the graphics tests for this card, head over to our P6000 review to check those out.
Performance Tests and Benchmarks
Geekbench 4 CPU Benchmark
Each CPU workload models a real-world task or application, ensuring meaningful results. These tests are complex, avoiding simple problems with straightforward memory-access patterns, and push the limits of your system.
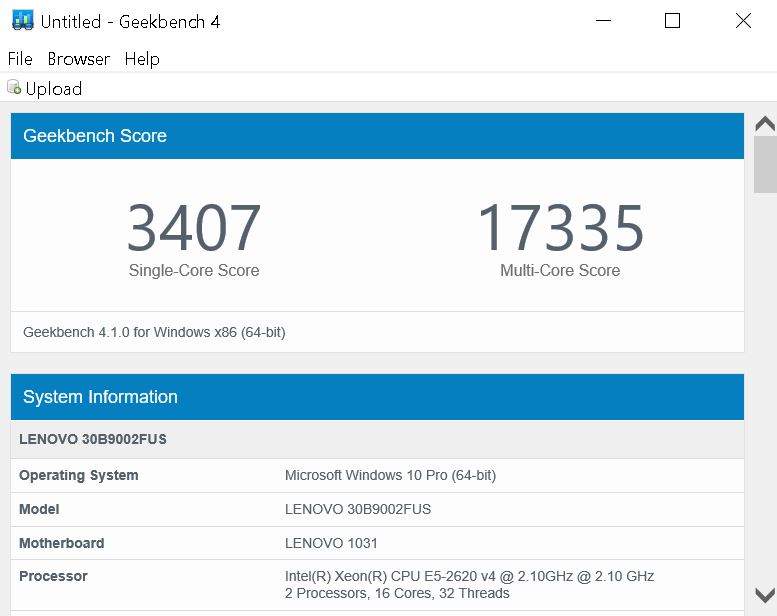
Our benchmark run with Geekbench 4 generates moderate scores results; higher clock speeds would improve these results.
Linux-Bench
We ran the motherboard through our standard Linux-Bench suite using Ubuntu as our Linux distribution. Linux-Bench is our standard Linux benchmarking suite. It is highly scripted and very simple to run. It is available to anyone to compare them with their systems and reviews from other sites. See Linux-Bench.
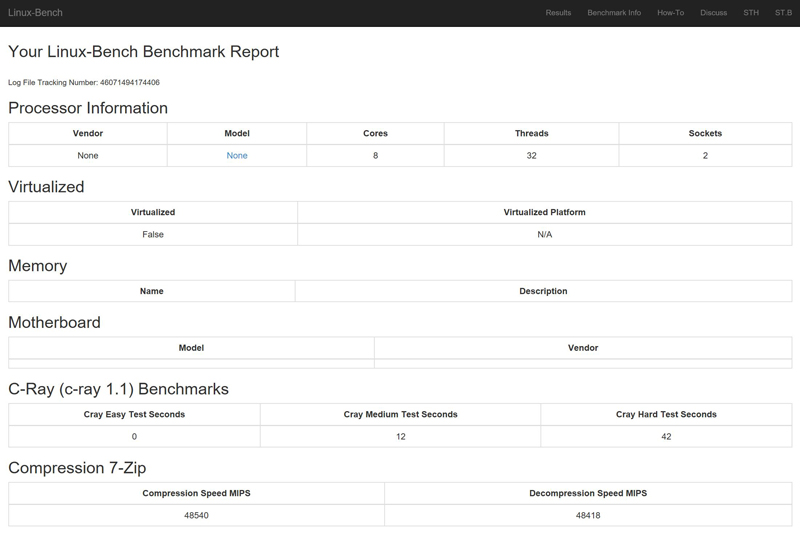
The full test results for our Linux-Bench run can be found here.
AIDA64 GPGPU Benchmark
For our GPU testing, we use AIDA64 Engineer to run the provided GPGPU tests which have the ability to run on all installed GPU’s and the CPU’s.
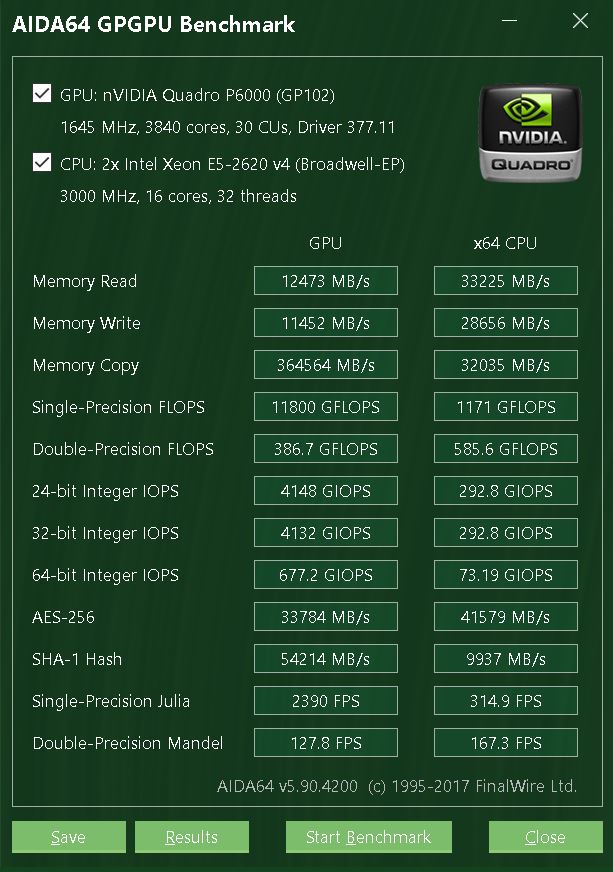
This test see’s both the P6000 and both the Intel Xeon E5-2620 v4’s in this GPGPU performance test. The P6000 is a good match for this system and depending on what workloads you will be using it can boost some applications performance.
PCMark 8
With PCMark 8 you can test the performance of all types of PC, from tablets to desktops. With five separate benchmark tests plus battery life testing, PCMark 8 helps you find the devices that offer the perfect combination of efficiency and performance. PCMark 8 is the complete PC benchmark for home and business.
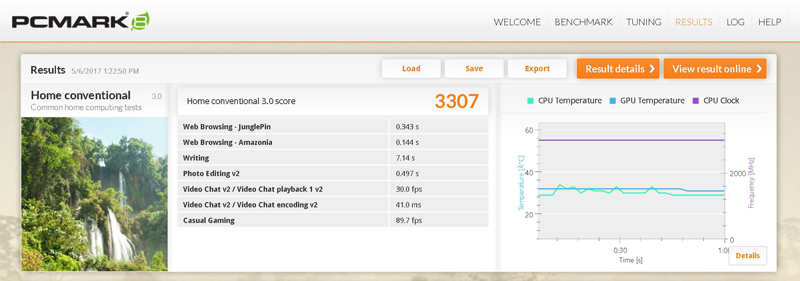
PCMark 8 benchmarks the entire system, we can see that the two E5-2620 V4 processors coupled with the P6000 and Samsung 1TB NVMe SSD generate a respectable score. With this benchmark processors with higher clock speeds and a larger number of cores will boost the results higher.
Passmark 9.0
Passmark 9.0 is another benchmark that tests the entire system and generates a PassMark rating.

According to Passmark a score of 5084 puts this P910 in the top 95 percentile of systems.
Storage Tests
CrystalDiskMark is designed to quickly test the performance of your hard drives and SSD’s.
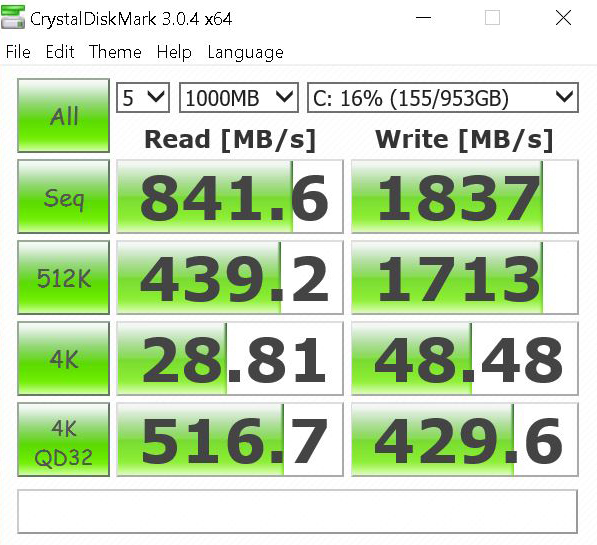
We use the C: Drive which has the operating system installed. Our drive is a Samsung SM961 1TB NVMe SSD.
PCMark 8 Storage Benchmark
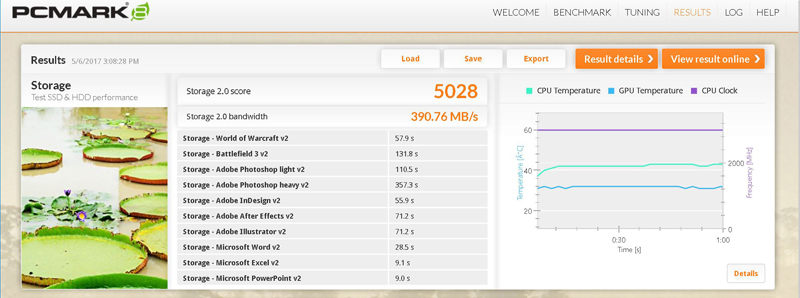
The Samsung SM961 1TB NVMe SSD installed in the flex module on our P910 and used as an OS boot drive generates impressive results.
Boot Time
BootRacer is an app that will tell you how long your computer takes to boot. It will measure the actual time your PC takes to get to Windows boot process, then measure the actual windows OS boot time.
BootRacer is a free download for personal use and can tell you if your PC is booting slower over time or after you have installed apps.
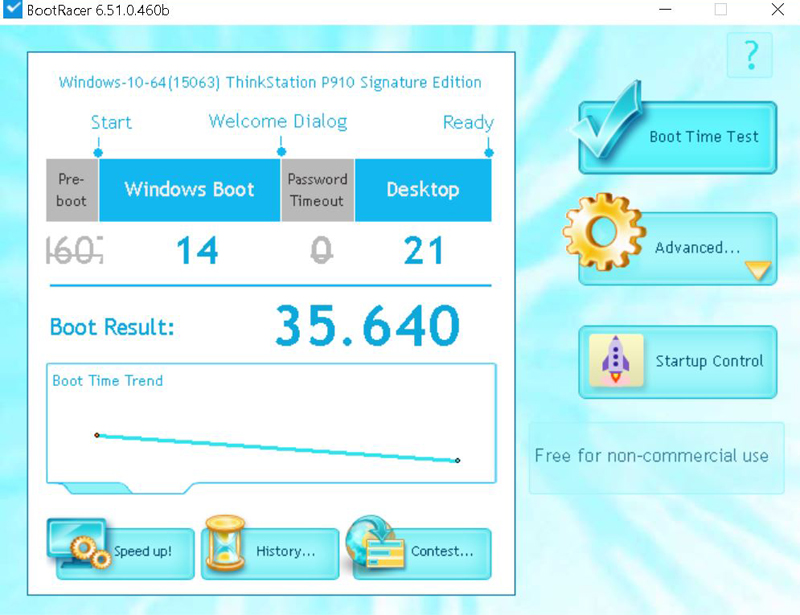
Booting up the P910 for the first time, we noticed it was very fast. In fact, one of the fastest booting dual processor systems we have used. Our everyday driver based on an ASUS TS700-E8-RS8 Workstation which uses a Z10PE-D16 WS motherboard and two E5-2699 V3 processors takes over a full minute to boot up!
We ran Bootracer on the P910 after we set everything up. No special BIOS settings were adjusted, BIOS set to default settings fresh out of the box. At 35 seconds for complete a system boot on this Dual-CPU based system is impressive.
Power Tests
For our power testing needs, we use a Yokogawa WT310 power meter which can feed its data through a USB cable to another machine where we can capture the test results. We then use AIDA64 Stress test to load the system and measure max power loads.
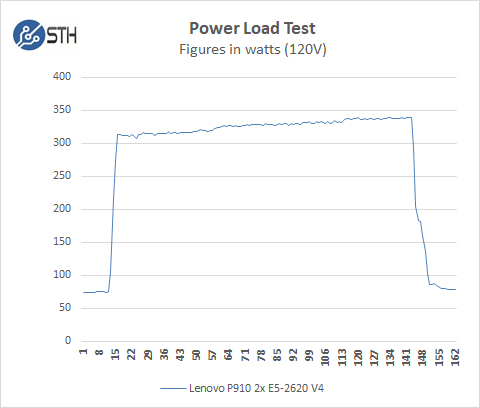
Our P910 configuration does not pull huge amounts of power under heavy load, coming in at close to 350watts even with all components except the OS Boot drive at maximum loads.
Conclusion
Top end workstations are always a pleasure to review here at STH. Over time we have used many different workstations from several manufacturers, each workstation has its pros and cons. These could range from being very hard to get inside the system for maintenance, adding new components, noise levels, and storage options. We feel the ThinkStation P910 has hit the sweet spot; it is a complete tool-less case which makes it a breeze to add drives, swap out PCIe devices or pull fans out for cleaning. Lenovo’s patented Tri-Channel Cooling solution not only cools the processors very well it also helps a great deal to remove noise.
Using the Flex-Module with a Samsung 1TB NVMe SSD improves system response. Most dual processor systems we use, boot in the range of a minute plus, our P910 booted in 35 seconds which was amazing to us. It boots as fast as many single processor systems or laptops that we use daily.
One of the other workstation specifications we first look at is the number of USB ports the system has; we use a large number of USB devices here in the lab which makes this an important feature to use. With 4x USB 2.0 and 4x USB 3.0 ports at the back and 4x USB 3.0 ports at the front fills our needs very well.
If audio outputs are important to you, we find the supplied rear audio ports to be lacking with only one output jack. An additional option to look at when customizing your P910 would be an independent audio card which has a Sound Blaster Z Audio add-in card or via USB 3.0 audio options.
Network options are relatively standard with 2x 1Gbps ethernet ports. There are more advanced network adapters available as purchase options. We would like to see 10GbE options available.
The bottom PCIe device area of the case is large and roomy. There is ample space to house two graphics cards, and case fans provide airflow. This area is large enough to handle longer GPU’s such as our ASUS ROG Strix GTX 1080. These are big cards which might interfere with the Flex Module if you use one.


Can you put this workstation in a rack?
Comments are closed.