After recently reviewing the ASUS P8H67-M EVO I thought it would be a good idea to take a look at a larger ATX motherboard, the ASUS P8P67 Pro. Based on the P67 chipset, the ATX board sacrifices being able to use Intel’s Sandy Bridge on-die GPU to provide video connectivity in favor of a few distinct advantages. The P67 chip set supports overclocking and splitting PCIe lines off of the GPU into two PCIe 2.0 x8 lanes.  The net result is a pretty awesome feature set with one big caveat, a ton of Sandy Bridge transistors related to the onboard GPU, such as Quick Sync cannot be used with the P67 chip set.
Before moving forward, Sandy Bridge’s Cougar Point chip set is having some well documented issues at the moment, specifically regarding the four SATA 3.0gbps ports that hang off the chip set. Intel has made arrangements with motherboard manufacturers to recall the defective products out there, however boards are currently not shipping while the Cougar Point revision is being manufactured. While we await the channel availability of P67 and H67 boards, I decided to get a head start on some of the reviews since it seems like this is more of a reliability fix than a feature change. For users of home servers, a very common data storage model is to have an OS drive or two, be they SSD or rotating disk, in the HTPC, notebook, or workstation chassis and the majority of data storage on storage servers. With this in mind, the functioning SATA III 6.0gbps ports are going to be sufficient for many of this site’s users and the ASUS P8P67 Pro has an additional Marvell controller to provide two additional SATA III ports over the standard Intel ports.
Test Configuration
To drive consistency with these benchmarks I am going to be using the Sandy Bridge platform’s 6.0gbps ports for the drive testing. Performance will change based on the controller used.
- CPU: Intel Core i5-2500K
- Motherboard: ASUS P8P67 Pro ATX motherboard
- Memory: 8GB 1600MHz CL9 DDR3 (4x2GB) I also used 4x Corsair Vengeance 4GB DIMMs to show a larger RAM heatsink
- OS Drive: OCZ Agility 2 120GB
- Additional NICs: Intel Gigabit CT PCIe x1 network adapter
- Enclosure: MYOPENPC DOMA Pro PCI Black Transparent Acrylic Open Computer Case
- Power Supply: Corsair AX850 850w power supply
Board Layout
The ASUS P8P67 Pro provides many standard features for consumer motherboards in its class, but there are a few areas worth noting. First off, there are three PCIe x16 physical (if all are used they are x8, x8 and x4), two PCIe x1 slots and two PCI slots. That is a lot of expansion possibilities. The first thing I did was add a Intel Gigabit CT PCIe x1 network adapter since, unlike the EVO or Deluxe models, the P8P67 Pro only has one onboard NIC. It ended up being less expensive to go this route than to get a secondary Realtek NIC.

One nice thing is that the two PCIe x16 physical slots that use the CPU’s PCIe lanes have two expansion slots between them. That is generally preferable if one is using two air cooled GPUs. I actually think expansion slot layout is something hard to do poorly unless there is a major board feature in the way of an expansion card slot. My advice is to always look at pictures of the board and expansion slots and mock-up before purchase.
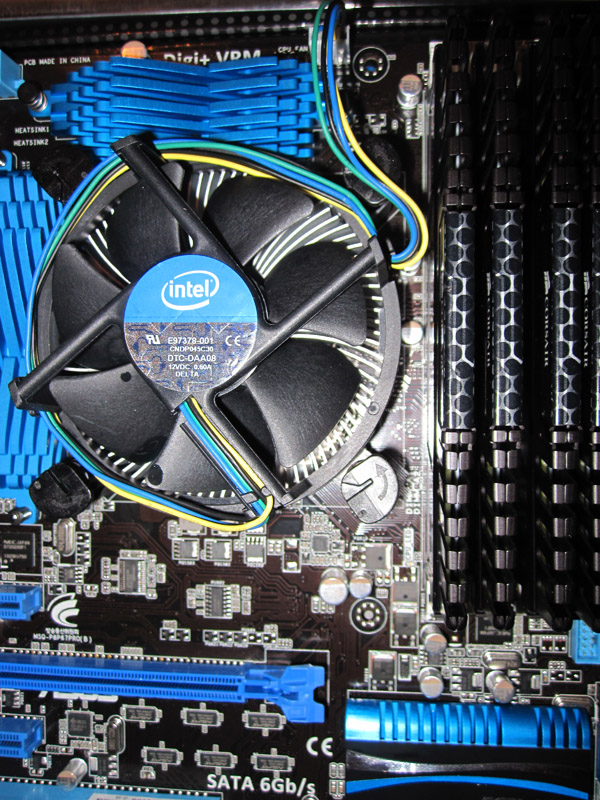
The Intel HSF unit is compact and fits easily in this space. My suggestion to H67 platform buyers is to save money by using the retail unit, it works more than adequately. On the P67 side, I will say that switching cooling was required above the 4.3GHz to 4.4GHz range on both the Core i5-2500K and Core i5-2600K. One major point here is that the P67 chip set begs for a K series CPU as overclocking on the Sandy Bridge platform is very easy since one is doing multiplier overclocking. Then again, I tend not to focus on overclocking on this site because most of the users are looking for home servers, not fast multi-GPU gaming systems. Note, there is plenty of room for the stock cooler even with 8GB of RAM installed, but larger coolers may run into space issues.
As a small note, using my main workstation’s watercooling setup I was able to dial in 5.05GHz in the UEFI “Advanced Mode”, leaving everything else on auto with my Core i7-2600K. This is one CPU family where the stock cooler is good, but there is very easily attainable additional clocks (over 10% more clock speed in my case) with a better cooling solution. Just beware, installing a waterblock is easy but larger heatsink and fan assemblies may be too large.
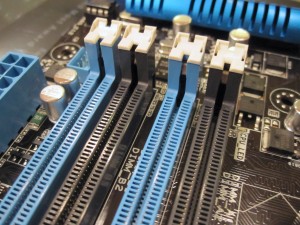
One thing I will note that is interesting on the new ASUS boards is that one side of the DIMM slots are the standard locking latches but the other side is completely fixed. ASUS takes the care to make each side look similar from above, but do not be fooled, one side does not move. The P8H67-M also had these fixed DIMM posts.
Software
Probably the most interesting piece of software is the UEFI interface that ASUS provides. For those accustomed to standard BIOS that have been used for decades, the ability to use a mouse is welcome. I did find though that using a mouse was almost necessary as navigating by keyboard was not as slick as old AMI, Phoenix, and Award BIOS implementations. The UEFI interface provides a simple mode (called EZ mode) that shows things like boot order, and lets a user change profiles between a power saving profile, balanced profile, and performance profile.
Beyond the UEFI interface, ASUS provides a suite of software including AISuite II, AICharger+, and ASUS Fan Xpert. Plenty of details can be found on ASUS’s site, but the highlights from this software are the abilities to:
- Monitor system information from fan speeds, temperatures, voltages, clock speeds and etc. and set alerts.
- Overclock the CPU if desired either manually or using a CPU auto tuning feature. Aside from tuning the K series CPU multiplier, the base clock can be increased too by a small amount as 100MHz to 103MHz base clocks are generally obtainable from a 100MHz base.
- Set the EPU power saving profiles and features. The EPU is a feature of ASUS motherboards meant to intelligently reduce power consumption.
- Set and test fan speeds using Fan Xpert. This can be useful if one wants to set thresholds and test them for quieter idle fan speeds ramping up as the workload increases.
- Enable fast charging (up to 3x faster claimed) using AICharger+
Overall I found these utilities to be fairly useful and given Sandy Bridge’s performance, and the fairly low CPU requirements of the utilities, they are worth keeping around.
Features
Gigabit LAN connectivity is provided by the PCH’s Intel 82579 GigE controller. This controller is fairly strong Intel based controller which is a nice upgrade over standard Realtek controllers. Intel lists the 82579V’s 1000 unit price as $1.72, so it is a more expensive option for motherboard vendors. An interesting aside is that the Intel 82574L controller, a favorite on server boards is rated at approximately .06w more power consumption than the 82579, which is more or less negligible in terms of system power consumption (both consume under 0.75w total).
ASUS uses two add-on controllers to add more SATA connectivity. eSATA 3.0gbps connections are not available from the Intel PCH, rather they are provided by the JMicron JMB362 controller. The Marvell 9120 adds two 6.0gbps internal ports bringing the total port count to four 6.0gbps ports, and two 3.0gbps eSATA ports not impacted by the Cougar Point recall. One of my favorite features of the board is that there are NO IDE connectors on the entire board. It has been years since I have had an IDE device so this is part of backward compatibility I am happy to forfeit. Actually, a board with no PCI slots would be welcome as well, but there are inexpensive Gigabit PCI NICs.

Like the ASUS P8P67-M EVO, audio on the P8P67 Pro is provided by the Realtek ALC892 8 channel HD Audio CODEC which is fairly commonplace on consumer motherboards. Audio out is handled by the 8 channel rear outputs as well as the rear panel S/PDIF Out and coaxial out. Internal connectors are available for another S/PDIF out and front panel audio.
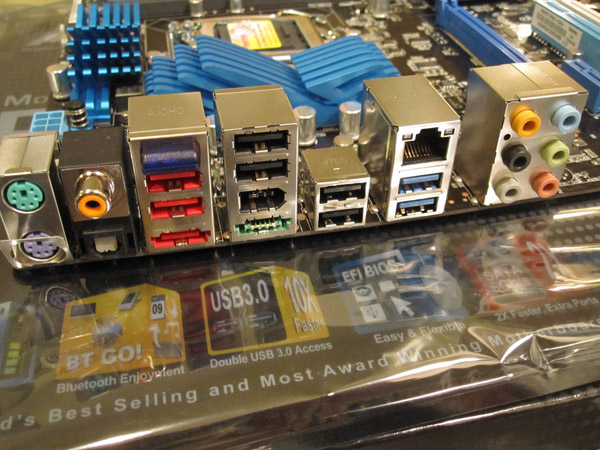
NEC USB 3.0 controllers provide USB 3.0 connectivity which is nice. Hopefully Intel will soon follow AMDs lead in providing USB 3.0 ports off of the chipset which would most likely lower component count and cost. USB 3.0 is far superior to USB 2.0 for storage applications.
ASUS also includes a Bluetooth dongle situated on the rear IO panel. It allows for things such as using a mobile device application to overclock the system. This is a cool feature, but what would be awesome is if ASUS did something similar to the IPMI 2.0 or Areca’s out of band management and provided an IP network based BMC function. Any device, anywhere, total control over the PC. This idea came primarily from seeing the familiar Nuvoton name on a P8P67 Pro IC (see picture below just to the right of the second PCI slot.) That Nuvoton controller is what feeds a lot of telemetry information on the motherboard, similar in a way to the Nuvoton ICs that power many IPMI 2.0 implementations. Just a thought here since IP management is great.
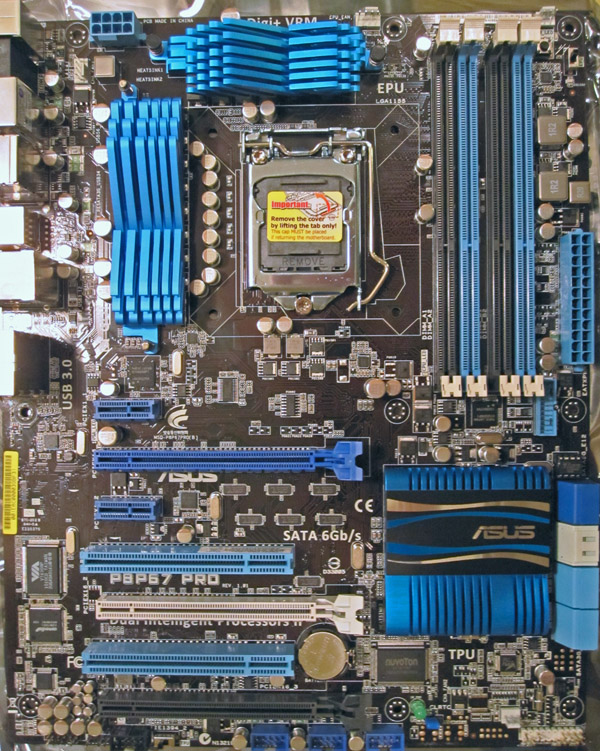
The P8P67 Pro has both a 12+2 phase digital VRM which aids in both overclocking and achieving low power states. The ASUS EPU is an included technology meant to monitor system requirements and ratchet down power consumption. One nice thing is that the ASUS P8H67-M EVO does a fairly good job entering low power state. The entire system configuration noted went into suspend mode and drew 4w (one watt more than the P8H67-M EVO) on the Kill-a-Watt. This is a negligible difference and 4w for many consumers equates to approximately $4/ year if the system is never turned on.
Conclusion
Overall, the P8P67 Pro is a great board for someone looking to build a home server utilizing a Sandy Bridge CPU. For the time being, the Cougar Point chip set bug may make availability difficult, however the relatively low cost of the board, combined with Sandy Bridge’s performance make this a solid offering. Two interesting notes would be that the C200 series Xeons are known to be coming shortly, which will undoubtedly be a better home server platform if just for the ability to use ECC DIMMs. If one has to build a home server today, I would actually still purchase a LGA 1156 Lynnfield or LGA 1366 platform just because they are more mature. On the other hand, Sandy Bridge is an exceptional workstation platform (when overclocked) especially when one has network attached storage and only requires 1-2 internal ports for SSDs. The P8P67 Pro actually provides enough SATA ports that a RAID 0 SSD configuration with a local backup drive and an optical drives is possible without touching any of the currently bugged SATA 3.0gbps ports.
If anyone was wondering, I actually replaced my old LGA 1366 Core i7 with this board and a Core i7-2600K. One can see my workstation specs and a sneak peak at overclocking results on the forums: here.


Hi, this board have drivers for w2003 server ? Thanks
yes it has drivers for xp which will work with windows sever 2003.
i was trying to find out how the sata ports are number on the board? Like witch port is A and Witch is drive B and so on! I have this board and right now my DVD is lettered D drive then my other drive are after that, I want my SSD drive C witch it is now then my next hhd to be D and so on with my DVD the last one in the list! I have 1 ssd witch is C now thats ok then i have 4 HHDs and want them D,E,F and in order with my DVD the last drive! But iv looked for like 3 months and no one tells you this! Not even asus! So i was wondering if someone here could help me out? Thanks I have 2 1tbs I want to raid 0 them and want them in D,E order!
@bob
How your drives are lettered is to do with the OS not the plugs on your motherboard.
You change that in disk management…
Windows 7:
start > right-click computer > manage
Under Storage click Disk Management
right click on the drive you want to change and click change!
simple as that :)