
For some that have noticed, STH started publishing guides on FreeNAS for some time. I wanted to take a quick pause and show the next-generation FreeNAS system we are setting up in the lab for storing backups, caching larger data sets, and similar needs. I also wanted to take the opportunity to share a few tips and tricks we use moving to a much larger setup. Many of the FreeNAS guides deal with much smaller installations of 2-8 drives. When dealing with larger FreeNAS systems, one does need to spend a bit more time on management.
Why we are moving to larger FreeNAS storage
In the DemoEval lab we have had requests to store larger data sets for folks who want to provision future environments faster. We have always provided a basic repository but we finally wanted something a bit faster. We like to support open source projects and have used FreeNAS for years.
FreeNAS has a few features that we really wanted:
- ZFS
- The ability to handle the hardware we had on hand to build the storage
- The ability to handle larger storage pools as we migrate to larger disks
- A GUI to handle some of the setup without having to always use the command line
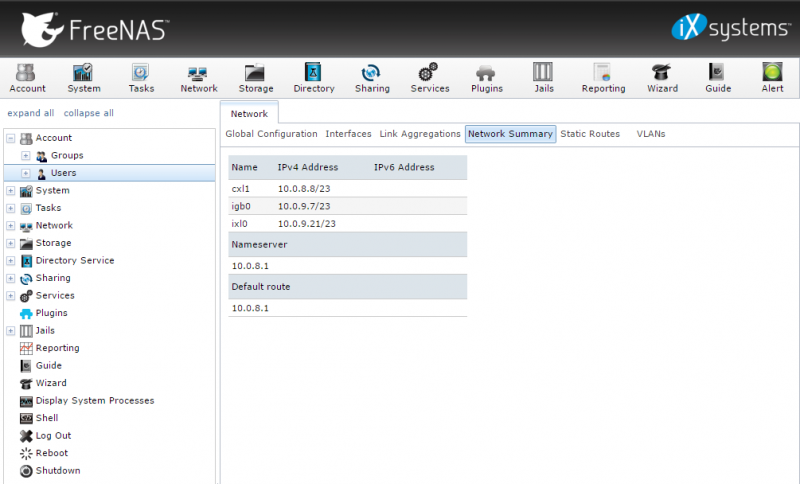
On the GUI, we have been trying out the FreeNAS 10 Beta versions. While we cannot use the Beta software for this build, we do hope to upgrade in the future. We also could have likely gotten by with a FreeNAS Mini XL

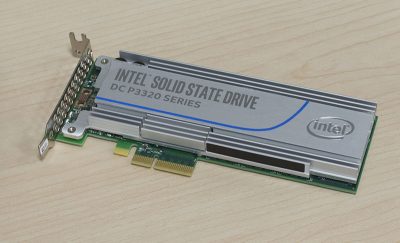
- The ability to use multiple NVMe drives (Intel DC P3700) for ZIL and L2ARC (Intel DC P3600)
- The ability to use dozens of SAS SSDs we had in the lab for an all-flash pool
- The ability to utilize 40GbE via a Chelsio T580-SO-CR
network card
- The ability to re-use existing storage and have room for additional storage going forward
While for smaller setups we recommend simply buying a FreeNAS Mini or Mini XL and being done with it, the fact that our lab is moving off of 10GbE and onto 40GbE and that we needed capacity for over 30 drive bays meant that we wanted to use something bigger.
We do also like the Napp-it project’s web GUI but decided to use FreeBSD and FreeNAS for this particular appliance so that we can use it for a few guides when FreeNAS 10 is released.
The Hardware
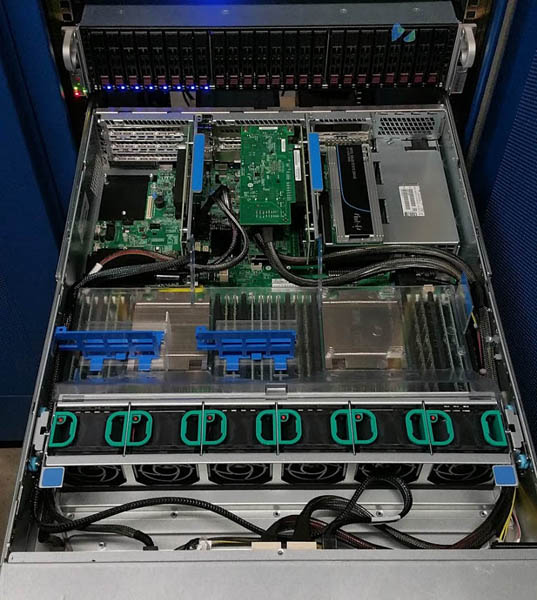
This is a slightly larger system so we are utilizing a 2U head node and a 4U 45-bay chassis. Many of our hardware decisions were heavily influenced by the fact that we have a lab and we had the parts available to use. iXsystems, the company behind FreeNAS offers a TrueNAS platform that we would have used if our budget allowed.
2U Controller Node
-
Intel DC NVMe AIC Intel R2208GZ4GC 2U server with 8x 2.5″ hot-swap bays
- 2x Intel Xeon E5-2690 V1
- 128GB DDR3 RAM
- 2x Intel DC P3700 400GB (ZIL)
- 1x Intel DC P3600 1.6TB (L2ARC)
- 2x Intel DC S3500 160GB (OS)
- 4x SanDisk Lightning lb406s SLC SSDs
- 2x Toshiba 1.6TB SAS3 (PX03 series) SSDs
- 1x LSI SAS 3008 (in-chassis connection)
- 1x LSI 9300-8e (disk shelf connection)
- 1x Intel XL710 40GbE “backup” network via mezzanine card
- 1x Chelsio T580-SO-CR 2x 40GbE network card
That chassis is fairly stuffed but we were able to make the configuration work. The CPUs are not what we would recommend to others, we simply had this machine available in the spare parts bin. The NVMe is important since we are moving above 10GbE and we wanted higher throughput storage.
Disk Shelf
Our first disk shelf is a 45-bay SAS2 3.5″ expander disk shelf made by Supermicro (847E26-RJBOD1
A Quick Look at the FreeNAS System
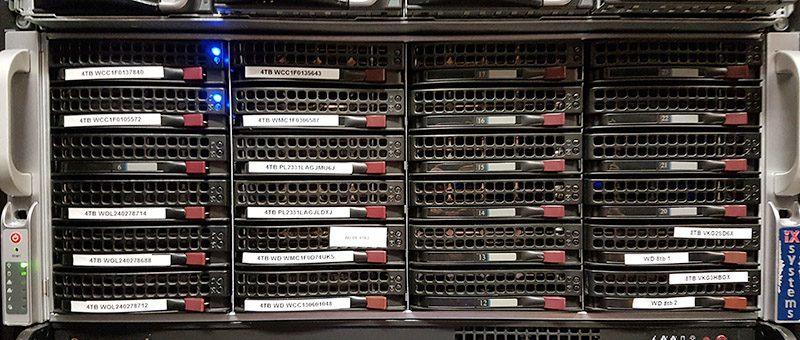
We did take a few photos in the data center as we were putting the setup together. Right now it is sitting at around 100TB of storage space with the intent that new drives will be added in the coming weeks/ months.
The head unit of our system is very similar to the 2U Intel hosting nodes we use for STH. In our hosting environment, we upgraded the nodes to utilize additional NVMe devices. These chassis share many common parts which helps.
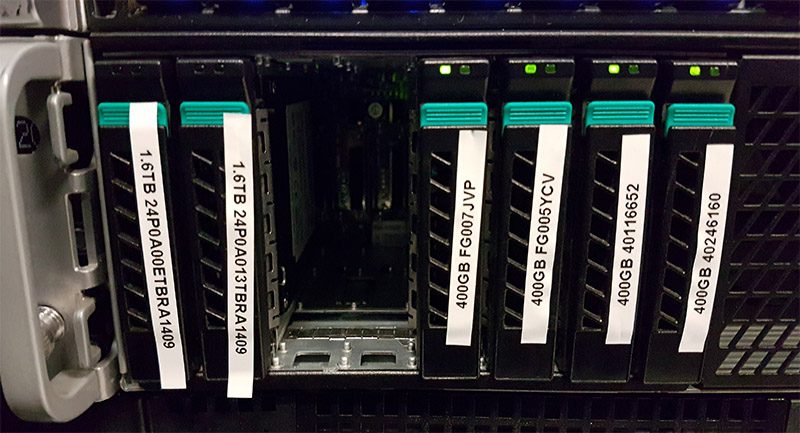
We did find that the Toshiba 1.6TB SAS3 drives had such long serial numbers in FreeNAS that the labels were too big!
In terms of networking we are using this as a test bed to see Intel XL710 versus Chelsio T580 40GbE performance. If we do find anything interesting we will surely report back. We still have a few weeks before this system will be needed for anything other than offsite backups.
The front of the disk shelf chassis looks like a normal Supermicro 4U 24-bay system. You may even be able to sport the Easter-egg that we are actually re-using an iXsystems 45-bay disk shelf.
Note: the hardware was not provided by iXsystems. They do not know that we built this system or are publishing this piece.
Moving to the rear, you can see that it looks similar to the front except that where the top left three drive bays are there are two power supplies and 8x SFF-8088 ports. In this photo we are using one of the SFF-8088 ports to connect to the head unit and we are simulating a drive failure by pulling out a HGST 100GB SLC SAS SSD.
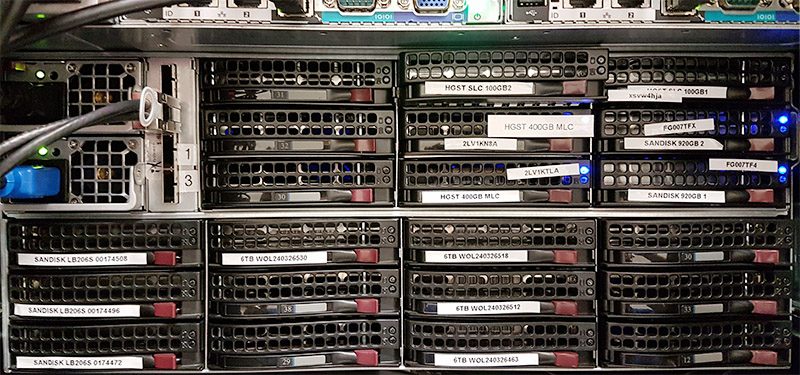
When using storage with rear hot swap bays, you do need to be mindful of how they will be serviced. If they would be blocked by a zero U PDU in your rack we advise placing SSDs in those bays as they have less than a tenth of the failure rate of hard drives. Although we eventually swapped out most of the drives here after testing, we were even using SanDisk Lightning lb206s SLC SSDs in this photo.
Tips for Using a Similar System
Since this is a less explored area, we wanted to show a few tips on setting up a larger FreeNAS system. These tips will work well with smaller systems but moving to a similar size system they will become more important.
- Label EVERYTHING. FreeNAS serial numbers in the GUI may not match the drive serial numbers labeled. You need to have a way to figure out what drive is in which drive bay, especially if they are going to be in a data center where remote hands (someone else) may be replacing drives for you. You may need to insert a drive and then make a label for the drive to ensure you have label-to-GUI alignment.
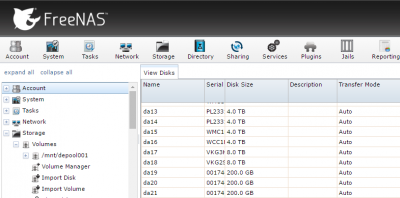
FreeNAS DemoARK Drive Listing - Backup your labeling. Take your mobile phone and take pictures after you are done. Every so often a label or row of labels can potentially fall off. If this happens having a photo with the correct labels will be a savior. You can also use these photos to circle drives for remote hands to be extra clear on which drive needs to be swapped. Our advice is to re-take photos whenever you add/ remove a device that way you always have the latest copy.
- Use GUI descriptions in FreeNAS with locations. In a larger system saying a drive is an 8TB hard drive is not as useful. Create a naming convention such as C1 (chassis 1), R2 (row 2), Col 3 (column 3) or C1R2Col3 that you can use in your descriptions to again help locate drives. We have also seen folks put references useful for RMA information such as PO numbers, in service, and warranty dates.
- If you do put SATA drives in a dual expander SAS backplane you may not see them in FreeNAS. The common fix is to use another SAS expander port on the enclosure. While most SAS drives you buy today are dual port, SATA drives are single port. As a result, if you are plugged into the wrong channel you can see SAS drives but not SATA drives.
- Change the hostname! FreeNAS is popular in lab environments so you will likely want to have a different hostname to avoid future confusion.
- Dedicate a 1GbE port for management. Our server has 4x 1GbE ports onboard. Since they are not useful for data transfer, we can use these ports for a dedicated management interface and attach it to an out-of-band network. Another good use case is for IPMI networks where you may want to share images to server out-of-band networks.
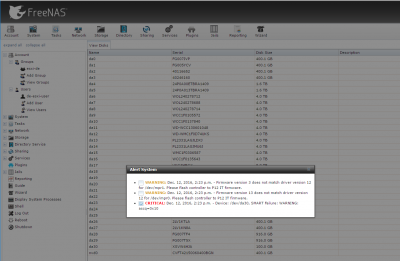
FreeNAS Single Drive Fail - Practice drive failure. As we were setting the system up, we were able to practice locating a failed drive. While SSDs do not fail often, hard drives in larger systems do fail regularly. Ensuring you are ready for such a failure is always a good idea.
- Use lower power processors. We are using extremely high-powered processors for the task at hand. Although we are excited to see what FreeNAS 10 will deliver in terms of Bhyve and Docker, these are overkill and solely a byproduct of what we had on hand.
Final Words
This system is considerable overkill but we did want a FreeBSD based ZFS test bed to try a few bits out such as using NVMe as ZIL and L2ARC (versus SAS SSDs), Intel versus Chelsio networking and a few others. As we gain insights from this testing we will share more information on what we found. If purchasing for your office, we would suggest giving iXsystems a call directly to discuss hardware and getting a unit with support. We have a unique situation with the STH / DemoEval lab where we can setup these types of systems for lab workloads quickly using parts we had on hand. From a power consumption standpoint, this system is very poor which is something that will need to be addressed in the coming months. We also are using this system to inform our FreeNAS component buyer’s guides, so expect feedback from this test bed to inform that series.


Nice article,would love to see more like this, thanks.
One very important thing I found using that particular 45 drive chassis, the cable transition fabrication was terribly executed. The assembly next to the dual power supplies was a soldered up nightmare. The dword errors (mistransmitions) through that cable assembly was very high.
I even tried replacing the cable assembly with a replacement from Supermicro. No improvement.
What finally did the trick was taking out the cable assembly and buying an external to internal cable. I used the hole from the removed assembly as a pass-through for the external-to-internal cable. Voila, no more errors.
The backplanes are solid designs, and I’ve never had an issue with the power supplies. The system I’m running had about 2 years on the “bad” cables, and 5 years (so far) on the replacement cables.
Thanks I will certainly look into this!
What are the risks if say the connection to your drive shelf fails? I have been considering adding an external array to my storage, but have been worried about what freenas would do if that connection broke. To me it seems like that is a potential for disaster lol
Jason,
Locked in a data center, the odds are somewhat lower. Remember, internally you still have a cable between your controller and SAS backplanes but there is marginally more places for this to fail.
Then again, remember, SAS disk shelves are present in just about every major storage vendor’s architecture. As a result, this setup is a well tested concept.
Hi Patrick,
Great articles with helpful information on your new 40GB FreenNAS set-up. Any updates on performance & gotchas? Especially network cards?
Best Regards,
ABQ :)
Keen to see a followup on this especially seeing performance testing between the 40g cards. Best I’ve seen elsewhere is ~20g on 40g hardware.
Did you ever do a followup on this? If so, were can i (we) read it?
Kind Regards
Magnus
Comments are closed.