
Today we have a quick guide on how to automate Proxmox VE ZFS offsite backups to Rsync.net. The folks at rsync.net set us up with one of their ZFS enabled trial accounts. As the name might imply, Rsync.net started as a backup service for those using rsync. Since then they have expanded to allowing ZFS access for ZFS send/ receive which makes ZFS backups very easy. In our previous article we showed server-to-server backup using pve-zsync to automate the process. Today we are going to show what the offsite replication looks like. With Proxmox VE being a great platform for small Debian Linux based hyper-converged clusters, having the ability to backup VMs easily to a remote service is very useful.
Getting ready for backup to rsync.net
In this guide we are going to be backing-up ZFS backed VMs from fmt-pve-07 to a ZFS enabled Rrsync.net account. We are going to specifically setup a daily job using Proxmox VE’s pve-zsync to snapshot and send copies of the ZFS volumes.

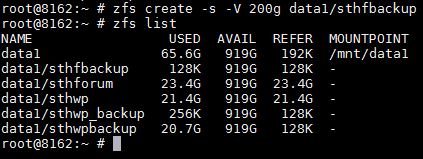
One of the first things we need to do is ensure we have a target for this. It is extremely easy to do since Rsync.net allows you to SSH into the jail your backup server is running on. You will certainly want the information that the Rsync.net team provides when you start. They can also help with making commands for zfs send/ receive. Here we create the backup location.

We can see our target using zfs list on the remote Rsync.net server.
Next we need to get the target server setup.
Automating Proxmox VE ZFS VM offsite backups to Rsync.net
The next thing we need to do is login to our source server and create a pve-zsync job. We use the following command to install pve-zsync on the server:
apt-get install pve-zsync
We use the command:
pve-zsync create –source 101 –dest 64.62.236.94:data1/sthfbackup -name sthfdailyrsync –verbose –maxsnap 7
The first sync is going to take some significant time. Be prepared. Here is the breakdown of the command:
Bereaking down that command:
- pve-zsync – the command we are using.
- create – we are making a new recurring job.
- –source 101 – we are going to use the volume associated with Proxmox VM number 101 and use that to snapshot and send to the other server
- –64.62.236.94:data1/sthfbackup – tells pve-zsync to use our Rsync.net target. Details for this come from their welcome e-mail plus setting up the target (see above)
- –verbose – we want to see what is going on
- –maxsnap 7 – this tells pve-zsync the number of snapshots we want to keep. We have 7 in this example. We are going to edit the cron entry shortly to make this a daily snapshot and 7 makes a week.
- –name sthfdailyrsync just a name given to the job so you can see it easily later on
Now we do want to edit the cron entry slightly. By default the command we just issued is going to try snapshotting and backing up every 15 minutes. We are trying to get daily so we will edit the cron job:
nano /etc/cron.d/pve-zsync
We will change this:
*/15 * * * * root pve-zsync sync --source 101 --dest 64.62.236.94:data1/sthfbackup --name sthfdailyrsync --maxsnap 7 --method ssh
To this:
01 01 * * * root pve-zsync sync --source 101 --dest 64.62.236.94:data1/sthfbackup --name sthfdailyrsync --maxsnap 7 --method ssh
If that seems a bit scary, the overall process should take at most a few minutes. We did a quick video on the steps we used if you would rather see it that way:


)
Vm include no disk on zfs.
hi, i know it’s an old post but i think that nowdays is still a avalid solution.
What about restore in case of failure? how to manage it?
Comments are closed.