
Recently we have been working on a new Proxmox VE cluster based on Ceph to host STH. During the process we have been learning quite a bit experimenting with the system. While the VMware ESXi all-in-one using either FreeNAS or OmniOS + Napp-it has been extremely popular, KVM and containers are where the heavy investment is at right now. Proxmox VE 4.0 swapped OpenVZ containers for LXC containers. While we wish Proxmox made the jump and supported Docker native, LXC is at least a positive step. For those wondering what an All-in-One configuration is, it is simply a hypervisor and shared storage (with inter-VM networking) built-in. That makes it an excellent learning environment. Today we are going to show the FreeNAS version of the All-in-One configuration with the Proxmox VE 4.0 environment.
Getting Started: The Hardware
For this we are actually using a small Supermicro barebones that is in our Fremont colocation facility.
- Barebones: Supermicro SuperServer 5028D-TN4T
(Xeon D-1540 based system)
- Hard Drives: 2x Western Digital Red 4TB
- SSDs: 2x Seagate 600 Pro 240GB (boot ZFS rpool), 2x Intel DC S3500 480GB
- RAM: 64GB DDR4 2x 32GB RDIMMs


For those wondering, why not NVMe the issue really comes down to heat. We run our hardware very hard and in this particular chassis we have had issues with NVMe drives running very hot under heavy load. For a home environment, this is less of an issue. For a datacenter environment where the hardware is being run hard, we would advise against using small/ hot NVMe drives or hot larger drives like an Intel DC P3700 800GB/ P3600 1.6TB if you are trying to have any type of sustained workload in this tower.
In terms of SSDs – the Seagate 600 Pro 240GB and 480GB drives are absolute favorites. While not the fastest, they have been rock solid in two dozen or so machines. The Intel DC S3500’s similarly work very well. The Intel DC S3500’s will eventually be utilized as independent Ceph storage devices.
The Plan
We are going to assume you have used the super simple Proxmox VE 4.0 installer. We are using ZFS on Linux for our boot device. As a result, we do have extremely easy access to adding ZFS storage in the native Debian OS. Of course, there are setups like FreeNAS and OmniOS that offer a lot of functionality. Our basic plan is the following:
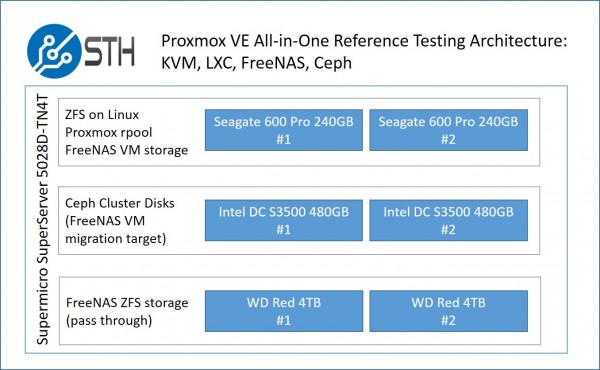
You can get away without using the Intel DC S3500 however it is nice to be able to migrate from ZFS to the Ceph storage cluster easily. The basic idea is that we are going to create a FreeNAS KVM VM on the mirrored ZFS rpool. We are going to pass-through the two Western Digital Red 4TB drives to the FreeNAS VM. We can then do fun things with the base FreeNAS VM image like move it to Ceph cluster storage. Should the mirrored rpool in the Proxmox VE cluster fail, we should be able to attach the two WD Red drives to another Ceph node and then pass-through the drives again to get our FreeNAS VM up and running. This can be useful if you need to recover quickly.
It should be noted that running FreeNAS or other ZFS storage in a VM is far from a leading practice, and there are many reasons why you would not do this in a production cluster. Still, for learning purposes, we thought this may be an interesting idea. The eventual goal is to simply use it as a backup target. Again, it would be much better to simply create a zpool with the two WD Red drives in the base Debian OS then create an iSCSI target to access the drives.
FreeNAS Setup in Proxmox VE with Pass-through
Key to this entire setup is passing through the WD Red 4TB drives to FreeNAS. We are using FreeNAS 9.3 for this, but are eagerly awaiting FreeNAS 10. The first step is simply creating a VM for FreeNAS to work with.
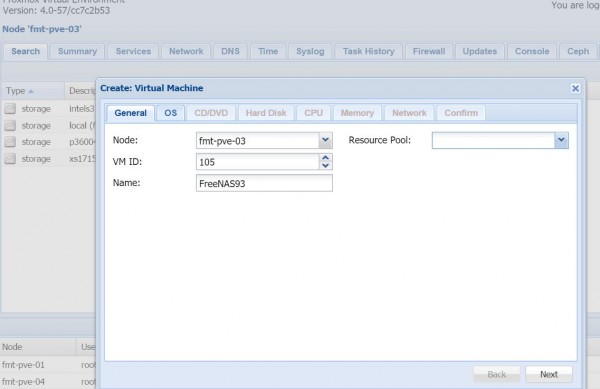
Here is a quick snapshot of the VM. We are actually using the disks as sata not virtio just for testing in this screenshot. You can see that the network adapter is virtio and is working well. We are using a modest 2GB data store and 8GB of RAM. We will show how to get those two disks passed by ID later in this guide.

As an interesting/ fun aside here – you could actually install the FreeNAS VM on just about any storage. Here we have it running on the fmt-pve-01 node’s Intel S3710 200GB mirrored zpool. As you can see, the VM is running off of the storage on fmt-pve-01. This is the same as we can do with our Ceph storage.

One can download the FreeNAS installer to local storage. Here is a quick tip to download an iso directly to the Proxmox host. You can then simply run the FreeNAS installer and everything will work fine.
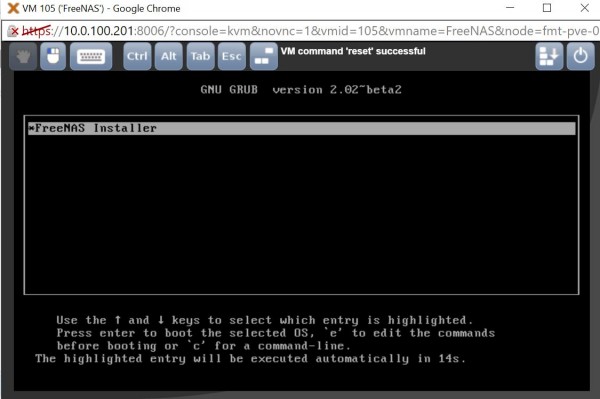
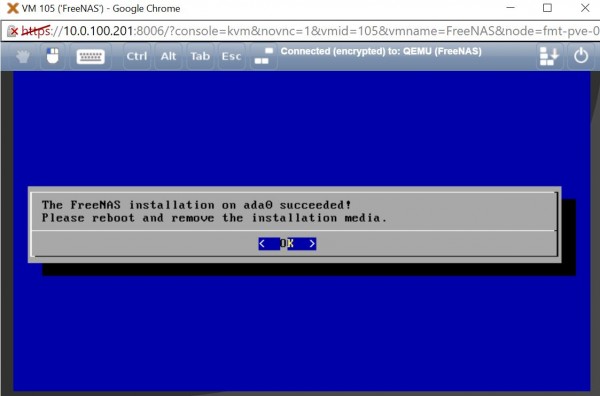
Here is the installation to our 2GB virtual disk:
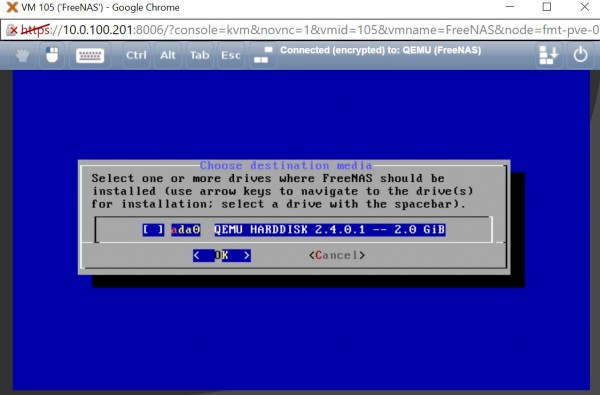
And here is success. Just as a fun note, this particular installation was over the ZFS network drive shown in the example above yet everything went smoothly.
Since we do not want to mess our storage configuration up by passing disks by their sdX reference, we are instead going to used /dev/disk/by-id as our identifier. This is a very small system to it is fairly easy to find our disks. You will want to issue “ls -l /dev/disk/by-id” on the Proxmox VE host (in our case this is fmt-pve-03.)

One can see that sda and sdb are the disks we want. We then can use “nano /etc/pve/nodes/fmt-pve-03/qemu-server/xyz.conf” where xyz is the VM number. As you can see our VM is number 105 so we are editing 105.conf. If you get stuck looking for the VM you can use “find / -name xyz.conf” to find the path to the VM conf file. Here is the configuration we are using:

As one can see the disks are being passed through by-id. We could also use virtio as our driver here and call them virtio0 and virtio1. You will need to restart the VM if you make changes here.
Moving over to the FreeNAS web interface, we can see these two drives are found in FreeNAS and ready for use.

We can then create our mirrored zpool using these drives.
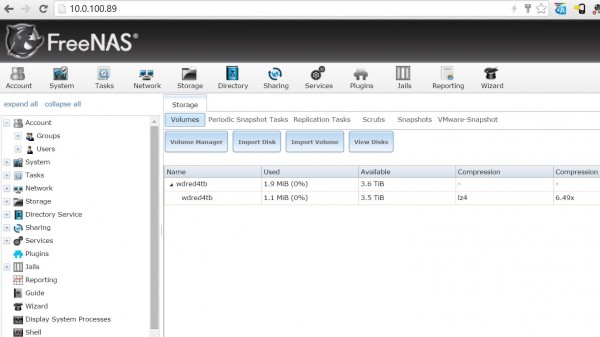
At this point, FreeNAS is running and has a mirrored ZFS datastore. We have shown examples running the 2GB FreeNAS base volume both on local and network storage. We can now use FreeNAS however we would like. Since most Proxmox VE installations will likely have a public and private facing network for a storage/ VM back-end, you may want to add a second NIC to the VM and set that up on the storage network as well, especially if it is a higher-speed 10/40GbE network.
On one hand, this is a largely academic exercise. If you have Proxmox VE you already have several advanced storage options to choose from including: LVM, ZFS on Linux, Ceph and GlusterFS. Still, packages like FreeNAS and OmniOS + Napp-it have some very easy to use features. And for those wondering, yes, you can simply add a Ceph disk to FreeNAS in this configuration and use FreeNAS to store information on your Ceph cluster. Again, this is just for experimentation purposes only and I would highly advise only trying that on a 10Gb network with at least 12 SSDs or 30+ hard drives in the Ceph cluster.


Patrick – thanks for posting, this has been a good exercise to replicate. Only thing I needed to change was to flip the interface type from “virtio” to “e1000”. My mobo has a Realtek NIC and I have an IBM NIC in a PCI slot, both are connected to my network, and I think that “virtio” was trying to use the Realtek NIC…. Freenas doesn’t like Realtek.
Thank you for posting this! I was having trouble getting the vm to boot after editing the config file directly. I stumbled upon being able to add the disks to the config via the shell (and use tab to complete). Thought I’d post it here in case someone else has an issue as well.
qm set {vm id} -{bus/device} /dev/disk/by-id/{DISK ID}
So you can passthrough HDD-s without having a HBA?
Curious, because planning to upgrade my Freenas box to a EPYC3251D4I-2T, but now as a VM under Proxmox. If I could save the PCIE slot for the future, would be great.
Managed to pass through the hdds without any HBA.
Is it possible to use the same method for an onboard 10gb nic?
In order to run freenas virtualized in proxmox, do I have to have two controllers?
WhatI dont understand is where proxmox storage remains?
I have a supermicro board with a single onboard controller.
Can I get to run freenas in a vm and let it manage zfs for me?