
Today we have a quick ZFS on Ubuntu tutorial where we will create a mirrored disk ZFS pool, add a NVMe L2ARC cache device, then share it via SMB so that Windows clients can utilize the zpool. Why would we use NVMe for L2ARC? NVMe drives are significantly faster than their SATA alternatives. While SATA is the prominent interface for SSDs today, NVMe is going to largely replace SATA in the very near future so we decided to do a more future looking setup. NVMe SSDs benefit from lower latency and higher bandwidth making them a great way to cache active data. While SATA SSDs worked well on single or dual 1 gigabit Ethernet, single SATA 3 interface devices cannot saturate 10Gb or 40Gb links. For higher speed networks, PCIe/ NVMe solutions are required.
Test configuration
Our test configuration is a fairly basic 2U server. We will have a review of this server coming, however this is our configuration we are using for today’s guide. We added different kinds of storage for use with this build:
- Server: ASUS RS520-E8-RS8
2U dual processor capable server
- Processor: Intel Xeon E5-2683 V3
(14C, 2.0GHz)
- RAM: Crucial 64GB DDR4 (16GBx4) ECC RDIMM
s
- Network: Intel X520-DA2 OCP Mezzanine card (dual 10Gb SFP+)
- Boot SSDs: 2x Intel DC S3710 200GB
- Data SSDs: 2x SanDisk CloudSpeed 960GB SATA SSDs
- NVMe SSDs: 2x Intel 750 400GB
(mounted above PSUs)
- PCIe SSDs: 2x SanDisk Fusion-io ioDrive 353GB (MLC)
- Hard Drives: 2x Western Digital Red 4TB
- NVMe add-in card: Supermicro AOC-SLG3-2E4
(see the NVMe retrofit guide here)


We still have 2x 3.5″ drive bays open in this configuration which will be used for storage later. Unfortunately the ASUS Hyper-kit was too large for the m.2 slot in the server, so we were forced to use a PLX based add-on card. Luckily with only one CPU and ample space above the redundant PSUs, this was very easy to accomplish. Also, one advantage with the ASUS RS520-E8-RS8 is that all of the PCIe slots work off of CPU1. That means that all slots were enabled with one CPU and we do not have to worry about performance abnormalities when a thread is on a CPU not connected to the storage PCIe lanes.
Getting a fast HD/NVMe share – the game plan
We are using Ubuntu 14.04 LTS as our base OS. This is to support Fusion-io ioDrive installation on Ubuntu. We started this guide with a mirrored (mdadm) root partition on the Intel S3710 200GB drives. Here is a basic outline of the steps we need to accomplish:
- Install ZFS
- Determine disks we want to use
- Create a mirrored zpool
- Add an Intel 750 NVMe drive as cache for the mirrored zpool
- Create a SMB share for the zpool that will work with Windows
- Verify that we can add files using a Windows test server
Overall, very simple steps to create a share. The process should take you no more than 10 minutes.
Getting ZFS installed
There are several different ways to accomplish getting ZFS installed on Ubuntu. The easiest is to use the ppa. Here are the commands you want to issue. We are using sudo but if you wanted to elevate to su to do this that would eliminate the repetitive sudo’s.
sudo apt-get install -y software-properties-common
sudo add-apt-repository ppa:zfs-native/stable
sudo apt-get update
sudo apt-get install -y ubuntu-zfs
The narrative behind these commands is that you need to add the zfs on Ubuntu repository, update your Ubuntu installation to see the latest ZFS version and then install Ubuntu-ZFS. If the apt-get install -y ubuntu-zfs takes some time, that is normal. Even on the 14 core/ 28 thread Xeon E5 V3 with a gigabit WAN connection in the datacenter installing to Intel DC S3710’s, it still takes some time.
After this is done we need to do modprobe zfs to load:
modprobe zfs
With this set, ZFS is installed.
Determine disks we want to use
In our add a mirrored zpool to Proxmox article we used /dev/sd_ to point to the drives we wanted to use for our zpool. Today we are going to add the main drives using /dev/disk/by-id/ which is a better practice. We are going to use our Western Digital Red 4TB drives as primary storage devices and want to mirror them for redundancy. Therefore we need two drives.
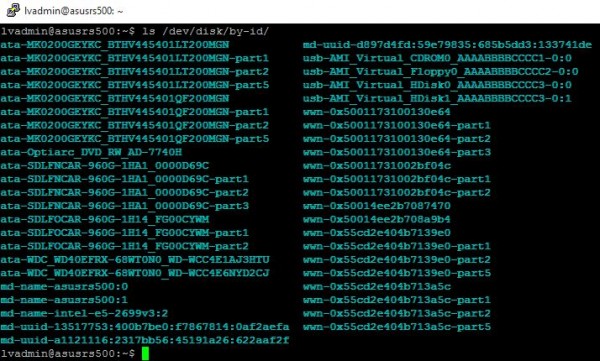
In the left hand column you can see ata-WDC-WD40EFRX-* drives. These are the drives we are going to utilize for our zpool.
Create the mirrored zpool
The next step is creating the zpool. We are just going to add the two WD drives for now. The important parts of the commands are:
- zpool create – this is telling the system that we want to create a new zpool.
- -f – likely will need to “force” the command so that is the flag for forcing despite warnings.
- -o ashift=12 – this is not required, but is a general performance tuning option that might be worth trying.
- hdpool – this is the name of the zpool. Replace this with whatever you like but it is best to avoid using mirror to start the name, hence r1 for RAID 1.
- mirror – this is telling the system we want to create a mirror.
- ata-WDC-WD40EFRX-* – are the drives and is used to tell the system which devices to use. These will likely be different on your server.
Once this is completed there is no output line to tell you success as can be seen here:
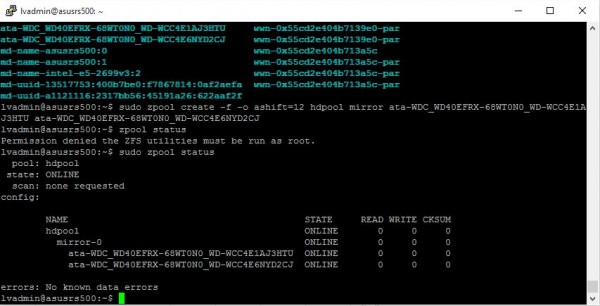
Here we did zpool status to verify that the mirror is up and running.
Add the Intel 750 NVMe drive to the zpool as cache
Now to add the Intel 750 NVMe SSD to the zpool as cache. Here we are going to use the /dev/___ reference which for this drive is nvme0n1p1. Here is the basic command parts:
- zpool add – this is telling the system that we want to add to an existing zpool.
- -f – likely will need to “force” the command so that is the flag for forcing despite warnings.
- hdpool – this is the name of our pool. Ensure it matches the above.
- cache – this is used to tell the system we are adding a L2ARC cache drive.
- nvme0n1p1 – the device pointer.
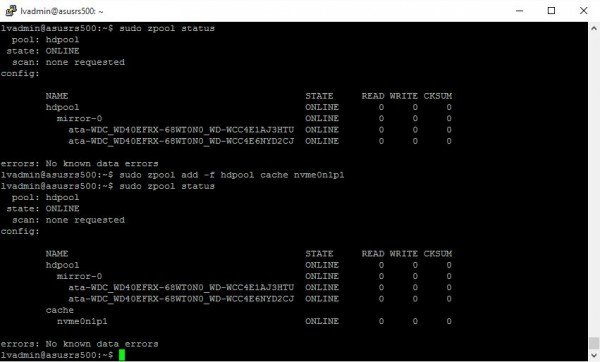
Another zpool status and we can see that we now have a mirror with a pool. Now we have a Ubuntu server that has a mirrored set of NAS hard disks and a super fast NVMe L2ARC cache drive. What we now need is the ability to share the drive to other clients on our network.
Create a SMB share so that we can use it with Windows
Installing samba is very straightforward. You can simply use:
sudo apt-get install -y samba
After a short while samba will be installed. This screenshots poorly since there are a lot of scrolling.
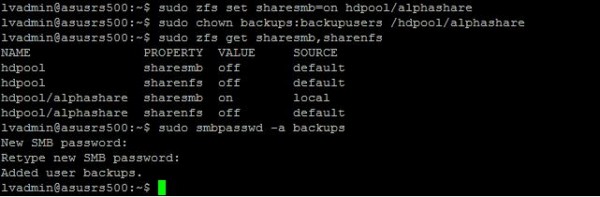
Next, we need to ensure that we have a mixed case sensitivity file system on the zfs pool because we are going to sometimes connect via Windows clients. We are going to call our share alphashare! Here is the command:

Fairly self explanatory except that hdpool/alphashare is going to be our share file system (more on this soon).
Next we need to share the hdpool/alphashare via SMB.
- sudo zfs set sharesmb=on hdpool/alphashare
- sudo chown backups:backupusers /hdpool/alphashare
- sudo smbpasswd -a backups
Here we are turning on smb sharing for alphashare, then we are assigning it to a user and group (backups is the user, backupusers is the group we had already added.) After this we are setting a SMB password for user backups.
At this point, we are ready to hop over to a Windows machine and test this out.
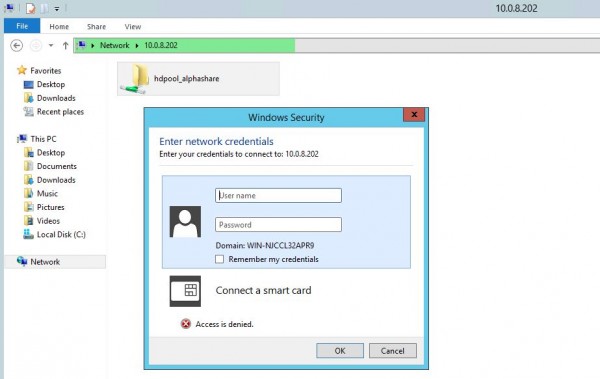
Validate that we can add files using a Windows test server
Here we have our completely ridiculous Windows Server test box connected via 40GbE to our Quanta T3048 switch. The switch also has a 10Gb SFP+ connection to our Ubuntu ZFS storage server. We did not have to tweak any settings (hence a good reason to use this particular machine!) We navigated to \\10.0.8.202 which is the IP address of the 10GbE NIC we want to use on our Ubuntu server. We can see the hdpool_alphashare network share and we can use our user “backups” and the password we just created to authenticate.
Once this is done, we write a file from the Windows server to the hdpool_alphashare share directory. Due to a lack of creativity ours is called testbackup.rar
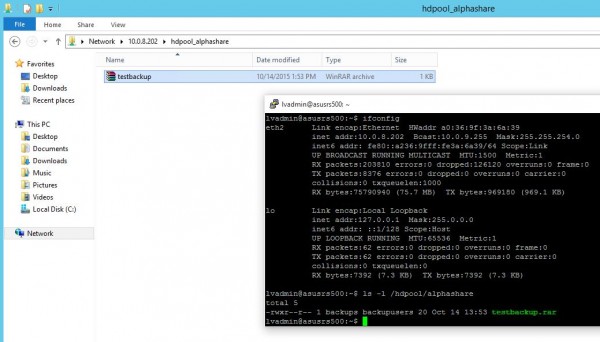
Once can see, we validated our setup as the file was written to the ZFS SMB share.
Conclusion
Overall this guide should take 5-10 minutes. If you want a decently fast but simple network folder, this is the easy way to do it. We have a lot of excess hardware in our machine but suffice to say this is a fairly robust setup. For those wondering about all of the other hardware, we are likely going to use this box for another guide or two. The key point here is that the NVMe SSD will help provide speeds beyond 1Gb Ethernet. As we move forward, 10GbE and NVMe SSDs are going to become more commonplace yet hard drives will still continue to be the choice for mass storage. This guide should help you deploy a fairly high-end ZFS network share to store backups but would even be a good choice for commonly used files like ISOs. In terms of performance, once the cache got warmed up:
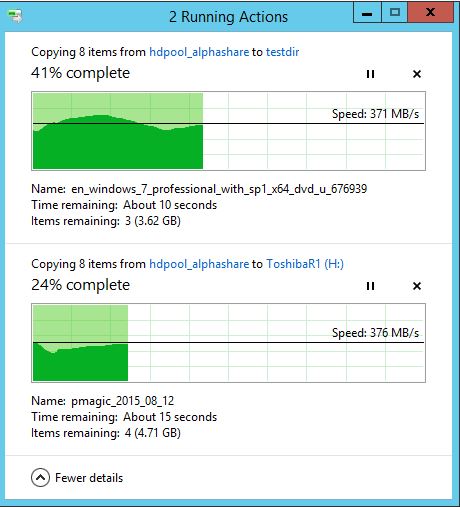
700MB/s+ transfer speeds were too much for a single SSD to write consistently so we had the share setup to sync write to two SSDs simultaneously on the Windows machine.


Nice guide dude. It took me 21 min but I’m a Linux neophyte
This awesome setup, then shared as smb?! Not nfs? ISCSI?
thanks for the guide!
i’m in the middle of choosing between debian or ubuntu with a zfs-on-Linux seup. more reviews about ZoL are welcome!
Aha this looks similar to what I have in mind and have been saying in my first blog post
probably as SMB share property on zfs is easier to integrate with a windows based infrastructure. Also it is worth trying out the latest M.2 as the Samsung 950 pro is around the same performance as this intel PCIe 750. (albeit smaller in capacity) but the required wattage is much lower so running costs are lower. Does this ZoL have persistent L2_ARC after reboot? I’ve not used ZoL much only ZFS on Solaris and FreeBSD in the past. The other great thing is if you compress your data ARC also will compress this identical to what is on disk. Therefore L2_ARC is the same, thusly if you have for example 2x compression ratio on disk then it will feel like you have much more memory as this will be the same. So the Intel NVMe 1.2TB = (almost) 2.4TB when fully populated. Compress and decompress will be identical to what you configure on disk for memory.
Does the Intel X520-DA2 OCP Mezzanine support SMB 3 / RDMA ?!
… performance could be bester with with a Mellanox Connect-X 2 VPI or 3 on both Linux & Windows 8.1 / 10 / 2012r2 !!
“-o ashift=12 – this is not required, but is a general performance tuning option that might be worth trying.”
This isn’t a general performance tuning option. It tells ZFS to use 4K sector sizes, which is what one would use when using AF format drives that are reporting their sector size as 512 bytes.
If drives are reporting their true sector size on vdev creation this wouldn’t be needed of course.
Comments are closed.