The Synology DS1812+ has recently been unboxed and its hardware exposed. Now it is time to look at what the Synology DS1812+ has in terms of software. That offering is standard across the Synology line. Today we are looking at the first part of the software, the Synology Assistant in order to start looking at how easy the setup process is. Prior to making this mini-walk through, the Synology DS1812+ was put together again. Hard drives were added to the unit. The power cable and both LAN cables were connected. All told, the process took a few minutes at most with the hardest part of the installation being using a Phillips head screwdriver to secure the drives. All of this basic setup needs to occur with any Synology unit prior to venturing into the software setup. After this was all setup, the next step was to power the unit on and download the Synology Assistant (SA) onto a client PC.
The Synology Assistant software will scan the local area network for the attached NAS. With the Synology DS1812+, there are two onboard NICs, both of which are seen by SA. If there was more than one unit on the LAN, one would see the multiple units listed below.

Selecting a device such as the Synology DS1812+ for setup next requires that one does two things. First, download he “.pat” file onto a locally accessible folder. Then browse for that when prompted to install a DSM. One can see that the below “.pat” file is specific to the Synology DS1812+ that is being used, so it is important to download the file that matches your Synology NAS.

As the DSM installs, you are prompted for a few things in Synology Assistant. The first is an admin password and to name the server. In the below example, we show just how little creativity we have when naming the Synology DS1812+ NAS. On older versions, this used to be a two step process. Nice job Synology recognizing they could combine screens.

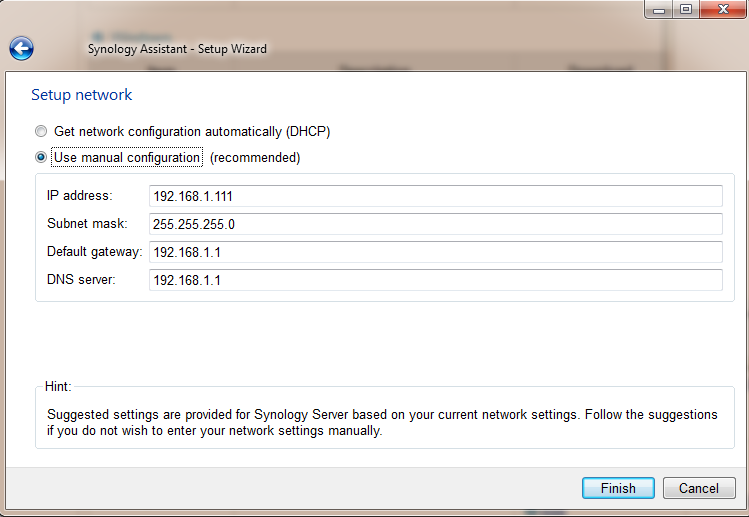
Next you can setup either DHCP or manual network configuration. A user needs to choose the correct option in the SA for their network topology.

Also worth noting, one really wants to have hard drives installed prior to starting. If one attempts to install DSM, and does not have hard drives installed, the below error message is displayed.

Assuming drives are installed, the Synology Assistant can format the system partition. At that point, one can log in to the NAS. A quick link is on the installer screen making this very easy.

Logging Into the Synology DSM
Clicking the link, one arrives at the DSM login screen. Use the password created with the Synology Assistant and you will be greeted by a great looking interface.

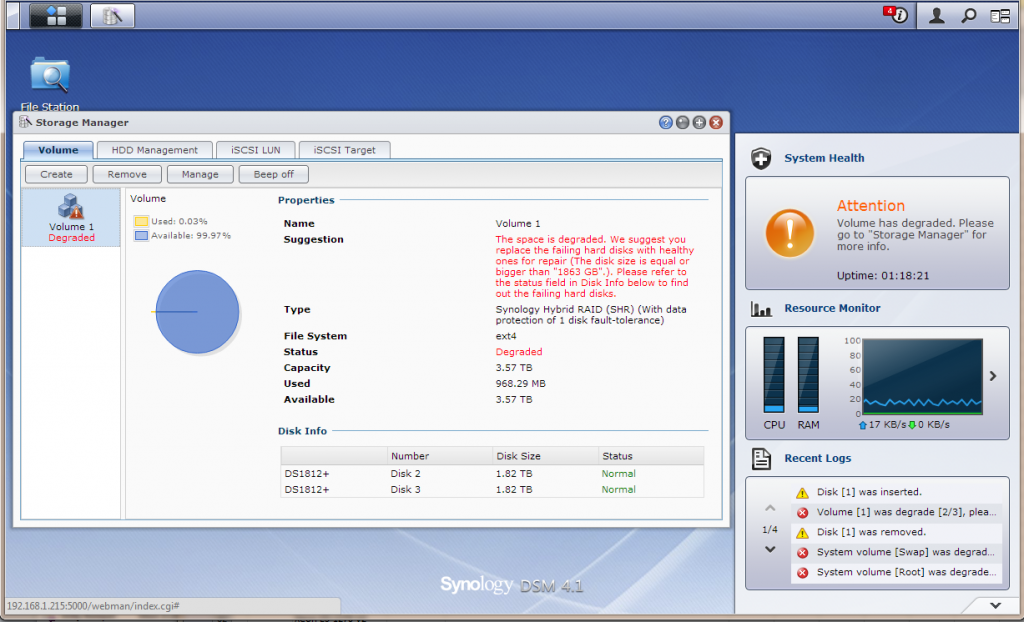
One of the first things one will notice when logging in is that the browser interface is very good looking. I think Synology DSM is created with something like Sencha Ext JS. If anyone knows for sure, please feel free to leave a comment. Upon the first loging in, one will notice that a warning that it is performing a Parity Consistency Check. Let it complete.

As one can see from the above example, there is a 3TB drive alongside two 2TB drives in the Synology DS1812+ test unit. This was done for solely one purpose, to pull the 3TB drive out and see what happens. When the drive is pulled, a warning message is displayed inside the Synology DSM GUI. The removal is found in the system log. The volume is noted as being degraded. Another key feature is that the Synology makes a periodic beep. After hearing the alarm beep or buzz, I will say that it was nowhere near as annoying as many other alarm buzzers which was greatly appreciated.

Conclusion
Overall, Synology has done a great job with DSM. Using the Synology Assistant and DSM is very painless. Reflecting back on the procedure, the initial quick installation that Synology provides is easy enough for just about anyone to use. The flip side to this is that the test NAS, a Synology DS1812+, is a fairly powerful unit. It has an Atom D2700 CPU at its heart and dual NICs. One can see from the Synology Storage Manager shown above that the unit comes ready with advanced features such as iSCSI protocol support. Future articles will go into setting up users, network shares and etc., but overall performance has been solid and the ease of use has been high with the current DSM.


Looks easy. How is making shares? What about user management? Sexy interface tho