
This week was spent building a new Proxmox VE 4.0 cluster in the Fremont colocation facility. Hyper-convergence is the current buzzword so the idea of running Ceph on the VM and container hosts seems like an interesting idea. Along with ZFS, I did want to add Ceph into the mix to accomplish the goal of having distributed storage. One very interesting feature of Proxmox is that it has a nice GUI to install and manage Ceph. Here is the official Proxmox Ceph cluster guide which you should follow after setting up the cluster. During the setup, I ran into an issue that we have gotten a few mails on over the past few months so I decided to include the fix in a formal post. The issue arises especially after recycling disks to re-use existing VM hosts for a Proxmox VE and Ceph cluster. Proxmox VE assumes that you are using clean disks with no partition table. We are using disks that were previously used as ZFS mirrors so we need to first delete the partition table. This is a quick guide will cover how to do so along the way.
In this example, the node I am using here is an Intel Xeon D-1540 node with 64GB RAM and six disks:
- 2x 240GB SSDs – ZFS RAID 1 rpool for Proxmox VE root filesystem
- 2x 480GB SSDs
- 2x 4TB hard drives – these were formerly ZFS mirror drives that we are converting to Ceph storage
The first steps in creating a Ceph cluster must be done from the command line:
pveceph init --network 10.0.103.0/24

pveceph createmon
The network 10.0.103.0/24 is our internal 10Gbase-T network setup in the colocation specifically for storage traffic. As a tip: it can be easier to issue the createmon command on each host via SSH.
From here, Proxmox provides an easy to use GUI to setup the Ceph cluster. One of the first things one will want to do is add a Ceph OSD. This can be done by going to the top Ceph tab and then the Disks sub-tab (bottom).

That location is a little bit confusing since you want to create an OSD but that is not on the OSD tab. Generally, one can just click on a drive and use the Create: OSD button. However, we can see the option to Create: OSD is unavailable and grayed out. We have gotten quite a few notes asking about this so we figured it was worth a quick detour, especially for those re-purposing servers for this type of cluster.
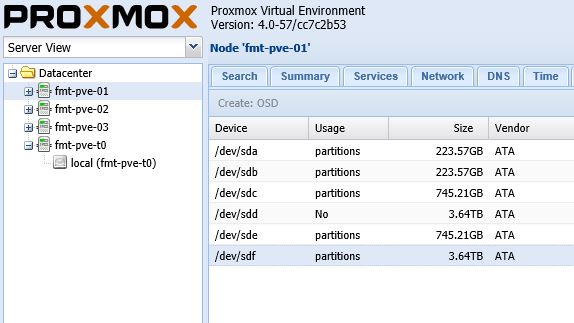
The problem if one looks under the Usage column is that it has an existing partition on the device. To fix this, the easiest way is to go back to the command line and use fdisk to delete the partitions.
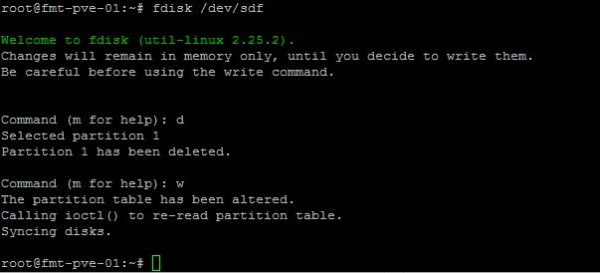
In our example we want to create an OSD with /dev/sdf we then use:
fdisk /dev/sdf
To delete the partition type: d
To write changes (and actually delete the partition) type: w
Here is what it looks like on that particular disk:
If you do have more than one partition on the disk, you may be prompted to pick a partition. If so, continue using d (for delete) and then the partition numbers until you have all partitions deleted before writing changes.
The other option is to use a command such as:
ceph-disk zap /dev/sdf
You can replace /dev/sdf with whatever your device is labeled. That will usually work as well but we have seen it fail to work once which is why we are using fdisk. ceph-disk zap is faster.
Once this is done, we can go back to the Proxmox VE GUI and we can see a significant change because the usage column is now No and Create: OSD is available. If it is still grayed out, you can click on another row and back to the device to get the web GUI to reset.
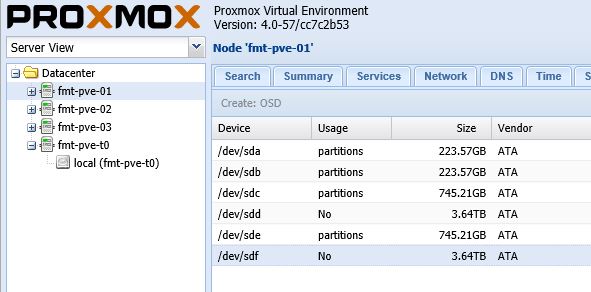
One can see, it is now possible create a Ceph OSD via the GUI.

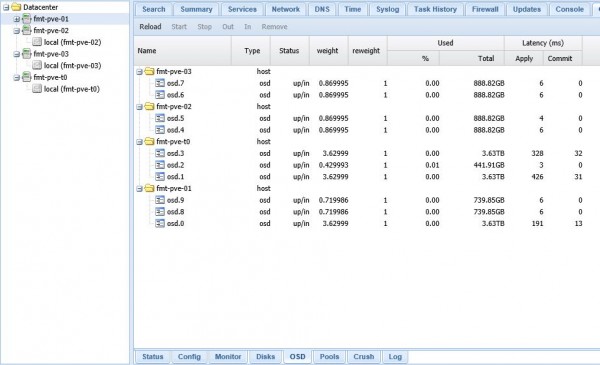
As one will quickly see, the OSDs begin to populate the OSD tab once the scripts run in the background:
The bottom line is that starting with a fairly complex setup using ZFS, Ceph and Proxmox for the interface plus KVM and LXC container control is relatively simple. In fact, Proxmox is one of the easier ways to manage a small Ceph cluster. There are other GUIs out there such as Ink Scope, Calamari and ceph-dash, but Proxmox has a fairly easy to use GUI that is integrated with its system to manage VMs and containers.
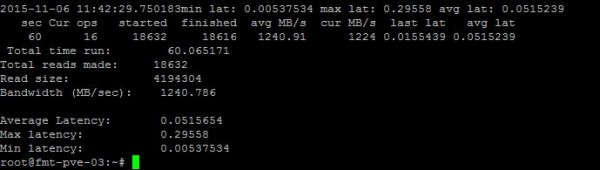
There is only a single 10Gbase-T connection at the moment to each server, however the read results are not bad for zero tuning of the Ceph configuration and network:
This was our fifth HA Proxmox cluster but our first utilizing Ceph. For those wondering here are some pre-reads we took advantage of:
- Mastering Proxmox – Based on Proxmox VE 3.x and version 4.0 was a major departure. Still it did cover Ceph.
- Learning Ceph – This book or something similar is much better organized than what one finds online, so it is recommended.
More to come on the journey. Check the STH forums for more on Proxmox VE.


)
For Ceph backup see https://github.com/EnterpriseVE/eve4pve-barc
Comments are closed.