
Recently we have been testing a number of pfSense appliances. One of the appliances, the desktop pfSense SG-4860 appliance has built-in Wi-Fi expansion providing 802.11 a/b/g/n. Since the pfSense appliance has significantly more functionality and configurability than a typical SOHO security appliance, it is also slightly more involved to setup. pfSense offers some great features such as being able to host a Wi-Fi network for guests outside of the main firewall, even using a different public IP to NAT behind. With all of that power comes a bit more configuration to get up and running with Wi-Fi. Today we are going to show the easy setup of Wi-Fi with pfSense. We are going to enable the adapter, setup Wi-Fi in AP mode, then bridge the WLAN network to the LAN network so devices can talk between the two networks.
Before we get started, here is a quick picture of the wireless adapter we are using from pfSense:

We took that card and antenna setup from the SG-4860 1U and transplanted it into the desktop SG-4860.
Wi-Fi setup in pfSense – Enable Interface
The first step of getting Wi-Fi setup is enabling the interface. At the outset, we have the first two igb (Intel) network adapters serving as WAN and LAN interfaces.
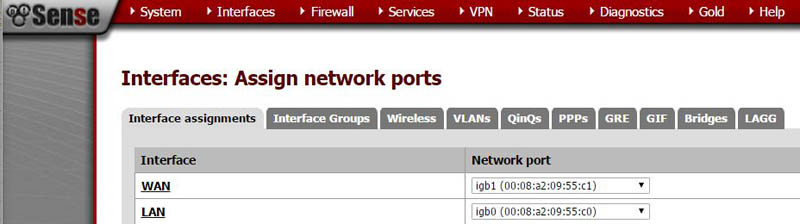
One can select the WLAN interface and click add and begin editing the interface. As a wireless interface, there is much to do.
First off, you will need to check the Enable Interface box if you want to work. You also should add a description so you know it is a wireless LAN interface later on.
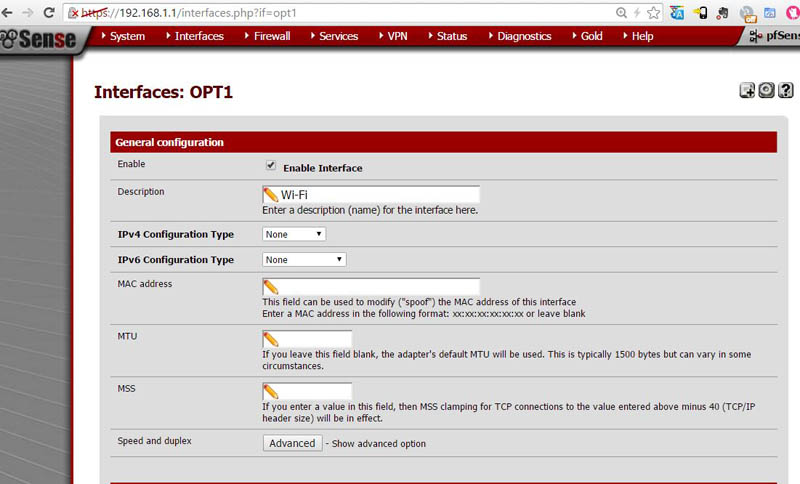
For this guide we are not setting up any special IPv4 or IPv6 configuration, but if you intend for WLAN to be a completely separate network, then you may want to change those.
After this section, you will need to specify a standard and a channel for the configuration to save.

Further down the page you will see some network-specific wireless settings. Mode wise you have “Infrastructure (BSS), Ad-hoc (IBSS) and Access Point” modes available. For this guide we just used Access Point since we just want to take traffic and dump it on the same bridge as the LAN interface.

Other major settings on that page are:
SSID – what your wireless network identity to be
Enable WME – we needed to check this to save the configuration
WEP or WPA – here we generally suggest using WPA and adding a pre-shared key (PSK). As you can tell, we had a bit of fun with the password.
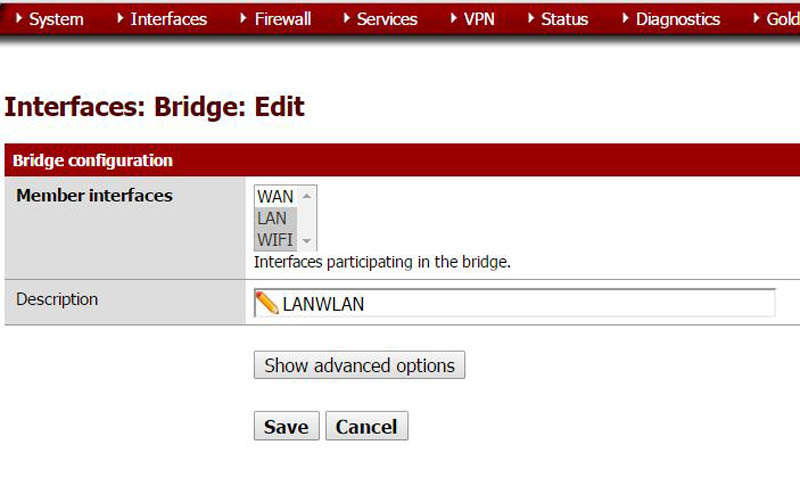
Once you save and enable the interface, the next step is bridging the Wi-Fi (changed to WiFi in the below) interface with the LAN interface. In our example this means bridging ath0 (WiFi) with igb0 (LAN).

On the top row of tabs under the Interfaces section of the pfSense web GUI one can see a tab labeled “Bridges” on the right side of the screen. Here you can select LAN and WiFi interfaces and create a bridge. Save and apply any remaining settings and you should be up and running.
One major note, we did the initial installation as wired Ethernet only which made the transition to bridged mode easier. One should double check services such as client configuration via DHCP is still working after the bridge is applied.
Whereas some switches and appliances automatically bridge interfaces, pfSense takes a more secure posture. Interfaces are listed as available but need to be bridged post-installation. We see this when configuring Wi-Fi on the device.
In terms of Wi-Fi one might notice that we are using an 802.11n standard. For many networks where primary access is from client to the Internet and the WAN pipe is at most 100mbps, this is sufficient. In other networks where faster access to local resources is required, users may want 802.11ac. 802.11ac is a much faster standard but FreeBSD, which pfSense is based upon, does not support “ac”. If you do want AC Wi-Fi or the newer and much faster wave 2 AC Wi-Fi, you will frankly want to add an external access point then use a wired backhaul to pfSense. For smaller installations where N is sufficient, adding Wi-Fi to pfSense is a simple all-in-one solution that lets one take advantage of the great pfSense filtering features.
We do have a series of more in-depth pfSense guides coming, but this hopefully addresses a question we get quite often around how to add wireless to pfSense.


Its sad that the state of wifi drivers in the FreeBSD core of pfsense is so far behind the curve, though I mostly blame the vendors on this.
Even many common N hardware is unsupported, don’t even think about AC anytime soon.
Thanks for the article. I’ve decided to go with the new AC access points from Ubiquiti and back haul those to pfSense.
https://www.ubnt.com/unifi/unifi-ac/
Seems like a great combo.
Wifi doesn’t function following these instructions. Doesn’t the wifi adapter at least need an IP address?
JohnnyVegas is correct, these instructions do not work, they are incomplete. If you do this, you will find that you won’t get any DHCP assignments when connecting to WiFi. These instructions are much more complete:
https://www.cyberciti.biz/faq/howto-configure-wireless-bridge-access-point-in-pfsense/
What you essentially do here is re-assign all the rules in place for LAN to a BRIDGE interface. The instructions above talk about using an additional interface as sort of a place-holder while creating the bridge. If you don’t have an additional physical interface, one could create a vlan interface as a place-holder, then go back and delete it.
Comments are closed.