
This guide will show you how to use the pfSense HAProxy package to get HA working with your web server. As a response to a forum member request, we are going to show how one can turn two virtual machines into a load balanced HA set. There are many guides out there but they tend to be from older package versions. We are using the pfSense SG-4860 1U which has an Intel Atom C2558 onboard in one of our datacenter labs. The pfSense SG-4680 has QuickAssist so it can handle decent SSL offload as well. In this article, we will be primarily concerned with simple HTTP traffic but HTTPS offload is on our list of to-dos as well. We are using the latest pfSense 2.2.5 release with the HAProxy-1_5 package. It is possible to run a FreeBSD jail with HAProxy or run it on another VM, however we are going to use the pfSense VM to serve the traffic.
HAProxy on pfSense: Game Plan
There are a few steps we need to take in order to set this up. We have a /30 routing a block of IPs so the WAN IP address and our publicly routable IPs are on different subnets. Instead of doing 1:1 NAT to a HAProxy VM, we are going to run HAProxy on pfSense which makes everything simple. Here is a diagram of what we are going to do:
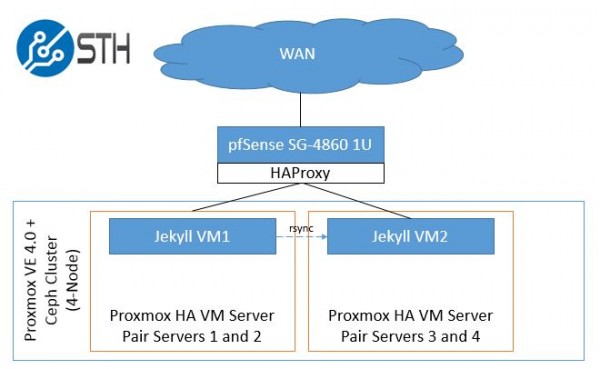
The key architecture point here is that our test Proxmox VE 4.0 4-node cluster with Ceph storage can easily be split into housing the VMs on separate pairs of servers. If one server goes down, the second server can continue serving that VM. These could be, for example nodes in a Supermicro 2U Twin style machine. If that 2U Twin chassis is taken offline, HAProxy will detect that VM1 is offline and the second pair of servers and VM2 will take the load. We would likely use DNS to help handle failures at the colocation site/ datacenter level.
We are going to add some IP addresses to make things easy to reference. These came from the forum example:
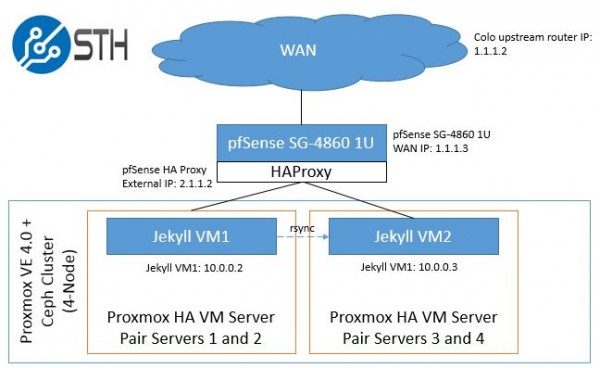
Note: we are using fictitious addresses. 1.1.1.2 is the upstream gateway and on the same /30 as our pfSense SG-4860 WAN IP. The routed IPs are on a subnet on 2.1.1.1. The VMs are on the internal network on 10.0.0.1/24.
Getting pfSense prepared
The first step we are going to take is to upgrade our pfSense installation to the latest (as of this writing) 2.2.5 release and install the HAProxy 1.5 package. Here we are using the Auto Update feature to upgrade pfSense from 2.2.4 to 2.2.5. Note, the upgrade will cause the unit to reboot. Thankfully our pfSense SG-4680 1U reboots fairly quickly.

From the Web GUI one can go to System -> Packages then search under Available Packages for haproxy. We are using the latest haproxy-1_5 package v. 0.32. Simply click to install and one will see the package listed under Installed Packages.

Once all of the packages are installed we are ready for configuration.
Configuring HAProxy on pfSense
We are using an official pfSense SG-4860 1U appliance that pfSense sent but one can do this with the “free” version as well. Here are the steps we need to accomplish:
- Setup a virtual IP address that is accessible on the WAN
- Setup a HAProxy front end to link to the virtual IP (WAN)
- Setup a HAProxy back end to point to our HA VMs
- Enable HAProxy
- Setup Stats to ensure everything is working properly
One major item we are not going to repeatedly cover is that pfSense will prompt you to Apply changes after clicking save using a large warning banner. We are going to assume that you will click Apply when it pops up in the UI.
Step 1: Setup a virtual IP address that is accessible on the WAN
The first step in the process is to have the WAN interface listen for the IP we want to setup. To do this we go to Firewall -> Virtual IPs and then click the + symbol to add a new record. Here we select IP Alias, WAN, we add our 2.1.1.2/32 test IP and then give it a name.
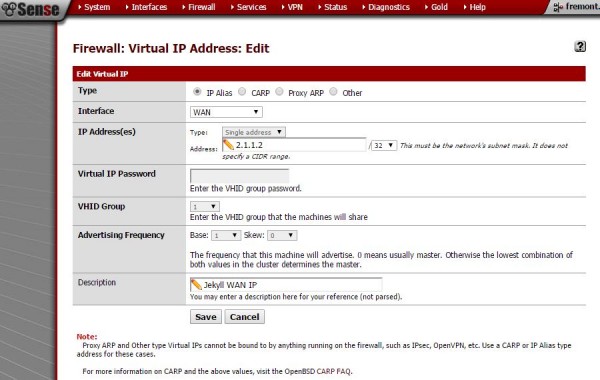
What this step is doing is telling pfSense to listen on the WAN interface for the IP. The IP address we will then use for HAProxy’s listener.
Step 2: Setup a HAProxy front end to link to the virtual IP (WAN)
Once we have the address to listen for, we can then setup a frontend for HAProxy to listen for requests on that WAN IP address. Here we want to give it a name set the status to active then set the Listen address to the same 2.1.1.2 IP address as our Virtual IP. We then use port 80 which is the basic HTTP web port.

If we were setting up a HTTPS site we would most likely want to setup a port 443 entry in this screen as well. You can see we have the backend server pool setup (which is the next step.) We also have Type HTTP/ HTTPS (offloading). We now have HAProxy setup to listen on an IP address, the next step is to tell HAProxy what to do when it receives a request.
Step 3: Setup a HAProxy back end to link to point to our HA VMs
We created a LVweb backend to tell HAProxy where it should direct traffic. Here we direct HAProxy’s requests to two virtual machines on our HA cluster. We use Forwardto Address+Port on our two entries and use our internal network IP addresses 10.0.0.2 and 10.0.0.3 both on port 80 to forward traffic. We give them equal weights which should split requests. We use Balane Round robin to distribute traffic.
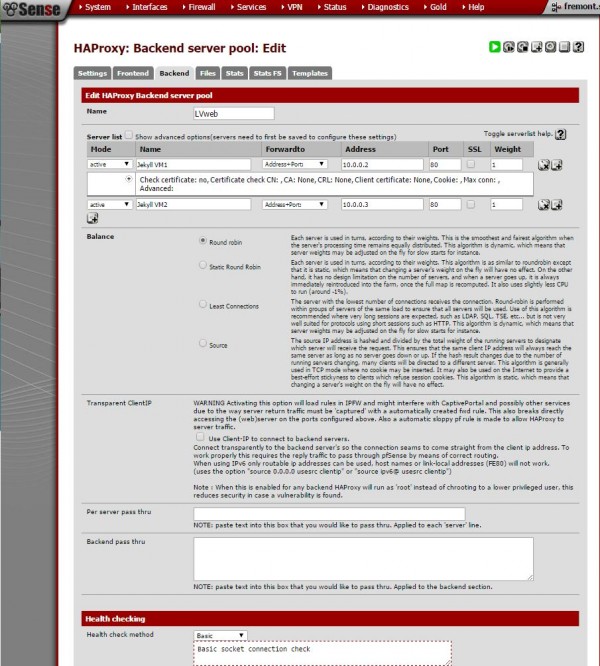
This is a very simple setup. We can add hundreds of VMs or servers. We can redirect requests and etc. Overall, there are an absolute ton of options to work with here but we are getting this setup with the minimal install. One other note is that we are using basic Health checking. Oftentimes when fairly installations do not work the reason is that health checks are failing. Keep this setting in mind as the package has many options that can be useful for troubleshooting.
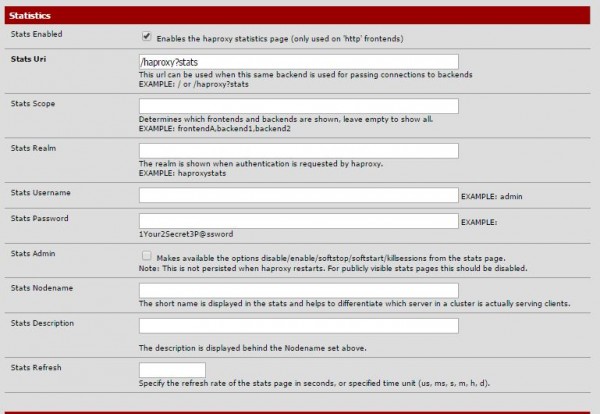
One other option we will want later is to setup a stats Uri. Here we just used the example Uri. We do this so we can see what is going on later.
Step 4: Enable HAProxy
At this point, we have pfSense and HAProxy installed. We have HAProxy listening on a virtual IP address and we have told HAProxy what to do with those requests. The next step is to enable HAProxy so we can see if it is working. Go to Services -> HAProxy -> Settings and enable HAProxy. You may also want to set a number of connections.
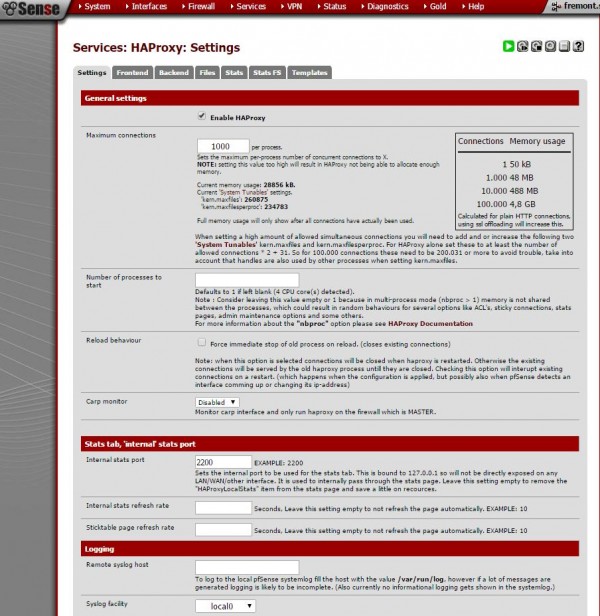
It also may be worth setting an internal stats port so we can monitor what is going on with the proxy.
Step 5: Setup Stats to ensure everything is working properly
One can see how HAProxy is working using Services -> HAProxy -> Stats or Stats FS (full screen). One can also navigate to Status -> HAProxy Stats for the full screen view.

HAProxy has a nice function to see how the proxy is performing. It can also tell you if health checks are failing. If they are, check Step 3 to fix. You can set your DNS record to the Virtual IP (in our case this was 2.1.1.2) and then access the site via a web browser. You should also be able to see server logs on the VMs to see the traffic get routed to each VM.
Conclusion
This is certainly not the hardest example, but it is slick because one can simply rsync from one server to another and have the site update across hosts and even datacenters. With Jekyll you can very easily keep sites in sync using Git which is also fun. At the end of the day this is a very simple setup for one looking to enable HAProxy on the same machine using pfSense. Our pfSense SG-4860 1U has enough power to easily run some SSL offloading with HAProxy along with VPN and firewall duties. Hopefully with this guide you can get at least started with HAProxy and pfSense and then have the ability to tune and use advanced features atop this architecture.


Hi Patrick, great article. I am about to configure a similar setup and this will be very helpful. Please could you provide any information as to the corresponding NAT and / or firewall rules that will be needed to allow traffic through the firewall and on to the web server?
Nice article, but firewall rules are missing, so its not complete and unusable, much work for nothing.
Missing configurations such as FW rules and the order of setup is odd; you should do backend before frontend. Following this article results in a non-usable configuration.
Typically when writing how-to articles you should verify that your steps work by doing your setup again from scratch but only follow your explicit steps, so you don’t leave anything important out of the article.
Nice tutorial. I think you assumed people are confident with servers, like I do. The steps everyone are complaining about are basic firewall steps and unique to each environment. Basically these comments complaining about missed steps are from n00bs.
Comments are closed.