
In June of 2017 HighPoint announced its RocketStor 6114V direct attached storage (DAS) solution. The RocketStor uses USB 3.1 Gen 2 technology which allows direct connection of the enclosure to your host PC or Mac. Solutions like these offer fast data transfers, data protection and ease of use in a simple, compact enclosure, that can connect to any device that can use a USB 3.1 cable.
Other benefits of this solution are ease of setup, in four steps your RocketStor 6114V is setup and running. If you are a photographer, for example, and do not want to deal with NAS complexity and instead simply want a fast data storage solution that offers protection and ease of use, the RocketStor 6114V fills this role nicely.
HighPoint RocketStor 6114V Specifications
Here is the spec sheet for the RocketStor 6114V:
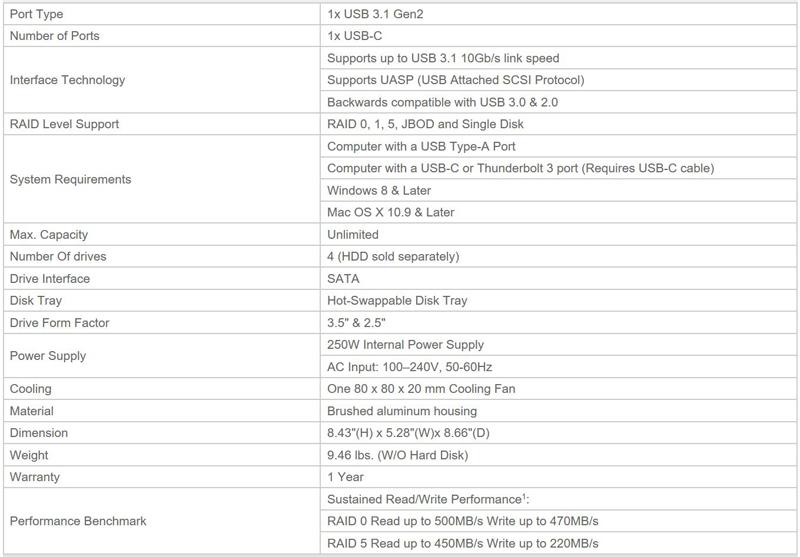
Four removable hot-swap bays support any 2.5” or 3.5” SATA3 Hard Drives or SSDs with up to 10TB in capacity. HighPoint recommends Enterprise/NAS class drives for use in the 6114V. You can also start off with fewer than four drives and expand your RAID later or even change RAID types by using the provided software.
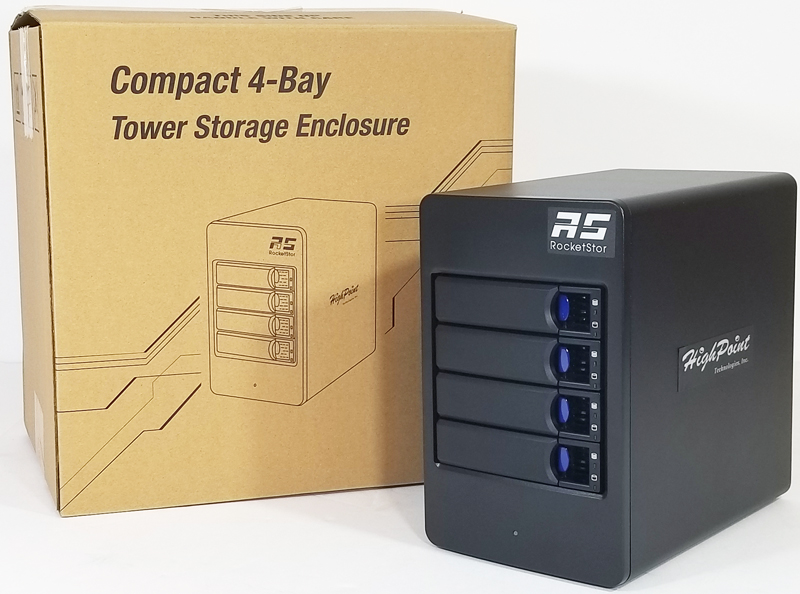
HighPoint RocketStor 6114V Overview
Packaging for RocketStor 6114V is simple and to the point, with a plain cardboard box and minimal printing on the outside.
Packaging for our sample unit does not include any product details or specifications.
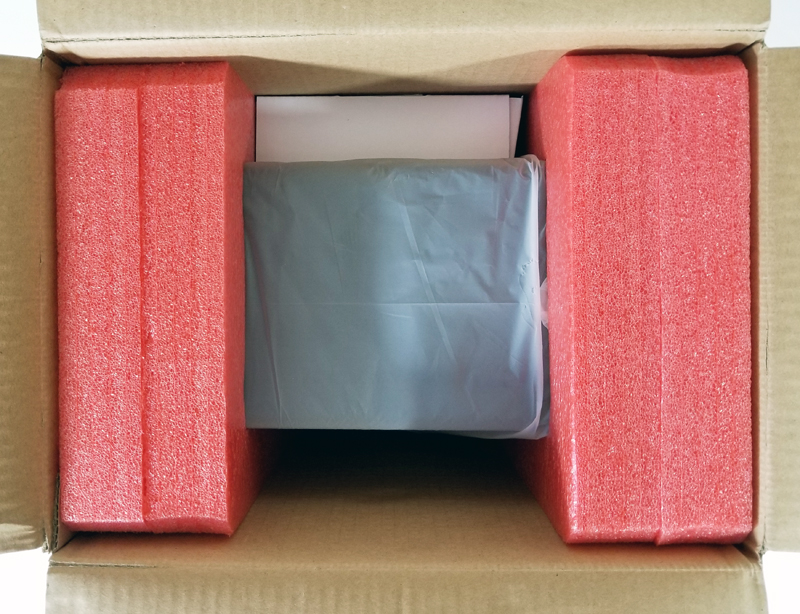
Opening the retail box, we find typical foam inserts used for protection and an accessory box down the side.
Let us take the 6114V out of the box and get a look at it.
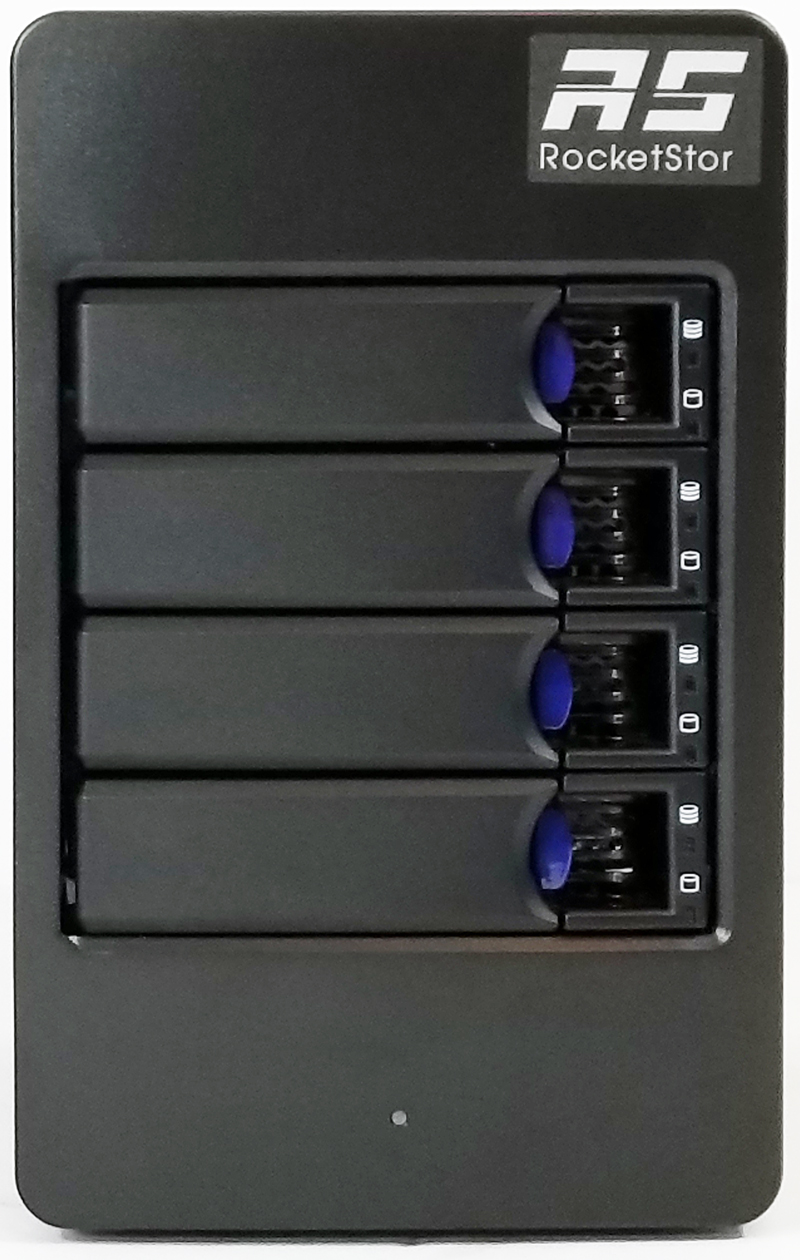
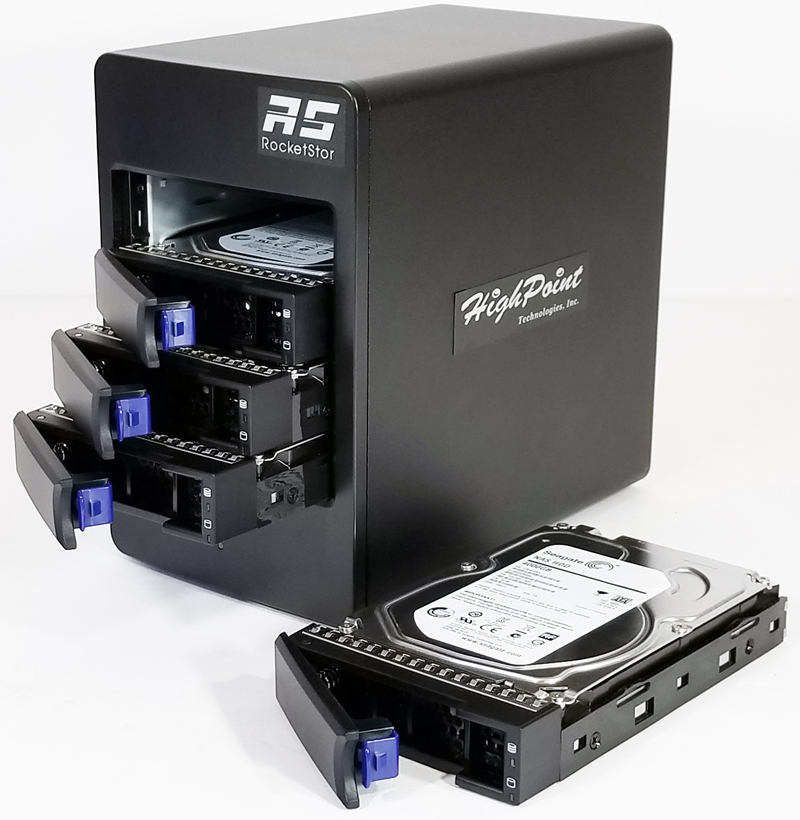
The front of the 6114V is simple, yet attractive and a classic design for boxes such as these. Activity and power LEDs are used to show status for each drive bay, these are not overly bright, no real distraction from flashing LEDs. A blue release button ejects the HDD tray, as you would expect.
There is no locking mechanism to prevent accidental drive removal. On the other hand, there is a standard Kensington locking mount point to prevent theft of the complete unit.
The enclosure itself is made of brushed aluminum which has a good feel to it, does not show dust easily as a glossy surface would.
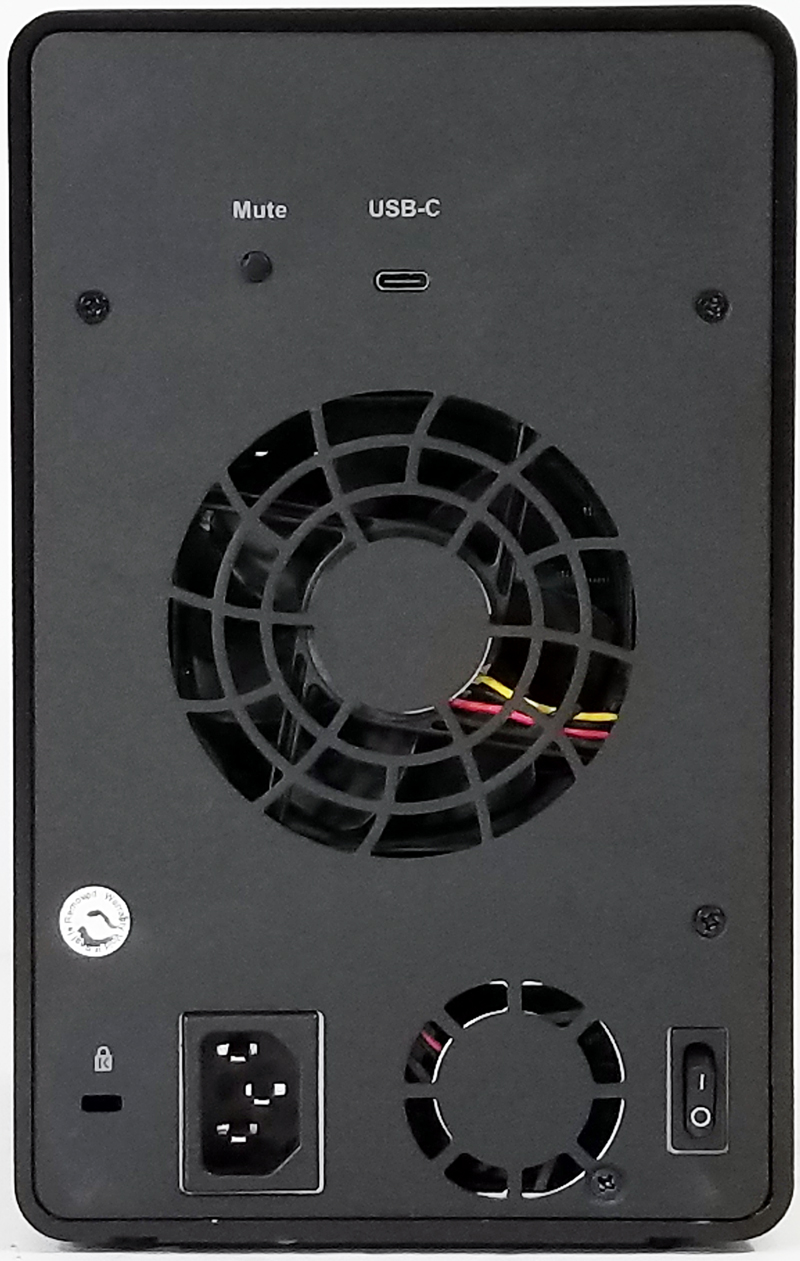
All that we need to connect our 6114V is a power cable and a USB 3.1 Type C cable, turn on the power button and the unit will power up. We also spotted two fans, the largest being an 80x80x20mm which cools the drives. The fan automatically adjusts fans speeds to maintain consistent ambient temperatures while keeping unwanted noise to a minimum. The smaller fan is for the built in power supply.
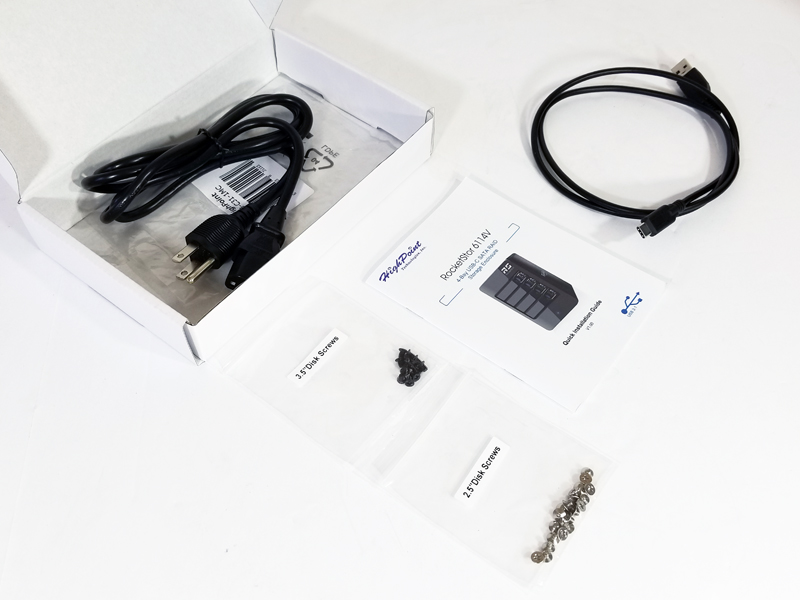
Accessories included with the RocketStor 6114V include:
- 1x USB Type-A to Type-C Cable (1 Meter)
- 1x UL Power Cord
- 16x 3.5” mounting screws
- 16x 2.5” mounting screws
- 1x Quick Installation Guide
Optional accessories are available separately include a USB-C to USB-C cable (1 Meter) and extra drive trays.USB-C to USB-C cable (1 Meter).
Let us move on to installing our hard drives.
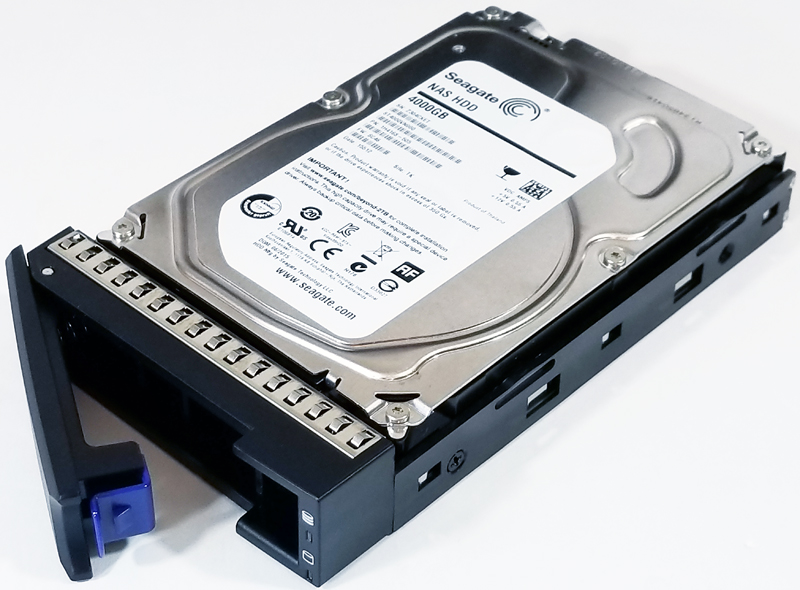
Installing 3.5” hard drives is typical of trays that require screws to hold the drive in place. Four screws secure our 3.5” drives. Package contents include mounting screws for 3.5” and 2.5” drives.
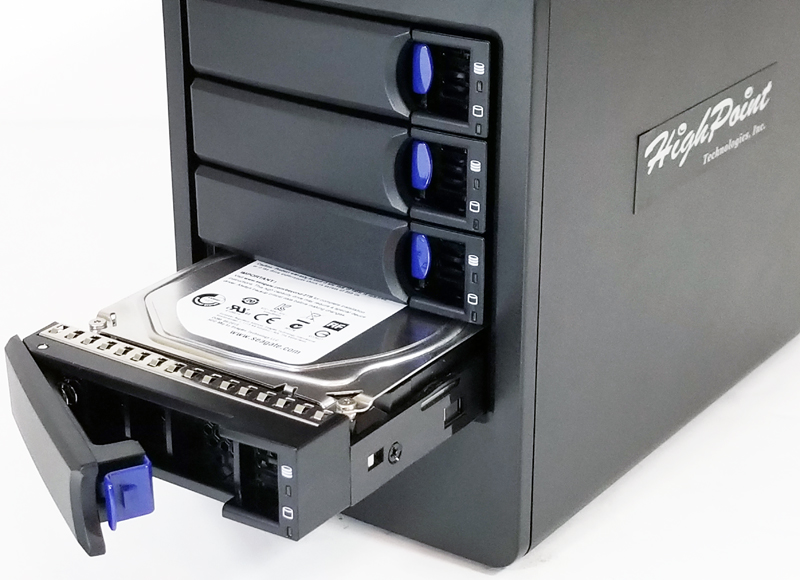
After securing the hard drives to the trays, they simply insert into the 6114V, push in the main latch to secure the drives into place.
With all four drives mounted and inserted, the 6114V connected to power and USB Type-A to Type-C Cable connected to our workstation we are ready to get our 6114V up and running very quickly.
HighPoint RocketStor 6114V Setup and Management
We will need to download and install HighpPoints RocketStor Manager for Windows first.
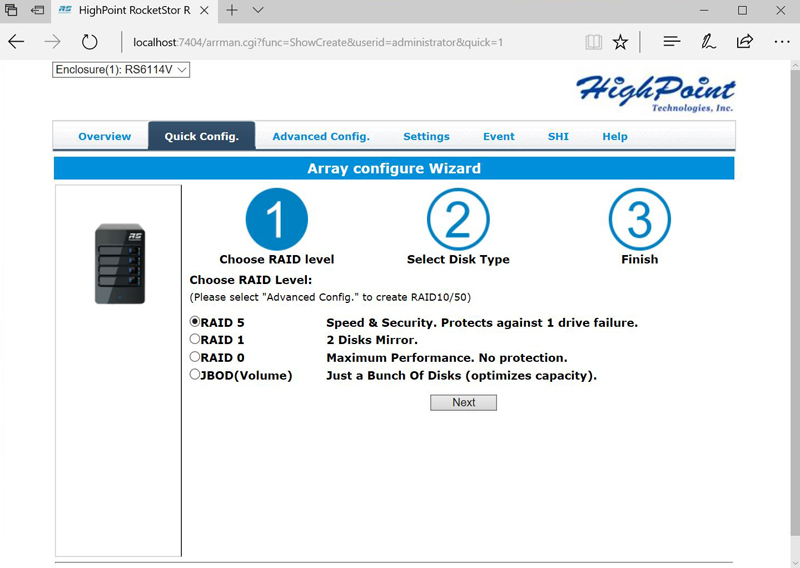
When opening the manager decide on what RAID type you would like to use and click next.

Here you can select new drives or import drives that contain data.
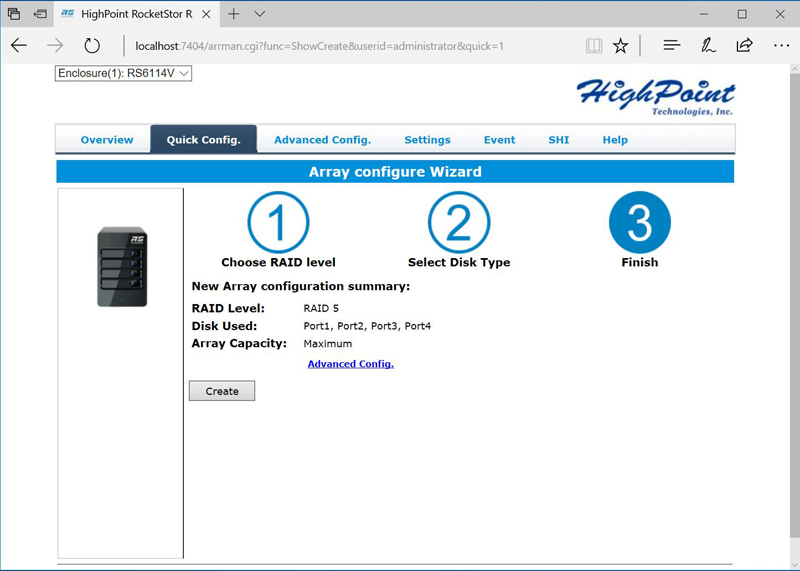
The last step confirms your setup configuration and creates the RAID. RAID creation happens very quickly.
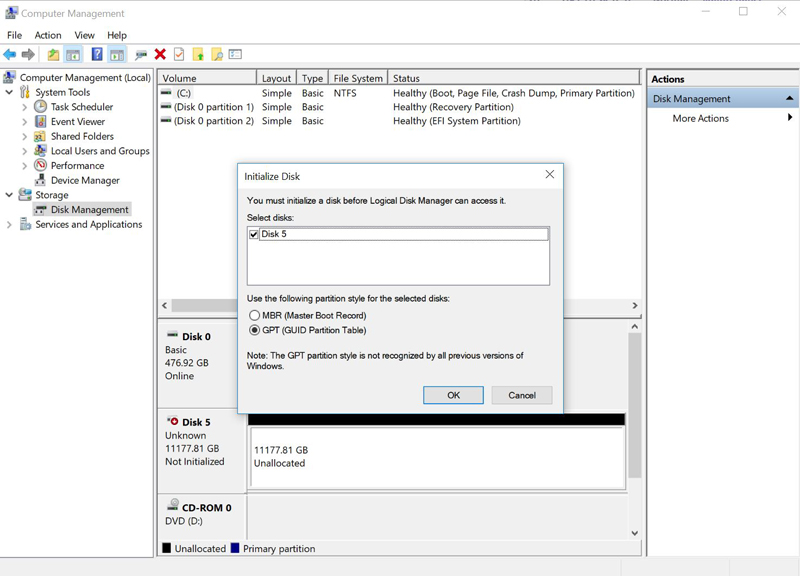
To use your newly created RAID, open up Computer Management in Windows, select Disk Management, a window will pop up noting that you must initialize your RAID first. Select OK to finish RAID initialization to complete this step. You new RAID will now appear on your computer ready to be used.
One upside to this arrangement is that the device will look like a single hard drive to a user. If you are an IT service provider for non-technical desktop/ laptop users, this arrangement is easy. To the user, they will see a large disk not an array of four disks once setup is complete.
HighPoint RocketStor Manager has additional features that we will show here.
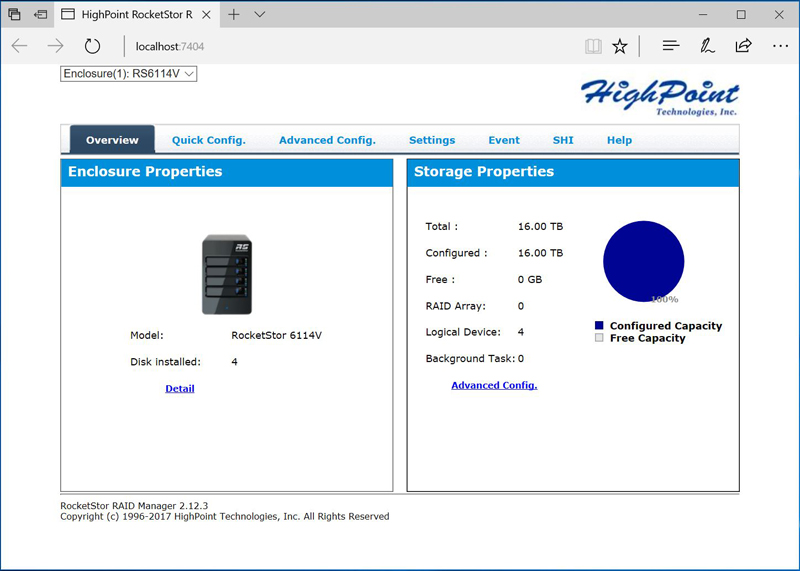
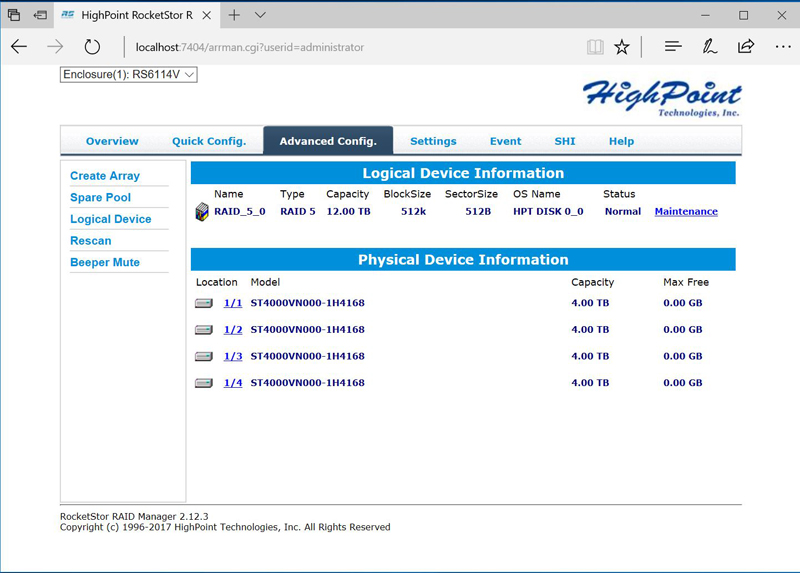
Here we can see our newly created RAID 5, under Maintenance we can adjust paramaters and even change the RAID type.
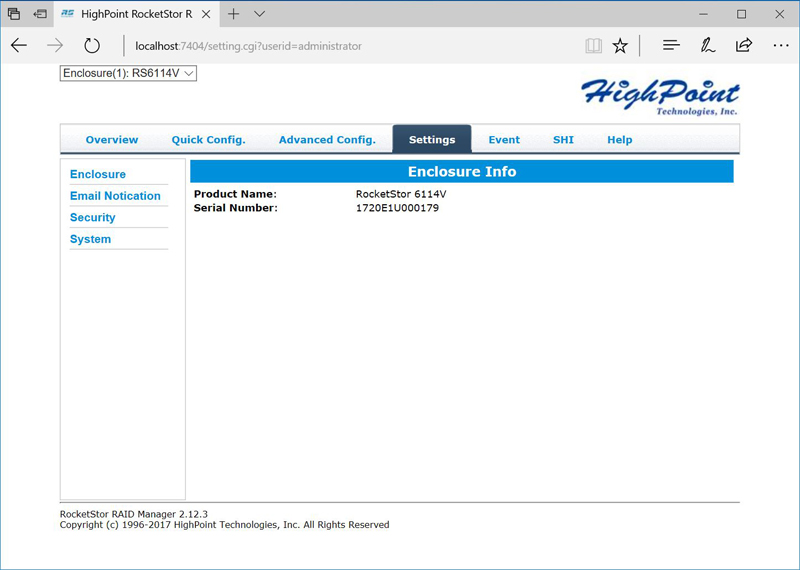
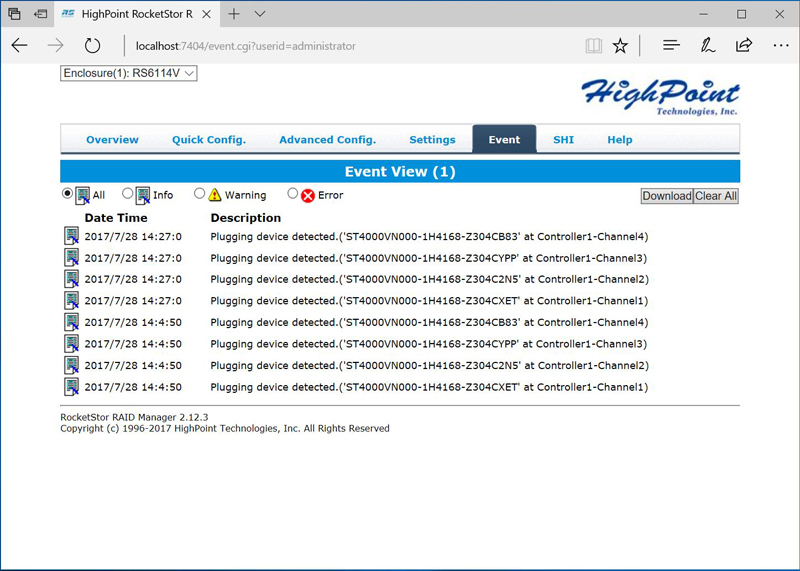
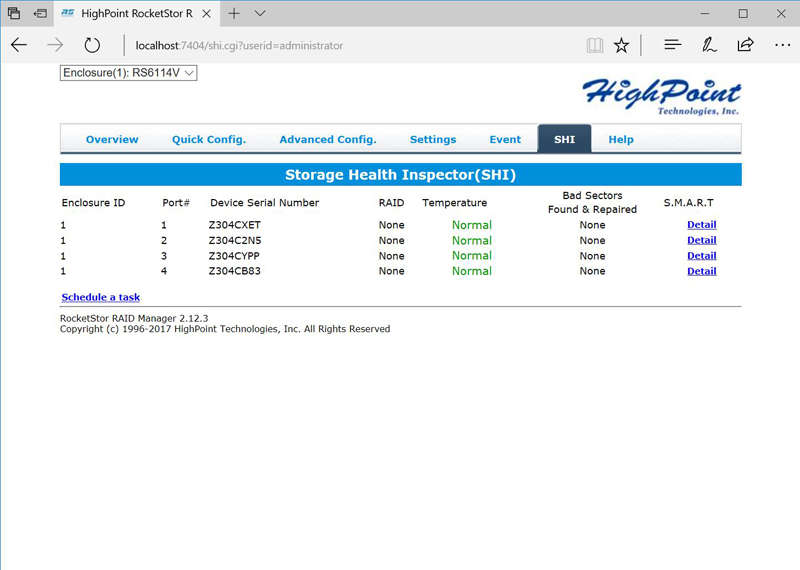
The last two screens will show us the status of the 6114V, any errors that might pop up and the health of the drives in the RAID.
Let us move on to running tests on the RocketStor 6114V.
HighPoint RocketStor 6114V Performance
Our test workstation uses an ASUS X99-E-10G WS motherboard that includes USB 3.1 type-A and type-C ports for us to connect to the RocketStor 6114V.
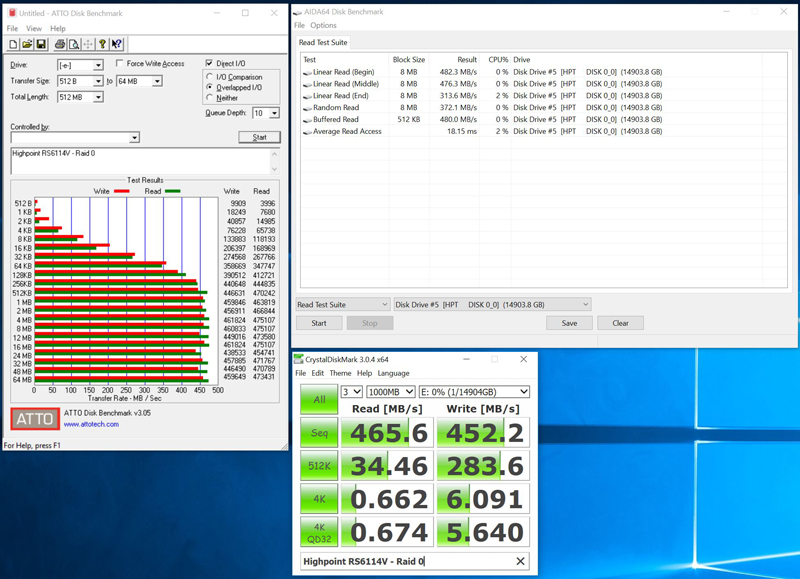
Using RAID 0 gives us the top performance and easily reaches 450MB/s transfer speeds. This RAID option offers no data protection so we advise against it.
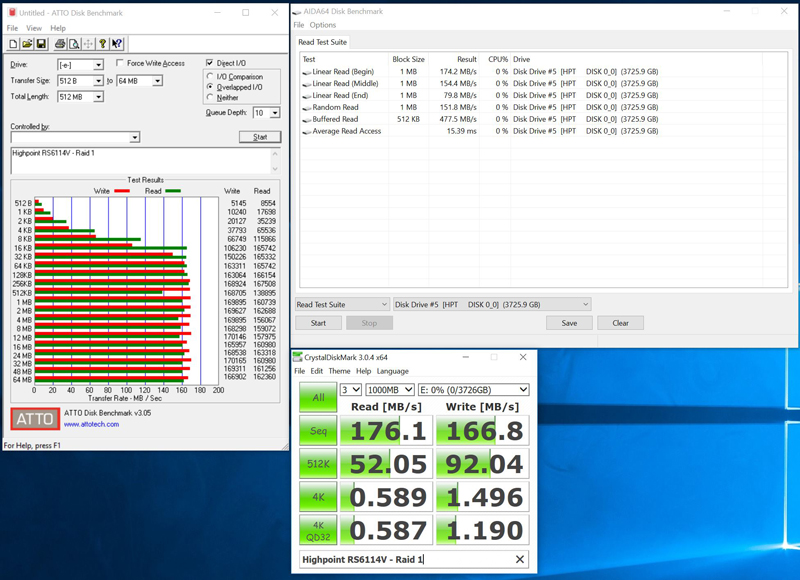
Moving to RAID 1 we find a performance hit which drops the unit down to 160MB/s transfer rates. RAID 1 provides redundancy and this is our preferred RAID level in many use cases.
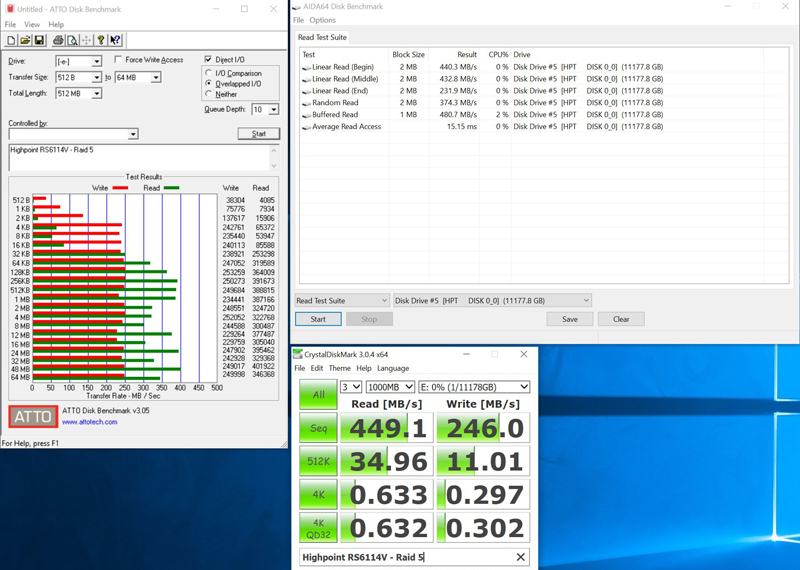
RAID 5 is what many users will use as it offers good data protection and still retains good storage capacity. With Reads at 400MB/s and Writes at 250MB/s, it keeps up fairly well.
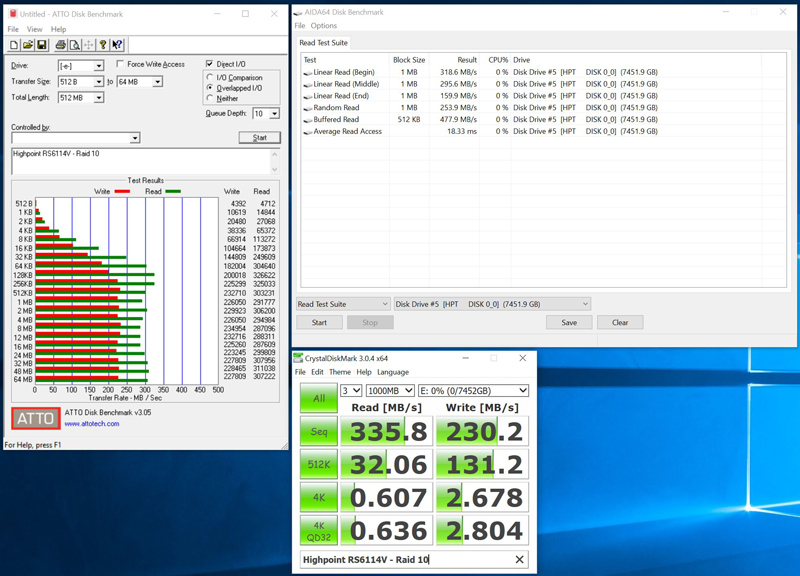
RAID 10 enters in with good performance at 300MB/s Reads, and 225MB/s Writes transfer speeds.
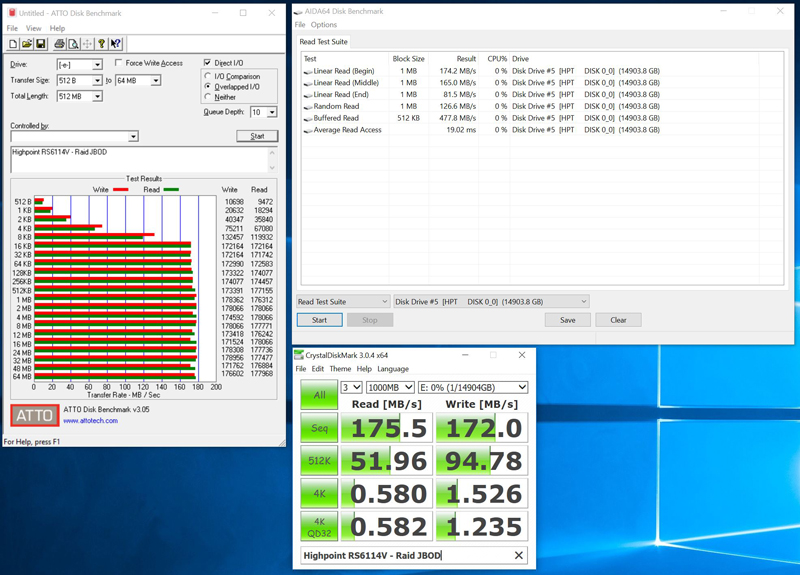
JBOD is the method that we expect to be used the least. Performance in JBOD mode comes in at 180MB/s transfer speeds.
Final Words
At STH we have used a large number of NAS boxes in the lab, they provide a very useful purpose for file sharing and data protection. Almost all of the NAS boxes we have used include a vast amount of downloadable options and features which add to the cost of the NAS.
Directly attached storage solutions like the HighPoint RocketStor 6114V offer excellent performance, data protection, and ease of use. The 6114V simply connects to your laptop or workstation by simply connecting a USB cable. There is no need to add drives and storage expansion cards to your existing workstation. Workstation users will enjoy the speed of the 6114V; it rivals our 10GbE network speed which we have gotten very used to in our lab. We transferred a full DVD ISO from the 6114V to our workstation which took about five seconds; it is very fast.
HighPoint also prices the RocketStor 6114V very competitively. With a quick scan on Amazon, we find the HighPoint RocketStor 6114V coming in at under $300 at the time of this writing. That makes the DAS a rather attractive storage solution at less than half the cost of 4-bay NAS boxes.


Looks interesting. Do you know if this is hardware RAID or firmware RAID?
Requires a Windows utility? Skip….
In JBOD mode are each of the disks presented to the OS separately?
Despite the comment that JBOD might be the least-used mode, it seems to me this is the most valuable mode — I could see using an external enclosure like this with Stable Bit’s DrivePool (or some other storage pool solution) to expand storage on my home server without the hassle, expense, and headache of RAID.
I recently went looking for a USB3 JBOD device similar to this (though I don’t need RAID). Number one thing I read on reviews of several units over and over again was bad USB compatibility with a number of Intel chipsets that is still unsolved even now (amazing, really). I’m not 100% sure if that applied to the RAID models, as I believe the root cause is a specific chipset whose name I’ve now forgotten. But it would be great review material to test this on a variety of generations of CPUs to ensure the USB works as expected.
This unit has a serious intermittant power switch. Calling High Point to get it fixed or where to purchase a form, fit, function replacement switch fell on deaf ears. Really disappointed this company cannot support its own customers. If anyone has a clue on the switch part number or who actually makes the power switch please be kind to respond to this comment.
Comments are closed.