One of the great new features in Microsoft Small Business Server 2011 Essentials (SBS2011E) is the ability to backup the system drives easily. This was a feature that Windows Home Server v1 was generally lacking and is something that users have taken for granted at this point with newer, more full featured versions of Windows Server platforms. Microsoft has been doing a great job of making server administration easy for the novice in SBS2011E and Windows Home Server 2011 and includes a simple dashboard interface to create backups. This guide will show, using the current beta version of SBS2011E both the easy way to configure backups and the more full featured, but harder way.
Test Configuration
Starting this guide off, I will note that the test configuration is a Windows Server 2008 R2 test System I used solely (at first) to test things like RemoteFX and Dynamic Memory for Windows Server 2008 R2 SP1. Everything is done in Hyper-V but everything is representative of what one will see in a normal non-virtualized environment.
- CPU(s): Intel Xeon X3440
- Motherboard: Supermicro X8SI6-F
- Memory: 2x 4GB kits of Kingston ECC 1333MHz DDR3 KVR1333D3E9SK2/4G (Unbuffered), 8GB total
- Case: Norco RPC-4220
- Drives: 2x Western Digital Green 2TB
- OS(es): Windows Server 2008 R2 with Hyper-V installed, Small Business Server 2011 Essentials
Note, I do recommend more than 8GB of memory if using a production system similar to the above. 16GB of memory is much more suitable and costs approximately $150 more for unbuffered ECC DIMMs. For this demonstration and for testing Dynamic Memory, this worked well.
Creating Server Backups the Easy Way – Using the MS SBS2011E Dashboard
Microsoft made making server backups easy with a wizard located on the main dashboard. One simply needs to click
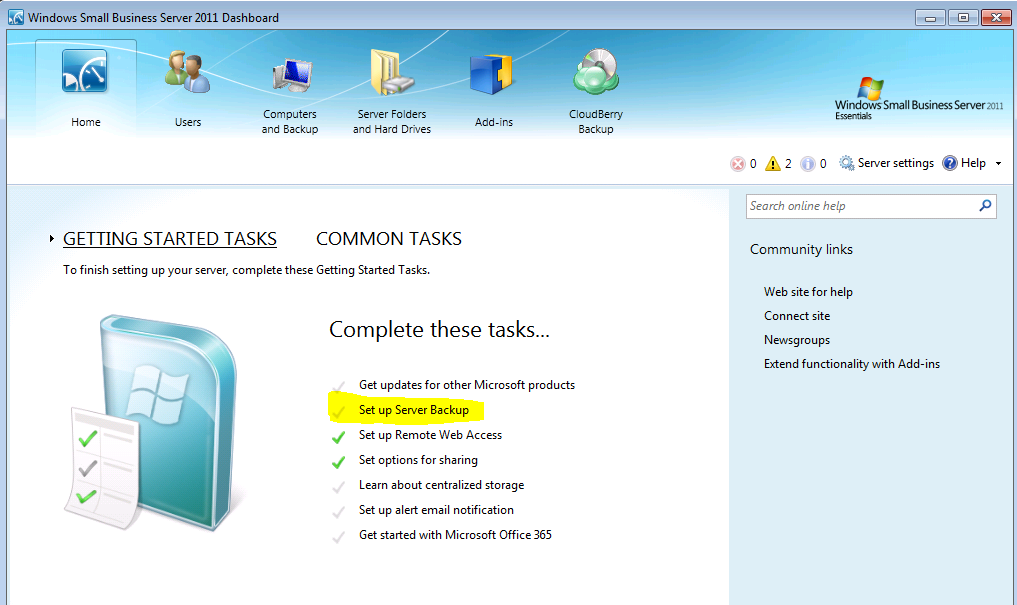
Once the wizard starts, click next.
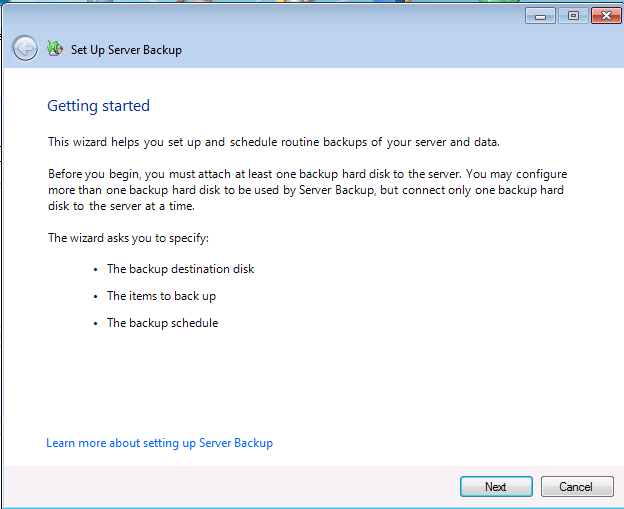
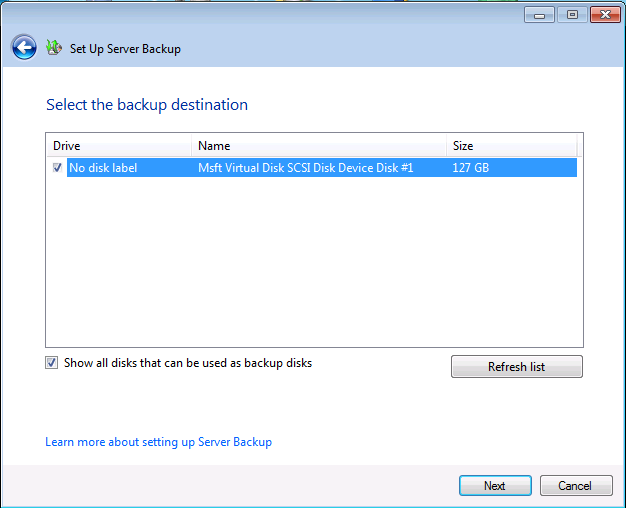
On this screen one wants to select the backup disk that will be used. This may require checking the box labeled “Show all disks that can be used as backup disks” and then refreshing the list.
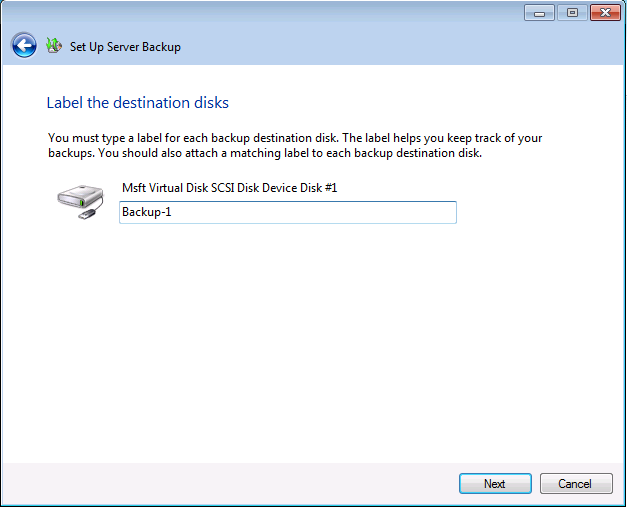
At this point a user will be prompted to enter the backup disk label. Especially if using multiple disks, this can be an important way of keeping track of disks.
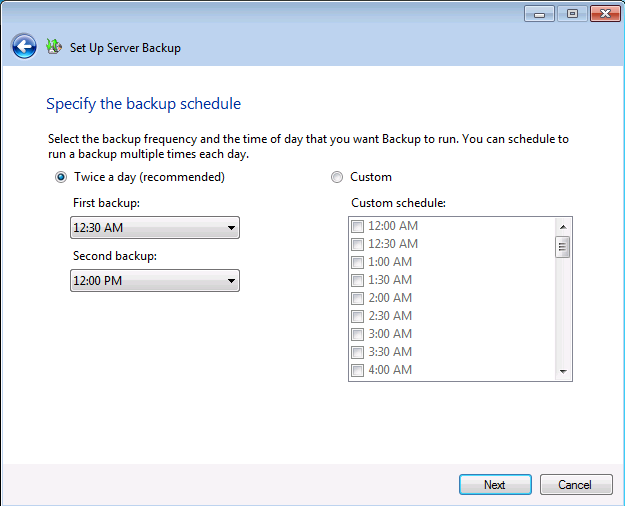
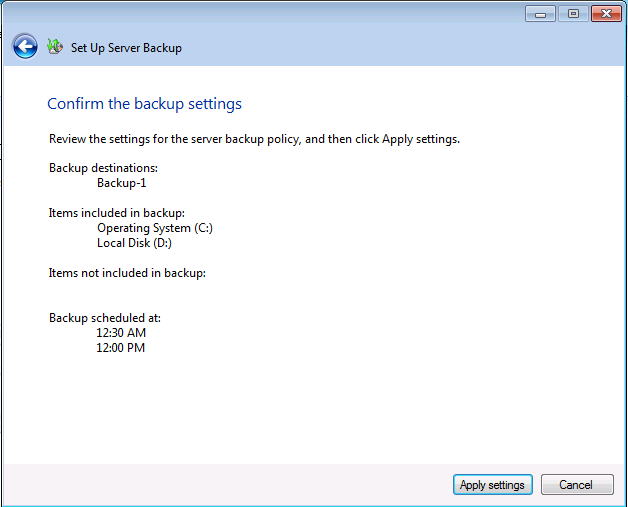
After the target disk is labeled, one can then specify a backup schedule. One should note that Microsoft is pushing users towards a best practice of at least two daily backups, or allowing a user to schedule their own up to every half hour. I like using 12:30 AM and 12:00 PM as it provides a middle of the night backup as well as a mid-day backup during lunch when usage is likely lower.
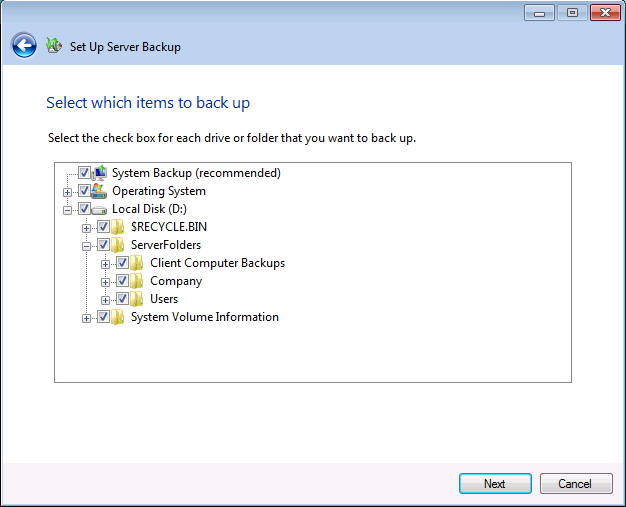
After determining a schedule, one can pick what they want to back up using an easy directory hierarchy. If you are unsure of how much to backup, and do not have a huge amount of data, I would suggest backing up everything. Note, especially when using “green” sub-7,200rpm disks for mid-day backups, backing up everything can cause lots of disk access slowing server performance.
Finally, one reaches the end of the wizard and confirms settings.
That was easy wasn’t it? Then again, it was quite limiting and with most things Microsoft, there is a slightly less user friendly layer to server backup that exposes a bit more power to the user.
Creating Server Backups the Hard(er) Way – Using the Server Manager’s Server Backup Wizard
Still relatively easy (as far as this site is concerned), is the method most familiar to many Windows Server 2008 R2 users, using the Server Manager’s Server Backup function.
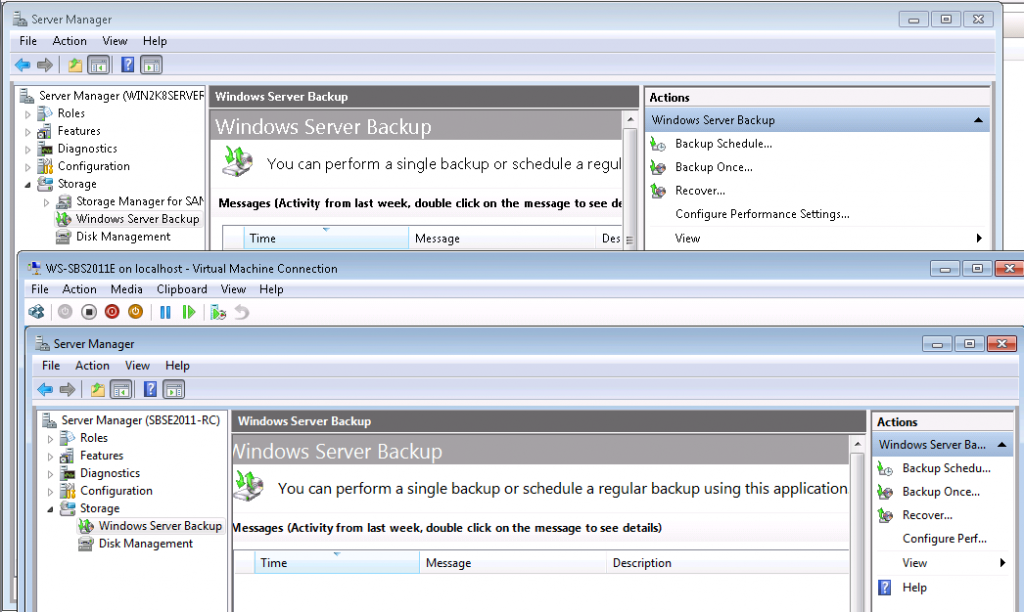
The above picture shows the Windows Server 2008 R2 SP1 Server Manager -> Windows Server Backup screen and then below in the virtual machine the SBS2011E Server Manager -> Windows Server Backup. The Action labeled backup once is not overly exciting, one can easily imagine what that Action accomplishes. For this, we will be looking at the Backup Schedule. Please note, if you used the Easy – Dashboard method above, clicking on the Backup Schedule option will allow one to modify the current backup with a few more options, still guided by an easy to use wizard.
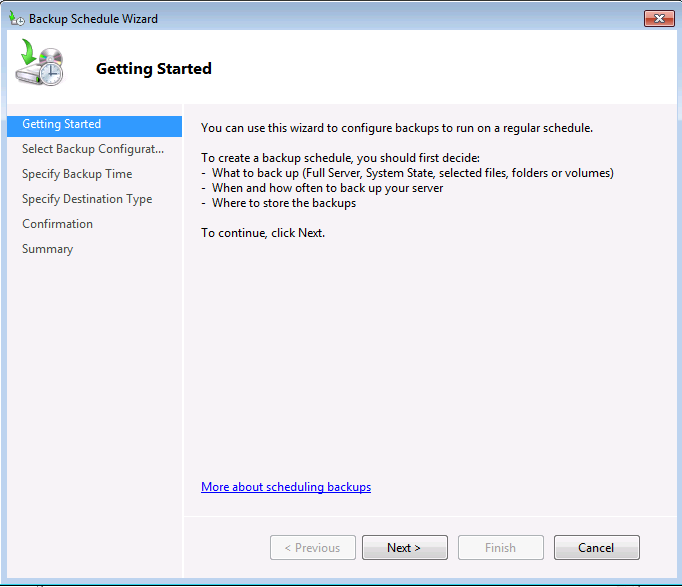
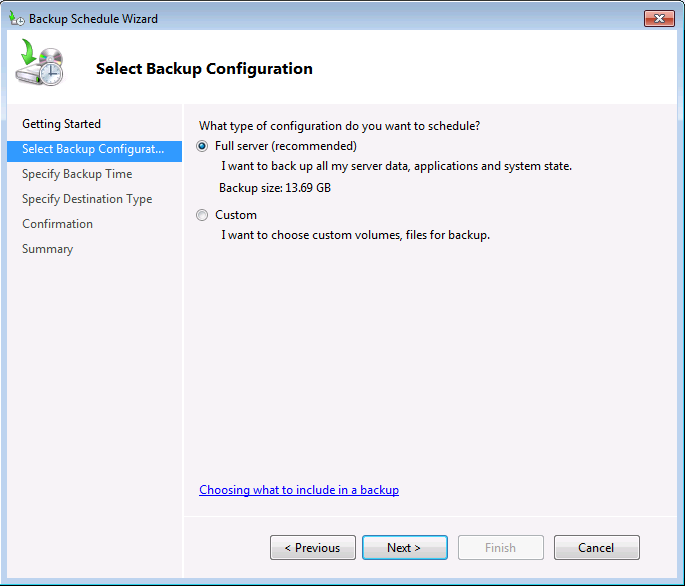
Clicking next lets one configure backups either of the whole sever or of selected portions (using custom). In general, I would recommend Full server backups unless there is a good reason not to.
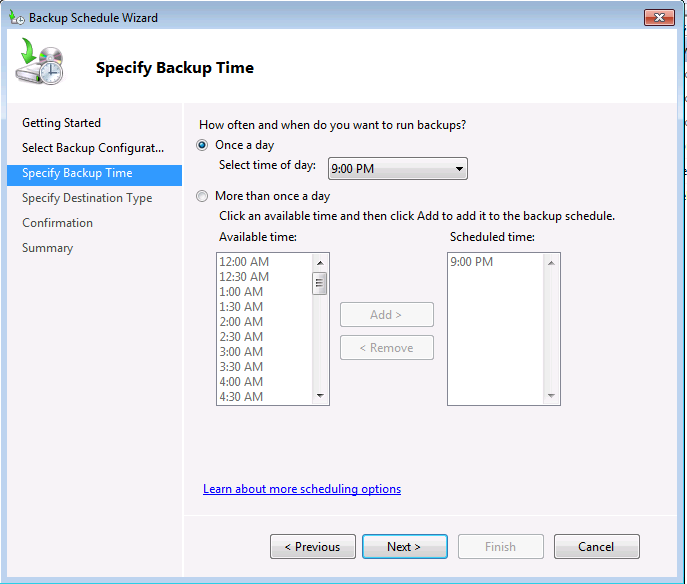
After the data that one wants to be backed up is configured, it is then time to set scheduling. Note, this is a different order than the SBS2011E Dashboard workflow. Also note, the default here is once a day versus the Dashboard which recommends twice a day.
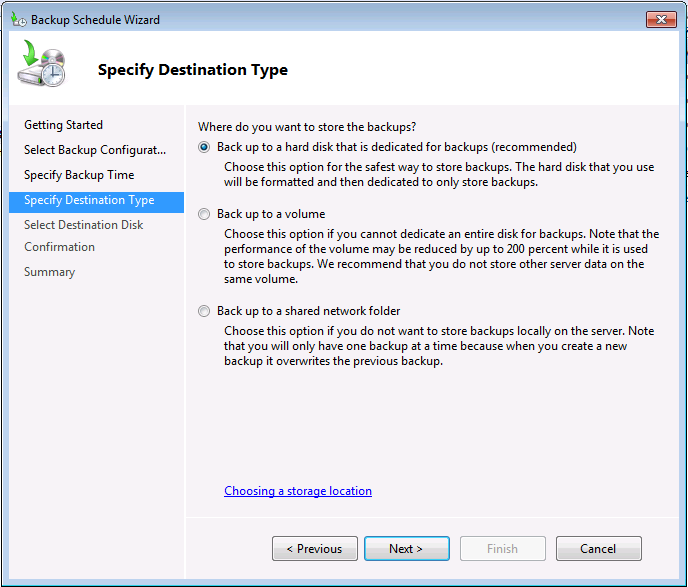
Next it is time to pick a destination. Note that here one can pick a dedicated drive, a volume, or a network share. The network share option gets to be fairly slow if one is backing up many TB over a single GigE link. It also only saves a last backup to restore from, so one cannot go back in time through multiple backups. One advantage is that it allows for super simple network backup to a different machine.
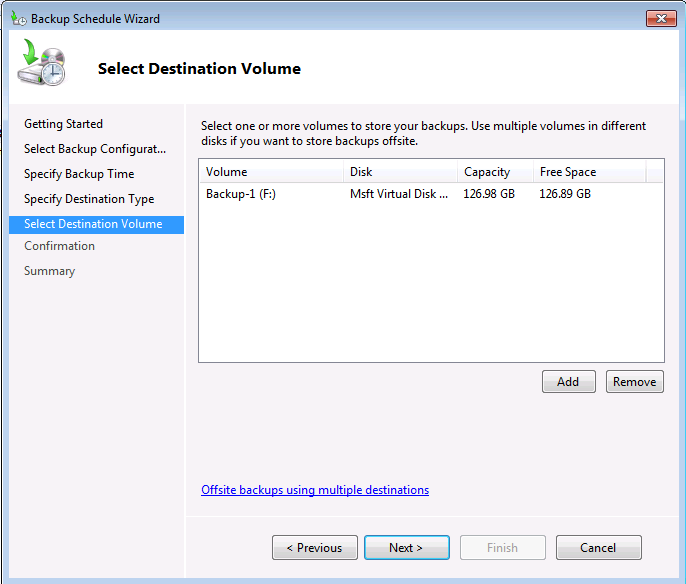
I decided to show the back up to a volume. One then can pick the destination volume which is the same Backup-1 used in the Dashboard example above.
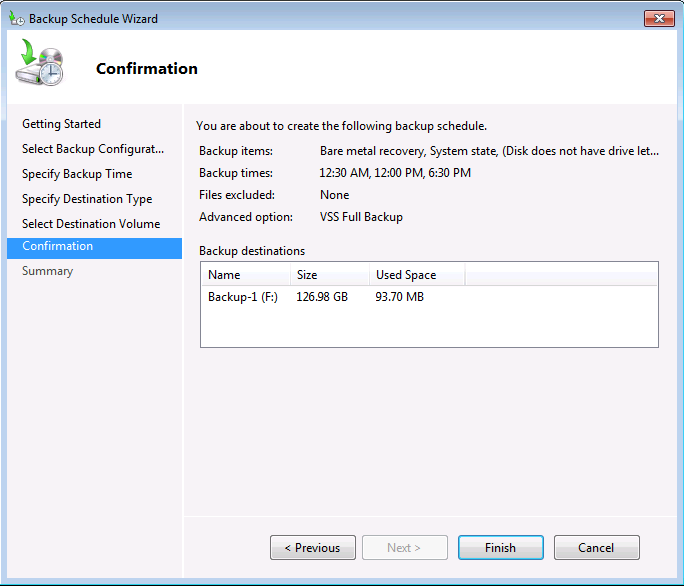
Finally, one then can review selections and apply the backup rules.
One other advantage of looking at the Windows Server Backup interface instead of the Dashboard is that one can tweak performance options. Clicking on the Configure Performance Settings action brings up a screen that allows one to either do full volume backups or just backup using changes.
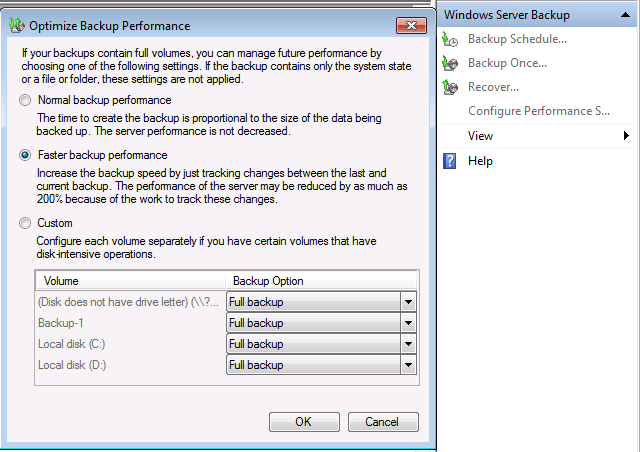
The first option is the very simple option as it backs everything up. The second option only backs up data that has been changed. Many high-end storage and backup solutions use similar functionality. The positive with using the faster performance option is that backups are often completed much faster since less data is backed up. The negative is that the system must keep track of all of the changes and that causes a performance overhead. Further, one can set this based on whichever volume will be backed up giving a more granular performance tuning option to users.
Conclusion
Backups are good. Many users will read about the removal of Drive Extender and think that RAID provides data protection. It does to some extent, although I tend to look at RAID more from a redundancy perspective. As many knowledgeable users will tell you, RAID is not a backup. Using the Dashboard (easy) method described above, one can easily start to backup their data. On the other hand, for users willing to run the slightly more advanced Windows Server Backup wizard (harder) method Microsoft provides some extremely useful backup customization tools. Since the Windows Server Backup wizard is also easy to use, configuring Remote Desktop to be able to avail oneself of the additional features is probably worth the slightly less convenient to access wizard.


Solution:
The Windows Backup utility in Windows SBS 2011 Essentials is able to do a immediate (backup once) or a scheduled backup. The scheduled backup is not able to use removable disk (e.g. USB memory stick, DVD or Dell RD1000). Only internal and USB hard disks are recognized as a valid backup target. This is because of the mandatory bound of the unique disk identifier with a backup job.
But there is a very simple workaround to avoid this problem: share your removable drive as e.g.: \\Servername\RD1000, and schedule a backup to that share in stead of a fixed disk. Make sure that the person who defines the backup job has full control rights to this share. Problem solved.
LexTol