One of the biggest new features in Service Pack 1 for Microsoft Windows Server 2008 R2 Hyper-V users is the new Dynamic Memory functionality. Instead of partitioning physical memory into separate silos for each virtual machine, Dynamic Memory basically allows the Hyper-V hypervisor to allocate a pool of memory to be used for various virtual machines and then allocate that memory based on needs. I have heard claims of 40% or better improvements in virtualization density (number of virtual machines on a physical machine) with Dynamic Memory, but in the past week I have only been able to increase density on my test machine by 25%. This of course varies by VM type and workload, but that is a respectable gain nonetheless. This guide will cover the basics to Dynamic Memory in Windows Server 2008 R2 SP1 with Hyper-V installed.
Test Configuration
The test configuration is the current Big WHS as detailed in a previous post.
- CPU: Intel Xeon W3550
- Motherboard: Supermicro X8ST3-F
- Memory: 24GB ECC unbuffered DDR3 DIMMs (6x 4GB)
- Case (1): Norco RPC-4020
- Case (2): Norco RPC-4220
- Drives: 8x Seagate 7200rpm 1.5TB, 4x Hitachi 5K3000 2TB, 20x Hitachi 7200rpm 2TB, 8x Western Digital Green 1.5TB EADS, 2x Western Digital Green 2TB EARS.
- SSD: 2x Intel X25-V 40GB
- Controller: Areca ARC-1680LP (second one)
- SAS Expanders: 2x HP SAS Expander (one in each enclosure)
- NIC (additional): 1x Intel Pro/1000 PT Quad , 1x Intel Intel Pro/1000 GT (PCI), Intel EXPX9501AT 10GigE
- Host OS: Windows Server 2008 R2 with Hyper-V installed
- Fan Partitions updated with 120mm fans
- PCMIG board to power the HP SAS Expander in the Norco RPC-4220
- Main switch – Dell PowerConnect 2724
This is not an ultra powerful virtualization platform, but it is very capable.
Setting Up Dynamic Memory
The first thing one needs is either a Windows Server 2008 R2 SP1 host or a Hyper-V R2 SP1 host either installed from CD or installing the base OS plus Service Pack 1.
Assuming one has existing VMs the one important, but often overlooked step is to make sure that the guest OSes have updates installed and in most cases one also needs to install Hyper-V Integration Components for SP1. Once one is sure the appropriate integration components or service packs are installed, one needs to shutdown the virtual machine so that settings may be changed (this is normal functionality).
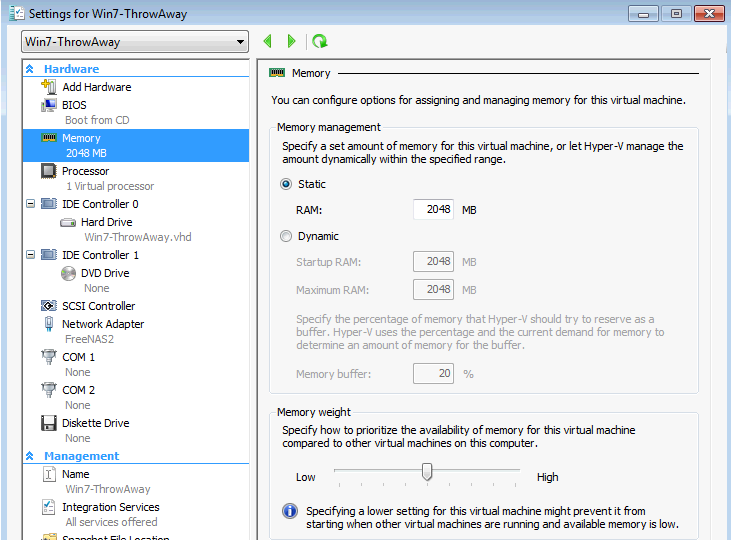
From there go to the VM Settings and then memory screen on the VM settings screen and one will see that existing VMs have static memory configuration. It is time to go dynamic.
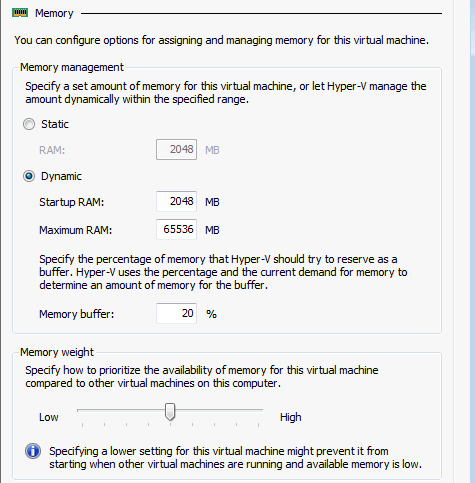
Next one sets the Startup and maximum values. One can think of these as minimum and maximum values whenever the machine is on. For Windows Server 2003 based OSes, the minimum ask is for 128MB of startup RAM. For newer OSes (at the time of this writing includes Windows 7 SP1 and Windows Server 2008 R2 SP1), Startup RAM should be set to 512MB or higher. Maximum I usually start off by giving a VM the old static limit and then ratchet down as I analyze performance and memory needs.

The next step is to set the memory buffer. The default value is 20%, but depending on the performance I need from a VM I raise or lower that threshold. In this case, the particular VM runs a single application and memory needs are typically fairly constant so I ratcheted down the buffer to 10%.

Once the buffer has been set, it is time to prioritize the VM’s memory needs using Memory Weight. The default is centered between Low and High. Depending on the performance needs of the VM and I personally have also found that utilization percentage and business/ or application criticality should be taken into account, one can raise or lower the threshold.

After setting all of these initial values, click Apply and OK and then start the machine.
Finally, before entering steady state make sure to monitor usage of the VM for awhile and any signs of performance degradation. Personally going over 25% higher density caused slowdowns in streaming media from the VMs so I decided to be less aggressive in the additional VMs I added. Key to even getting acceptable performance was to make sure I monitored memory needs before and after SP1 and adjusted the four levers described above accordingly.
Conclusion
25% more density may not seem like a lot, but that is a big difference because more active VMs can be online at a given time, and the need to expand beyond 24GB has been reduced as I would have required approximately 32GB to run more VMs prior to Service Pack 1. I will likely see better results over time, but the ideal settings for a given VM really do involve the mix of virtual machines running on a given setup. For this reason it is not a self optimizing feature. Dynamic Memory is one of those features Microsoft is slowly adding to chip away at VMware’s virtualization technology lead so this is a positive development.

From a VMware perspective, I hear that ASLR can reduce the improvement in density seen with Transparent Page Sharing / Dynamic Memory by about that amount.
http://blogs.technet.com/b/virtualization/archive/2011/02/15/vmware-aslr-follow-up-blog.aspx