Generally speaking, the default username and password for Supermicro IPMI is ADMIN / ADMIN. Since Supermicro platforms are plentiful, it is best practice to change the default, especially if you are going to colo the server. All too often, the server runs in the field fine for a year or two, then comes the need to perform some maintenance. When the time comes, it is easy to have forgotten the username and password. This just happens. In fact, I had a machine at home that had a 643 day uptime (Supermicro X8ST3-F if you were wondering) that I recently had to log into. I could not remember the password for the life of me. This guide will show you how to use ipmicfg to reset a lost password. The guide does assume you have physical access to the machine. I will do another guide shortly on how to reset the IPMI password under Linux and Windows. Bookmark this page, you never know when you will need it.
Update 2020: Default Passwords Changed
As a quick note here, due to SB327, the Supermicro default password is no longer “ADMIN”. Instead, it is now a randomized unique password. You can read more about this in: Why Your Favorite Default Passwords Are Changing. Check out the video here if you want to learn about why as you go through the procedure in this piece:
Ipmicfg is still a tool we recommend to change the ADMIN password over ipmitool. You can also use Supemicro SUM and the python scripts we mention in the above piece. Below, you can find the ipmicfg version we reference which still works.
Test Configuration
For this guide, I am using the new SSD test configuration.
- CPUs: 2x Intel Xeon E5-2690 CPUs
- Motherboard: Supermicro X9DR7-LN4F
- Memory: 8x 4GB Kingston unbuffered ECC 1333MHz DIMMs
- SSD: Corsair Force3 120GB
- Power Supply: Corsair AX850 850w 80 Plus Gold
- Chassis: Norco RPC-4220
- Operating System: FreeDOS
For those wondering, I utilized a USB DVD drive and my LiveCD that was updated with IPMIcfg and the new Supermicro X9DR7-LN4F BIOS for flashing.
How to Reset Supermicro IPMI Username and Password to Default
This guide will show how to use a DOS LiveCD or USB to modify IPMI users and reset the IPMI BMC to factory defaults. The first step is to get ipmicfg. Supermicro has a package that includes DOS, Windows and Linux versions. The current revision is 1.02.
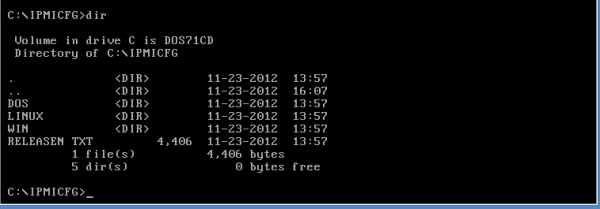
Since we have physical access to this machine, we are using a DOS LiveCD to do the IPMI Password reset.
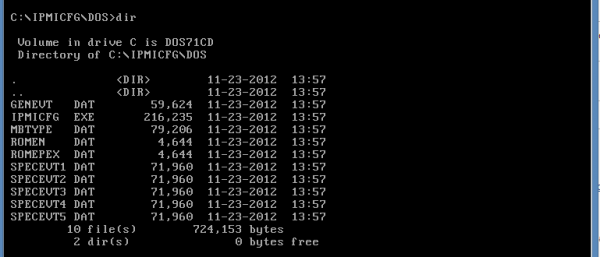
The IPMICFG.EXE that one can see above is the tool that we will use. One of the first things that you should do is make sure you get the IPMI IP address and MAC address. Use ipmicfg -m to get this information. It may be a good idea to write this down.

One of the most useful tools is just creating a new user. During this process, you need three pieces of information:
- User Number
- User Name
- Password
- Privileges

The next thing I will generally do is create a new user. The below creates a user with the username Patrick and the password Password. The user is created in the third spot. User 1 is anonymous and user 2 is ADMIN if that is still active. As will be obvious, it is easy to create a user with an IPMI password that you can use to login.

One thing you may want to consider is making an operator user. Using ipmicfg -user level 3 3 we can turn Patrick (user 3) into an operator (privilege level 3) in that order.

If this does not work, you can use ipmicfg -user level 3 4 and then see Patrick changed to an Administrator.

All that is well and good, but there is a way to reset the unit to factory defaults, thereby resetting the IPMI password and user to ADMIN / ADMIN. Use ipmicfg -fd and in a few seconds, the BMC will restart. It should be noted, while you are restoring to factory defaults, you will not be able to use other commands.

As you can see, the Patrick user we created is no longer there. The factory default username and password have been re-enabled.

Hopefully, that quick guide helps those who have a Supermicro server or motherboard with IPMI that they are locked out of. The total process takes a few minutes at most.

Bookmarked. Gonna have a Linux version?
Thanks for the article. My company just bought a new server, strangely ADMIN/ADMIN no longer works.
Thank you for this information. When buying Supermicro from resellers, it’s common practice for them to change it from ADMIN/ADMIN to something else, which they tell you on a piece of paper that you subsequently lose 🙂
http://serverfault.com/questions/85042/is-it-possible-to-reset-the-password-on-a-supermicro-ipmi-interface also offers an easy (ipmitool only) solution if you have SSH/console access and the machine is running Linux.
Thank you Patrick! Exactly what I needed.
Hi but it will not work for 64 bit version OS
Super Article ! Vraiment très instructif… 🙂
Thank you! Finally I could reset the BMC password.
While I respect Patrick’s knowledge, if you have any custom config in the IPMI interface, this will blow it away. A Factory Default reset should only be done if you have no other choice and are not playing with any complicated setups that you want to keep.
Part way through the 9th Generation is where the passwords are changed to the new random all CAPS password, and there is a sticker on the motherboard for what that password is set to. I don’t know if an ipmicfg -fd will revert that to ADMIN, as I haven’t tried.
I believe the 9th Gen is where the ADMIN account changed to line 2. An 8th Gen and older will have it on line 1 in the user file. A disabled Guest account is in position 1.
However, remember that caching is disabled on our staging environments by default
for development and debugging purposes.
That process isn’t complicated with the assistance of Technic
launchers not having sufficient ram.
Minecraft is a sandbox video game created by Mojang.
How to reset the bios in supermicro sys-220he-ftnr.
Same board but no way to boot from USB (guess the option was locked on the bios) so IPMI is not default and bios has a password that can’t be cleared with CMOS clear jumper, any suggestions?
Just tried running this on a mobo that I bought on an auction. Running Windows, but not able to run the command. It executes, but it doesn’t do anything, just sits there.
Perhaps I need to run it in fail-safe mode..? Will try this at earliest convenience.
dont understand such a rubish!!!! articles.
No details regardin the live dos
no details how to get that ipmicfg to that stupid live dos
rubish article
and the most unimportant the cpu/spec etc listed … for a what purpose? idiot
to johan.
if you don’t know how to install freedos to a flash drive, copy the supermicro ipmicfg dos utility to it and boot it… this article isn’t for you.
RE: Rowan Hawkins June 30, 2021 At 8:23 am — RESETTING THE PASSWORD
I just got a used SuperMicro server. Motherboard model H12DSi-N6. BMC Firmware 01.01.03 04/27/2022.
IPMICFG-Win.exe -fd 3 resets the BMC password to the one printed on the motherboard
IPMICFG-Win.exe -fd 2 returns “not supported” message
IPMICFG-Win.exe -fd 1 I didn’t try this.
Here is what I did:
C:\Users\Administrator\Downloads\ipmi\IPMICFG_1.35.1_build.230912\IPMICFG_1.35.1_build.230912\Windows\64bit>IPMICFG-Win.exe -fd
Command: -fd
Please select an option:
option: 1 | Preserves User configurations
option: 2 | Restores to factory default and default password
option: 3 | Sets user defaults to ADMIN/ADMIN
C:\Users\Administrator\Downloads\ipmi\IPMICFG_1.35.1_build.230912\IPMICFG_1.35.1_build.230912\Windows\64bit>IPMICFG-Win.exe -fd 2
This command is not supported.
C:\Users\Administrator\Downloads\ipmi\IPMICFG_1.35.1_build.230912\IPMICFG_1.35.1_build.230912\Windows\64bit>IPMICFG-Win.exe -fd 3
Failed to get the IPMI Firmware Revision. Completion Code=FFh
C:\Users\Administrator\Downloads\ipmi\IPMICFG_1.35.1_build.230912\IPMICFG_1.35.1_build.230912\Windows\64bit>IPMICFG-Win.exe -m
IP=0.0.0.0 (Changed from previous value)
MAC=82:77:A1:87:7B:B0 (Changed from previous value)
I waited for 10 minutes and then checked again
It now has the correct ip address and MAC address.
C:\Users\Administrator\Downloads\ipmi\IPMICFG_1.35.1_build.230912\IPMICFG_1.35.1_build.230912\Windows\64bit>IPMICFG-Win.exe -m
IP=192.168.1.102 (DHCP)
MAC=3C:EC:EF:xx:xx:xx ( Hidden for privacy)
It reset the password to the one printed on the motherboard and now I can login.
FYI: I ran IPMICFG from Windows , not from DOS.
You can download IPMICFG for Windows and run it from the Windows Command Line.
Great guide thank you. Just note that if you create a FreeDos USB bootable drive using Rufus built in image, you get the error “allocation of dos memory failed” when trying to run IPMICFG – I found a fix for this on this site which suggested getting a full freedos image and burning that to USB