
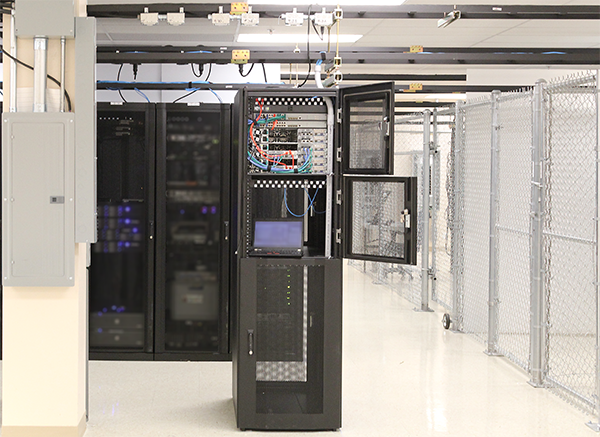
After a long selection process, it was finally time to do the colocation installation. I arrived on-site at our colocation provider Fiberhub in Las Vegas which is very easy to get to. In my carry-on I had two barebones servers, probably a dozen SSDs, an extra power supply, a Fortinet Fortigate-60C (if things went poorly,) two laptops and a myriad of external USB accessories. It turns out, the most important thing I brought was my screwdriver. Great to be over-prepared, but the folks at Fiberhub had everything already racked for me. Once there it was time to re-wire everything and get Rack911 setup with remote access. I snapped some pictures for those that want to see the installation.
The first thing we did was to setup the pfsense nodes. At first, we decided to use 1U Atom servers. Then we decided to use a single Intel Xeon L5520 CPU in the pfsense nodes with an extra dual port gigabit controller. Previously we were going to use a dual QDR Infiniband card to provide this interface. The decision was made to scale back and swap to an add-in PCIe dual gigabit Ethernet controller.
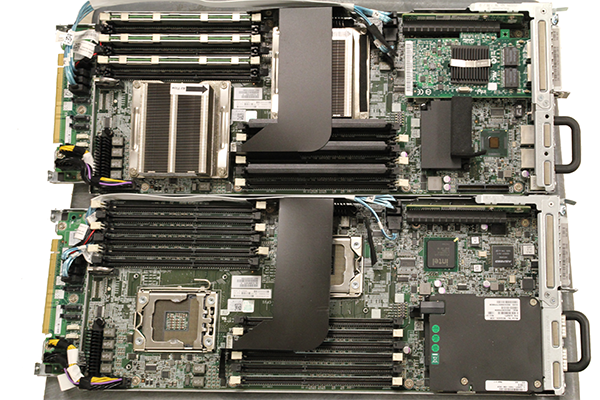
Luckily the Dell PowerEdge C6100 XS23-TY3 cloud server is very easy to work on and the entire swap was done in only a few minutes. The hardest part was maneuvering the PCIe network controllers into place but by the second pfsense box this was easy. ServeTheHome will occupy 10U of rack space. It is a very compact installation but the Dell C6100’s allowed us to achieve a very high density.
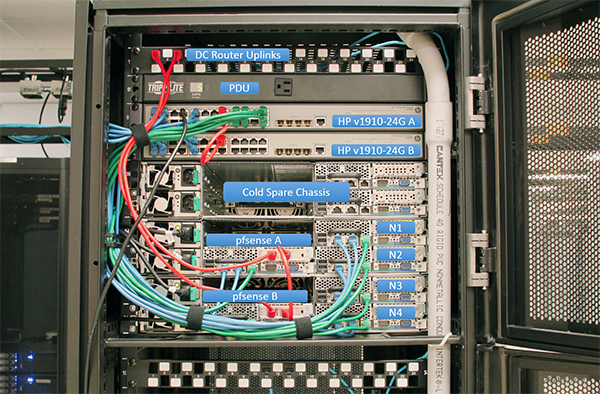
The first step was to wire everything up in the rack. We used Green for IPMI management. Red is used for the uplinks and switch to switch and pfsense to pfsense cables. Blue cables are the data cables for each node.

Once the pfsense nodes were installed, and everything was wired up, it was time to start with the first pfsense node. Luckily Fiberhub had a crash cart or KVM cart available with a CD/ DVD drive, monitor, keyboard and mouse all available. One of the really nice things is that the optical drive, keyboard and mouse were all wired to a USB hub, so this only took one port on the servers. One disadvantage with the Dell PowerEdge C6100 series is that there are only two USB ports available per node. Having the KVM cart connect using only one USB port was a major benefit because we could use optical media to do the installation.

After that first pfsense node was confirmed working, everything else could be completed via laptop and remotely. Rack911 started their processes and I played around also even doing a forum post from the setup below.
For those wondering what all of the components are this is an annotated view that gives a tour of the 10U. Spares are located above the top chassis:
The forums have been the site for a STH colocation architecture discussion for a few weeks now. The end result was very close to the last powerpoint representation there.
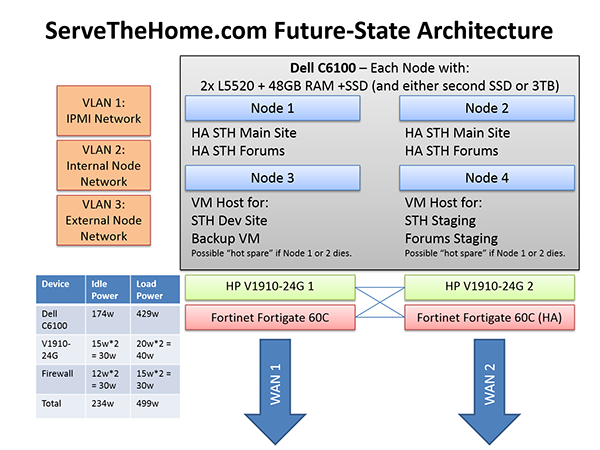
The obvious and major change was that instead of having two Fortinet Fortigate 60C UTM appliances, we installed a second Dell C6100 and used two nodes as pfsense nodes. Power estimates were very close.
There will likely be more on the installation, but we wanted to show everyone the installation. Far more power than the site and forums run on today!


Very useful article!
One small note, though, in the bottom left, blue table:
Firewall 12w * 2 = 24w, not 30
What is the purpose of that Sch 40 PVC pipe?
bdaniel7 – thanks for that catch. I overestimated a bit.
femi – that pipe is a conduit for the bottom 1/2 cab and middle 1/4 cab partitions. We are only using 1/4 cab.
Datacenter porn FTW
LOL @ the indoor fences, what’s on the other side
Datacenter porn FTW
LOL @ the indoor fences, what’s on the other side?
What are you using to failover between the Main Site and Forum nodes? HAproxy? Heartbeat?
Private/ locked cages. The STH servers are in a locked 1/4 cabinet since we do not have anything too big.
We are currently testing a Proxmox VE HA setup. The other option is to run HAproxy on the two pfsense nodes.
Are they using a cold/hot isle system in other parts of the DC?
Yes they are. My cabinet was installed that week.
Just FYI, the link in this sentence “The forums has been the site for a STH colocation architecture discussion for a few weeks now.” on discussion is broken. Double paste of addresses it appears.
And thanks so much for the details write up and pics – greatly appreciated sir!
Fixed… actually forgot http:// doh!